Showing posts with label lampwork bead instruction. Show all posts

Wednesday, April 21, 2021

Lampwork Glass Beads~ 'Frit Stacking' Ideas

 So... I'm sure many, if not all of y'all bead makers, have some frit mixes lying around. Back when I first started to make beads, I didn't use frit. And it was in the old 'dinosaur' days before Val Cox and her 'Frit Secrets' book came out, so frit mixes were not yet a big part of the glass bead world. Nowadays, a  nice mix of frit can decide the colors of a bead, making that part of the process easy. They are a useful crutch, especially for days when one is feeling a wee bit less than inspired. Just grab a mix and enjoy making the bead! Val's book has a lot of different ideas for how to use frit in a bead; it is a great resource. 

I often feel like I am kind of cheating when I use a prepared frit mix in a bead and it takes a little bit of the creativity away, so I try not to lean on them too heavily. That said, I seem to be in a bit of a frit loving stage. I mean Gaffer's or Reichenbach's royal purple or purple rose frit is simply irresistible! 

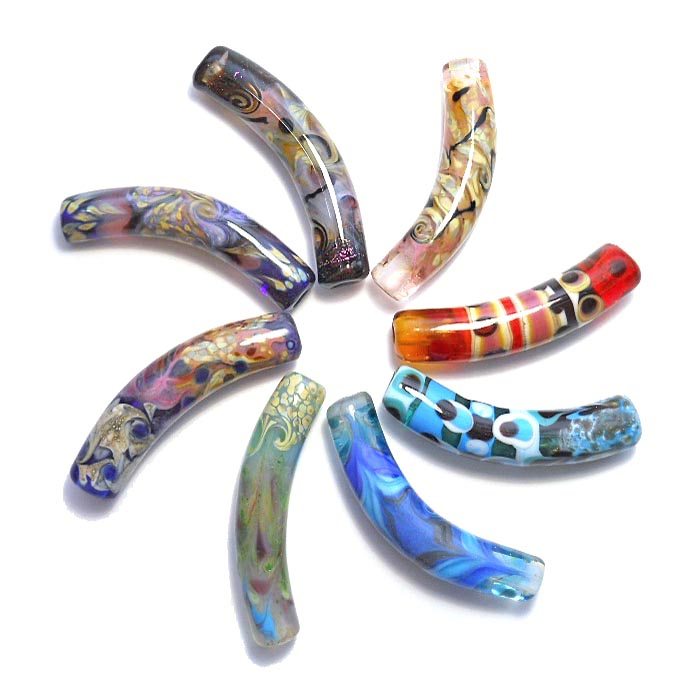
While thinking about some of the things that happen when a couple of different frits are mixed, or just a touch more of something is added to a mix, I realized that maybe the frit colors could basically be stacked instead of using them all at once in a mix. Say, for instance, you are inspired by the colors in a violet. Instead of using green and purple together, why not put on some green and then add some purples randomly on top of it. Would this not give more of a violet feet to the whole bead? (Without all the trouble of having to actually put wee violets all over it). How about rolling the bead in a larger size purple frit and then a smaller one~you can see in this example that little bits of purple are on larger dots of purple. Those larger bits of purple must have been sticking out when the smaller purple frit was added, making it look like glass dots were placed on the larger purple bits. Another fun idea!

Today was a 'frit stacking' experiment day. I was pretty happy with the results. As a bonus, interesting reactions sometimes occur between the frits. Here are a couple of the beads and how they happened.

This pink bead started with a base of clear, then CIM rose quartz with triton frit at one end and then another layer of clear all around. The triton was reduced to bring out some shine and then encased for a little extra background play, though that was rather lost in the shuffle after everything else was added. Some Reichenbach iris amber green, opal raspberry and copper ruby were added over the clear layer. These three frits were all about the same size. You can see that some rather interesting things ended up happening on this bead.


Another bead was a play of organic colors and purples. I didn't write down the colors on this bead, but I believe I started with a background of amber green iris (which changes colors a bit as you go), then some large Reichenbach purple rose frit, and then small Gaffer purple rose, which I put all the way across the bead. I don't believe I added any actual green frit to this bead; the iris amber green can make its own green in some instances.


Here are closeups of both of these beads to show some of the yummy reactions that happened!


Sunday, March 1, 2020

Glass Bottles ~ Lampwork Tips


Little lampwork glass bottles are quite a lot of fun to make over a torch- when everything goes according to plan! Because I know these can be used for some very special purposes, I tried to keep calm and think happy thoughts as I make them. Which is usually not too hard. They have their challenges, but the final result is often surprisingly nice!
For the glass makers in the crowd, I'll give a few pointers. These are made at the end of a hollow steel tube which has been dipped in bead release. I like to use KRAG mudd because it is strong and cleans out nicely.
* Dip the mandrels the night before so the bead release will be firmly attached to the steel.
* Make a small bead right near the end of the mandrel~ this will be the neck of the bottle. Make the ends of this bead nice before continuing. You will need to keep this area warm the whole time you are working on your bottle so that it won't detach from the mandrel. Bounce it in and out of the flame often keeping the mandrel warm as well.
* Begin wrapping the glass at the base of the neck as you would for a hollow bead.  Because you will add several layers and blow it out and expand it later, the bead does not to be as large as the finished bottle will be. Apply one or two layers of glass and do a 'test blow' to be sure there are not weak spots that will blow out before proceeding.
* Add decorations- more colors, enamel, silver foil, whatever your heart desires! Melt everything together carefully and manipulate as you wish. Don't let the whole bottle get floppy while you do this. If things start getting messy, remember to take the bottle out of the flame and let it stiffen up; let gravity work for you too!
* Shape into a basic teardrop shape, then blow a little air in to expand. Reshape, flatten a bit if desired, blow in a bit more air and continue shaping.
* Add a lip wrap~ just one or two wraps around the top of the neck.

* Add handles~ put a dot of the lip wrap color on one side, then halfway around. If they look straight, add a thin bit of glass even with the dot from the bottle side up to the lip wrap. Melt gently and open and shape the handle using a poking tool. Add another handle on the other side. Handles may need to be shaped more than once.
*  Check the shape of the bottle and adjust as needed.
*  Heat the base, attach a thin rod to it and pull gently to make the end more pointed.
*  Check it all again, make sure everything is warm and pop it into your kiln!

Thursday, August 15, 2019

Removing a stuck lampwork bead from a mandrel.


Removing a Stuck Bead From a Mandrel

Here's what I have found works particularly well for removing long, thin glass beads from a mandrel (a tip from my book 'Reflections, the Diary of a Glass Beadmaker'). Tubes can be more difficult to remove from your mandrel than other types of beads due to the larger amount of glass that is in contact with the mandrel.
 
Soak the beads in water for a little while. Grab mandrel right below the bead with vice grips (at the long end of the mandrel). Make sure the vicce grips are tight on the mandrel and perpendicular to it. Grab the bead firmly with a paper towel or flexible jar opener. Turn the whole apparatus so that the bead is at the bottom. Grip the bead firmly and (here's the trick!) wiggle the vice grips (not the bead) back and forth and turn them until the bead loosens. Once the bead has loosened, twist and pull it to remove completely. 
You can also try tapping the tip of the mandrel against a hard surface to set up a little vibration that may help loosen the bead release.

I have heard that soaking in vinegar may help, and also that putting a bead in the freezer might help because the metal mandrel contracts a little bit. For me, the vice grips method works best.

Tuesday, March 19, 2019

Making Blown Glass Beads with video link


People are so interested in learning to make hollow glass beads on the end of a hollow mandrel or small blow pipe- myself included! Thanks to a wonderful bead making buddy, I was shown a way to do it that is pretty cool, without the use of diamond shears. Many people can do this better than I can~ I am still learning, but this video will show the basics, along with ways to recover from some errors that I guarantee will happen to you too!

Here is my youtube video in all its glory!
https://youtu.be/hM6L3MVHkWs
 
A couple of video pointers~

*  Make your first wrap of glass nice and thin and right at the very end of the mandrel and it will pull off much better and have a good hole with less fooling around.

*  I start with a small coiled bead or cup bead, very similar to the way a hollow bead might be made on a mandrel. That way there is a little bubble built in from the start.

*  First build a little bead, blow a bubble in, and then add more glass and decorate before shaping and blowing it the final time. The starter bubble is nice, just to be sure you are really going to have a bubble in the bead.


* Because I wanted to show the bead being blown, I did not blow it in the correct way, which is pointing the mandrel towards the ceiling. Pointing the mandrel up seems to work the best for consistent shaping. I have also been told to take the heated
bead out of the flame, point it down for a moment and then point the mandrel to the ceiling so it will be a little stiffer on the outside. In reality, I point down and begin to blow, then move up to the vertical blowing position to finish.


* Make the tungsten pick really hot before plunging in into the bead. Turn up your flame if necessary- white hot is good! Make sure to keep the bead warm behind the flame so it won't crack. Look down the bead through the hole once you've plunged the pick through to be sure it is nicely opened up. If not, try again.

*  When you are ready to pull the bead off of the mandrel, be sure to only heat the mandrel, not the bead. Don't let the hot fingers get in the flame, or they will stick to and mar the bead.

I was not going to put this video up because of all the mistakes I made, but then decided, what the heck~ everyone is going to make some of these errors!

Here are some video links to folks who really know what they're doing!

You can watch Olga Alianova https://www.youtube.com/watch?v=atXlC1mxpo4

Davide Penso https://www.youtube.com/watch?v=Phb3vjDs1PE

My favorite https://www.youtube.com/watch?v=SgaN1q4enk0...

Tuesday, February 19, 2019

Lampwork Glass Curved Bead Tutorial- Making Curved Glass Beads


Well, I finally did it! After many requests and loads of questions from folks, I have written down everything I know about curving glass tube beads my way, which is in the kiln! If you look at the etsy listing for the booklet, you will see that there are a lot of disclaimers. Why? Because it will take some work for each person to get it right. This is not a tut in the traditional sense, but rather instructions, suggestions, a lot of information on what might go wrong and why and happy photos of some of the beads I have made using this method. It's written in more of a workshop style, with loads of information. I've really tried to include everything I've learned as I've explored this method over the years. Tester questions are answered and details I've explored are explained. I am happy to answer questions and lend support where needed.


Is it easy? Well, yes and no. Making the bead is fairly simple, and I have provided two short photo tuts to help with that bit. Curving them after they're made is a bit of a nail biter because issues can arise. This method of curving in a kiln came about through the help of a glass fusing friend of mine. It took a lot of fooling around and changes before I got a method I was really satisfied with.


Here's a little bit of feedback I've gotten on it~
'I just glanced through your tutorial and it’s really exciting. I made some assumptions about how you make your beads and not one of them were correct.'
' It's designed to encourage experimentation, and shows you a way to create these distinctive, curved beads without any special equipment. The entire process is very clearly expressed and even includes a nice introduction to making long tube beads in addition to the info on curving them. It's really like being in the workshop with Laurie and watching her process and learning from her years of experience. No, it's not a plug-and-play, effortless, "copy this and you'll get that" kind of tutorial. To me, it's much better, because it shows you a whole way of looking at your work methods.'

I have tried some other methods and read up on others. I've had more success with this method than with the 'Tom & Sage' method (which is pretty cool) or using a curved mandrel. The curved mandrel has a few problems in my book- first it is not really all that curved, secondly it is darn hard to get the beads off, and thirdly it is simply difficult to build a bead on a mandrel that is not straight! There is also a method where the bead is built on something flexible and curved while it's hot. Sounds interesting though I have not tried it ~ it sounds a bit scary and I don't like the texture left inside by the flexible rope!

Here's the etsy listing link:
Glass Bead Workshop~ an exploration of curving tube beads in your kiln


Sunday, November 18, 2018

Using Enamels in Lampwork Beads


Here’s a rundown of the enamels I use for making lampwork glass beads, such as it is. I don’t actually use all that many colors. I have tried a few others, but these are the ones I’ve settled on. 
I like enamels because they give nice, clean colors with none of the problems you can run into with glass rods. No devit, no mud, no worries! I also find them essential when I’m trying to duplicate most types of designs from nature~ I always use them as part of my seahorse patterning. I wrote a blog about an experimental bead of that sort a while ago, trying to imitate a natural pattern. My camera ran out of gas in the middle of the experiment, so there are no pics of the best part, but you can get an idea of what was done, anyway.  
By the way, I don't care how many people say to do it, I DO NOT recommend putting your enamel in a shaker or sifting it onto your beads. Talk about some airborne micro particles that you can breathe! Ugh! 

Here are links to a few articles on this blog that talk about enamel use.


I’m still not really sure about the edp trick, but it’s worth further exploration. 

Here are the colors I use, and why!

*  White(9010)- essential~it’s great for a background and can make the colors pop. And there are other things you can do with it too, like overmelt goldstone frit into it for an interesting stone like look (there’s a little more to it than that, but not much. I need to find my old notes as I haven’t done this in years.)
*  Bright red (9840)~ great for a nice, stable red red. If folks ask me for something red and I am thinking clearly, I virtually always use red enamel.
*  ‘New’ purple #9740~ a nice, clean purple. Dark purple is OK, but this reads more true to me.
*  Light or dark orchid(9760 or 9780)~ wonderful pink either way~ also essential. I don’t know if I can tell one from the other. Reacts nicely with raku and iris gold frit.Also lovely with a line of rubino running through it.
*  Oxford blue (9650). There are several blues that are all very similar. Medium blue or blue green are OK, but I prefer oxford. There is also something called just 'aqua' I think which is quite nice.
*  Transparent aqua( might be #9452)~the only transparent I really want to have around. It’s a nice light aqua blue, not dark like all of the ones mentioned above. Probably best backed with white enamel.
*  Melon yellow (9830)~ kind of halfway between orange and yellow. I’m not a big yellow fan, but I do like this color.
*  Green~ I’m pretty sure it’s apple green (9330) that I like. Moss is a bit too grey and dark for my taste.

I have not tried orange red (9835) but it looks intriguing.
NOT black. I’ve gotten it and it just seems to turns kind of dark grey and takes over. Then again, maybe some folks know what to do with it!

Sunday, October 7, 2018

Lampwork Glass Bead Tutorials~ Sculptural Techniques

Over the years, I have sent a lot of tutorials in to magazines to be published, often at their request. I've decided to try fixing up a few of them to be sold on etsy- new and revised by me! Why bother? Because I feel I can make the tutorials even better myself! How?
  • I get to edit the photos myself. Often they come out cleaner and crisper when I do the work. 
  • I can add tips and extra information that there was no room for in the magazines.
  • I can include extra photos.
  • At the end I add a one-page list of all the steps for easy reference.
  • I can add a picture of my beloved pup if I want to!
Because these are PPTs (previously published tutorials), they are only $5 each and will be bundled for extra savings too. The location of the original publication will be noted in the etsy listings so if you already have it, you don't need to buy it again.


I've begun with a couple of sculptural tutorials- a Dragon's Head (Dragalope) bead and a Fish Bottle Bead. These are beads that only I make, so the instructions are all from my wee brain. I feel they give a lot of information that is especially nice for folks who want to try their hands at sculptural beads. Find all of my tutorials here: Glassbead tutorials on etsy

Mask and turtle instructions should be available shortly. These tuts have been published in a variety of places- The Flow, Soda Lime Times, Glass Bead Evolution and Glass Line to name a few. I thought it would be nice to have them all in one place!

Thursday, April 5, 2018

Lampwork Masked Bead Tutorial From Isinglass Design


https://www.etsy.com/listing/501695668/a-beginner-and-intermediate-tutorial?ref=shop_home_active_16
Here is an example of how to make one style of  masked beads in photos, taken from my ebook 'Reflections: the Diary of a Glass Beadmaker.' Complete instructions for these, two other masked beads styles and many other lampwork glass beads are in the book, available on etsy.


Black base bead
Aqua dots


Black dots overlapping aqua
Black Dots Top & Bottom


Black dots between
Melt it all in evenly

Melt everything together, fin~

Aqua dots as shown


Here are a couple of other masking designs that are covered in the book.


Saturday, February 10, 2018

How to Get Clean, Clear Holes in your Lampwork Beads


Isinglass Desgin handmade glass fish bead https://www.etsy.com/listing/593000089/purple-glass-bead-fish-pendant-necklace?
Here it is, the post you've all been waiting for, where I reveal how to get really clean bead holes! Woohoo!

Once a lampwork bead is finished and taken off the steel mandrel, the sludge inside has to be removed. Folks use a reamer of some type to do this- sometimes by hand, sometimes with a dremel tool. But no matter how it's cleaned, the inside of the bead hole can look pretty gritty and almost chalky at the end of the process.
Fish hole before sanding
In a small holed bead with a solid core, this might not be a really big deal- who can see down in there anyway? But if your bead is clear or the hole is large enough that someone might be looking at it closely, it can be an issue.
Fish hole after sanding

So, what can you do about it??? One solution is to sand the inside of the beads. Here's how.

First ream the bead well and make sure all of the sludge is removed. This can be done by using diamond reamers by hand or with a dremel tool. Make sure the bead and tool are both wet when you do this.

Reamer with sandpaper
Take a tiny rectangular piece of 400 grit wet/dry sandpaper, place the long reamer (or mandrel) in the center lengthwise and fold tightly around it. Get the bead and sandpaper/reamer wet and rub back and forth lengthwise all around the hole for a minute or so. It could take a little longer if the bead is really messy inside. If that is the case, you may want to start with 220 grit wet/dry sandpaper.
Next do the same with a piece of 600 grit sandpaper. That should do it for the inside of the bead. If you would like it to be even smoother, go up to 1500 grit wet/dry sandpaper.

End reamers with sandpaper
If you want to sand the opening of the hole, take a small square of 400 grit sandpaper and place it at the tip of a small conical reamer. Rotate until smooth, then do the same with 600 grit.

At the end of this process, your bead will have a lovely smooth satin finish.


A couple of final tips ~
Use the smoothest sludge you can find to start with. For my money, that's KRAG Mudd. You will need to call them to order it. Yes, it is kind of pricey (mostly because of the shipping cost). But it will give you a decent inside surface to start with.
Air dry your sludge over night. This will also help the sludge stay strong while you work on the bead.
Black bead before sandpaper
Black bead after sandpaper
Clear bead before sandpaper
Clear bead after sandpaper


Monday, June 5, 2017

Lampwork Glass Agates From Murrini Ends

Here's the cut murrini rod on a clear background

So, time for more experiments in glass! I am beginning to learn to make murrini. Who know what fun that would be? As my studio space slowly fills up with little plastic ziplocks full of glass slices, my mind is slowly working on new ideas. Two things can happen with my murrini pulls- they can be too thin and they can be wonky (or possibly just plain ugly). What to do with all those rod bits that you don't want to cut up into murrini?

Rather than pitch them, I thought I'd try using them with a technique I figured out a number of years ago. Simply? Lay them across the hot bead, stick them on in the flame, cut them, push them on to the bead surface and melt flush.
Some surprising results ensue. Mostly they seem to end up looking a bit like agates. Or turtle shells. So far, it seems the designs show up best on a simple clear background.

Time for pictures!


I started with some murrini end pulls- pieces that are 4mm or more in diameter will work well.
I made a long bead, slightly wider in the center than at the ends, then rolled one end in silver foil and everything in raku frit, just for a bit of 'background noise'.
A piece of murrini rod was laid diagonally from end to end. Don't stretch it out, just lay it on.

Bead and rod were melted together just until the rod was attached; then the attached rod piece was melted slowly and snipped with scissors all along the length. Heat a small section and make a few cuts, then heat another section, all the way up the bead.

There are a couple of different ways to approach the cut bits- either push them onto the bead as you go or cut all the way up, then remelt and push. I use a small knife, place it into the cut and then pivot the knife sideways to open up the center of the murrini rod. It will not look like a regular murrini, but will have an interesting design.

 Another line from a different murrini end was added parallel to the first line and treated in the same way. I added a line of clear between the cut lines, a few dots of aqua here and there, melted everything together and called it done.

My feeling about this bead is that it turned out a wee bit murky. I've made a few leaves on a simple clear background, and the design shows up much more vividly on that background. It makes a pretty cool turtle shell, I think, though next time I will try it on a clear or color encased in clear as the background.