Thursday, October 13, 2016

Wet Felted Scarves- Butterfly Style!

The BFL scarf, with a bit of black added
Oh, don't you love it when things converge!? I went to the Black Sheep Handspinners Guild meeting in September with fiber to give away. And the kind person who took it off my hands gave me a bit of BFL (Blue Faced Leicester, for the uninitiated) that was dyed orange, yellow and brown. Now these are colors I just don't work with~ but it was a lovely bit of fiber, so hmmm...  I just happened to have a book out of the library called Patterns in Nature (Publishers Weekly's 'most beautiful book of 2016')~ an excellent book which not only shows amazing patterns, but tells the science behind what makes those patterns occur. For instance the patterns on feathers happen before they split into barbs- who knew?

Three butterfly scarves here!


As I was leafing through the book I came across a closeup photo of a butterfly wing and~ guess what? The colors were the same as the lovely fiber I'd just gotten my greedy hands on. And so an idea was born! The colors, the patterns, the shapes~ it's all good. These days, just about all of my scarves are based on butterfly patterning. There are so many amazing patterns to study and imitate.

Now, of course I am wondering about starting a fish scarf series!


Sunday, July 17, 2016

Wild Horses

It came to me the other day that I had only ever made a few horse beads and they always seemed to be in different styles. So it was time to try again. Thing is, I can't seem to decide how I'd actually like them to look.So I made a sampling.
From left to right they are:
* The Swedish style Dala horse
* 'Rocking' horse without a rocker
* A more realistic horse, with a bit of aqua blue
* 'Southwestern' style horse


I think I like the Dala horse and realistic horse the best of the bunch.Tried another in the realistic style and transparent amber glass. There is still work to be done to make these be 'just right'!


Tuesday, April 19, 2016

Modern Medievals- Lampwork Glass Beads With a Historical Twist

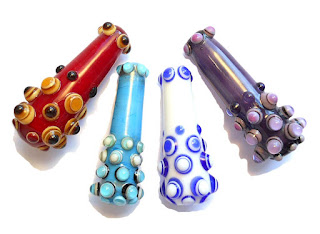
It's time to introduce a new 'line' of handmade lampwork beads- 'Modern Medievals.' What the heck does that mean, you may ask? This bead grouping is made up of beads that are designed using techniques that have been around for millenniums using basic tools and glass colors. These are not copies of historical finds, but rather somewhat modernized versions of these beads that will encompass some different shapes and color combinations. Here are a few examples:

Stacked dots or 'horned' beads. This style was extremely popular during the warring states period in China. Though first imported there from countries to the west such as Egypt and Mesopotamia, the popularity of these beads encouraged the Chinese to begin making their own. These beads are made up of different colors of glass stacked one on top of the other and melted together. They have a lot of texture, which makes them a bit fun to wear. Most of the historical finds are round. My beads will encompass other shapes, like these conical beads.


'Eye' beads are a close relative of the stacked dots; as a matter of fact, stacked dot beads are also often referred to as eye beads. In the classical version of the eye bead, the dots are melted together. The eyes can be made from just two colored dots melted together, or many. The two beads in this photo could both be considered 'eye beads', though one has raised stacked dots. In some cultures this type of bead is worn to ward off the evil eye. One of these beads has a fine silver foil core, a technique. practiced as far back as the Viking era, or about the 10th century. The other has twisted glass (twistie) decorations, a technique I have observed to be present in many ancient beads, some over 2000 years old.

Beads that have been 'feathered', 'combed' or 'raked' have also been around for a very long time. The three techniques are quite similar, using a tool or point of a glass rod to pull lines of glass laterally across the bead. Some of the beads pictured are cone shaped. These could have been used as whorls on wool spindles, or worn decoratively, or both (as some of my friends do).

The last technique I will mention here is that of folding glass. Tom and Sage Holland re-discovered the methods of making this type of bead after a lot of trial and error. An article explaining how this is done can be read in volume 29, issue 4 of Ornament magazine. I have as yet to make any of these for the 'Modern Medievals' collection, but they will be coming soon.

For more interesting information about ancient glass beads, you can search the collection at the Corning Museum of Glass , or visit the Viking Answer Lady. You can also visit my Pinterest page , Historical Glass Beads.

Wednesday, March 2, 2016

A Picture is Worth... Photo Relevancy on Facebook

Parachute Jumping Turtles
"Kaleidoscopic Gears'
 I wanted to show a few photos that I've posted on  facebook in the   past that have received a lot of attention. As those of you who use facebook know, a post with a photo is much more popular than one without. My theory is that if the photo contains several different things it will get extra attention~ folks will look at it more carefully and often pick out their favorite and tell you about it thus making the post more 'relevant'.


Making Faces

And since we're all about relevance and SEO (search engine optimization- or maybe, in this case, FSEO because it's on facebook), it's a fun thing to try out in your spare time!

Even a photo showing rod colors can be popular


Saturday, February 27, 2016

Nuno Felted Scarf mini tutorial

  The nuno (New? No!) journey continues. Scarf used for this project is rayon, which, if loosely woven, seems to work nicely. And, yeah, another thrift store find (hence the 'new? no!' designation). I was kind of afraid to do this one because of the print, but I decided to take the plunge yesterday and just pay no attention to the printed side! Gives me hope for some of the other printed scarves I have been ignoring...
Five photos show the three easy steps and finished product. Did it turn out precisely right? Well, no, but I like it anyway! I will 'splain what I did and why below.

  First, lay out the fiber (not too much!) on the wrong side of the (ironed) scarf on plastic on top of the bed. I do this dry so I can change it later if I don't like it. In this photo, the wool has been sprayed with cool water with just a wee bit of soap in it.

  Next, I wanted to see what would happen if I 'raked' the fibers~ just like a big bead! So I took a chop stick and carefully manipulated the fibers, making three lines. Then I filled in the empty space I made at the top with a little more fiber. Turns out this raking was not severe enough, so the pattern is pretty muted in the finished scarf. Oh- and that maroon? It's actually a lovely dark purple.
 And, because I have it, I added a little bit of 'confetti'. Just take bits of plied yarn apart into its single plies and toss it about.

 Whoops, no pictures, but next step is to roll it around a pool noodle, put a towel around it, tie it up tightly and roll gently. I do this for about 20-25 mins, then take it apart, check for empty areas that might need a bit more fiber, fix those, and put it back together for more rolling around~ while watching a good movie! By the end of the movie, you should have taken it apart 3 or 4 times and readjusted it (roll on noodle the opposite direction, etc.). Don't keep adding fiber, just the first time).

Hopefully, at the end of that movie it will be ready to slam on the counter 30-40 times, rinse in warm water, then water with vinegar, then cool water, wring gently, adjust and hang to dry. Go to bed and Bob's Your Uncle~ a new scarf to wear in the morning!

And here it is in all its glory. The back actually works nicely with the front. And it will be very warm! 

One more shot- you can see that the raking made the lines wobbly and not much else. Better than straight lines, anyway!

Oh, this picture looks wonky because it is. This scarf is not on a flat surface! 

Wednesday, February 24, 2016

Drawing the Line~ Glass Stringer Control for Beginners

Well, I recently purchased a pair of amazing glass beads with musical notes on a staff from Heather Behrendt. The stringer work on them was so precise and tiny I could hardly believe my eyes. Needless to say, I started thinking that it was maybe just slightly possible that I could begin to learn to draw a few lines on some beads. I know the theory, of course~ pull very fine stringer, find sweet spot in flame, apply to bead. Sounds easy, yes?  Oh! I forgot something~ p,p,p (practice, practice, practice, in case you had something else in mind).

I tried a wee bit of this out yesterday, and here are a few conclusions, ideas and points of interest. Firstly, if you are just scribbling stringer randomly around a bead, you can heat up a pea-sized bit of glass on the end of a rod to a nice red glow, pull it out of the flame, attach it to the bead and run it quickly around the bead by either turning the bead around or moving the blob about. This is what I call a 'glass blowers style' application as was used in this bead. Not a teeny tiny line, but quite easy to do, and no need to pull stringer in advance as you are using a blob of glass instead of a thin bit.


But anyone can do that, right? Time to move on to something a bit more difficult. The next bead was made using a commercial thin stringer. Thinner than a regular commercial stringer, but still not really thin, so the lines still ended up thick-ish. I tried out a couple of parallel lines and then a couple intersecting lines. Here's where the sweet spot in the flame came into play. I have often heard that you can work to the side of the flame, using the heat of the bead to heat the stringer. Seems I was working more in front of the flame. I don't think it really matters, as long as the bead is hot enough to make the stringer stick. The stringer should be applied by pushing it onto the bead, not just laying it down onto the bead, or it will not adhere properly. If that happens, it will pull off of the bead and ball up, giving you dots instead of lines. In this case, I added some dots at the intersections of the lines to help hide any blobby bits there.

Now on to the harder stuff! For this bead, the first step was pulling some thin stringer. I have not gotten to the hair-thin phase, but it's pretty thin! I decided to try some colors other than black just for fun. The main tip here is- PAY ATTENTION! Hold the stringer near the end so it doesn't wobble while you apply it, but be sure there is enough sticking out to make the entire swipe onto the bead at once. Be sure the tip of your stinger is not blobbly (cut it off if it is), heat the bead, put it in position out of the flame, but still close (your sweet spot) and apply the stringer by pushing it onto the bead. Wow, do I have shaky hands! You can see I used a lot of dots here and there to hide ends and wobbly bits. I had to figure out how to make that a design element! Oh, but now I've given it away... I do like the look of the different stringer colors~ helps with the retro look! And you can see that is is very different on each side. Why the heck not?!

I will have to let you know if the p,p,p works out, or if I just end up peeved, peeved, peeved!


Wednesday, January 20, 2016

Form Follows Function


Looking around on facebook, I saw a wonderful thread with many lampworking tips and it got me thinking about one little lampworking detail that I think about a lot which is the first step in many bead style decisions, and that is- 'how will this bead hang?' I make a LOT of fish, so that's where I'll start.

If the fish has a vertical hole (as most of mine do), the front and back end need to be fairly well balanced. That means the front end of the basic body will be a little bit longer than the back end. Why? Because the back will have the fins and the tail added which, though thin, will add some weight. The side fins do not extend much past the hole, adding a little more weight to the front. Hopefully in the end it will all work out! One more thing; ever since my wind disaster, I have made my fish with the side fins against the body rather than sticking out to the sides. Much less fragile!

A horizontal hole on a fish is a bit more difficult for me. The bottom of the fish needs to be heavier than the top, so I mash it a bit unevenly and then try to extend the bottom a little more. Sometimes later in the process, when it's time to add the eyes, I can't remember or really see which is the top and which is the bottom. Today, I added a wee dot of clear at the top where I was planning to put the eyes. Problem solved~ now I wouldn't get mixed up later, and the clear does not mess with the design; I can just melt it and cover it up later. (thanks to Elizabeth Dauch for this tip)

Another new design change for those horizontal fish has made them work out so much better in my mind. No more worries about the tail being too fragile- it is now just another part of the bead.

One more thing- you might call this a pet peeve, I suppose. Both sides of any bead I make have a design on them. Why? Because they can flip over or be put on backwards and I feel they should still be nice to look at. Any time I put up a bead for sale anywhere online, I show both sides, and maybe even a side view.

There you have it~ one little step in the design of the bead that can be quite important. Or so I believe...