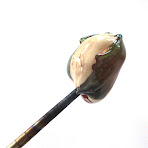
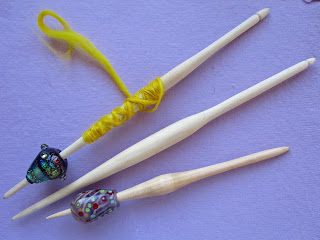
Showing posts with label handmade spindles. Show all posts

Tuesday, January 25, 2022

Making Glass Worry Stones

I have been asked off and on if I could make a little flat bit of glass with an indentation in it for- sort of like a worry stone. The short answer? I had tried and not been happy with the results. But now I've figured out a whole different way to do this. There are a few tricks that have been working well for me, so I thought I'd try a mini tut for the glass workers out there.
This piece is not actually just a 'worry stone', but a very small glass bowl that can be used for support spindle spinning.

First, ditch the mandrel! A large glob of glass will be built off the end of a metal chopstick to be removed later. Add 1 ~ 1 ½ rods of clear glass to the stick as quickly as possible; shaping & smoothing can happen after it is on the stick. Build the glass off of the end of the stick; don't let the stick get too far up into the glass. Clear is a nice stiff base; colors will be added over it later.   


Next add colors and shape as desired. Ivory and aqua have been added here. Keep the chopstick hot as you do this. After color has been added, the glass has been heated, shaped into a cone shape, stretched and twirled back on itself. 


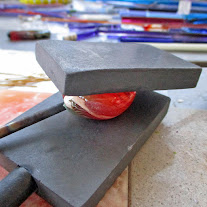
 Get the glass really hot and smooth, and then flatten. Here two graphite marvers are used to press the glass. It may take a few tries to get the glass flattened to about 5/16 - 3/8 inches. Check to be sure it is even and not thicker on one end~ usually this seems to happen at the chopstick end. Just reheat and mash again. Shape the piece as you'd like it to look when finished.
 

Here's one of those special tricks~  make the hanging or wearing hole now, rather than at the end. Making the hole now will keep the glass from getting distorted later; do keep this area hot as you work on the rest of the piece. 
Thin the top end slightly with the corner of some mashing pliers to make a triangular flat spot; then use a pair of biter tweezers and a pick (or something better like Peter's tweezers) to make the hole. Rotate the pick or stretch with the tweezers so the hole will be large enough for a cord to pass through. Be sure to keep this area warm while you're working through the rest of this piece.
 

It's time to move on to the indentation. After a bit of trial and error, I've settled on a couple of tools from the 'alternate craft store' (my local hardware store)~ a large smooth bolt and ball peen hammer.

Heat the flattened glass well on both sides to be sure the tool will be able to sink into it. Quickly put the hot glass on a marver and push hard with a large smooth bolt. You may need to do this a couple of times to get a good bowl. If you'd like a deeper indentation, a ball peen hammer works quite well. I use both and go back and forth between them to get the bowl as deep and wide as I want it. Remember to keep both ends of the piece warm! Heat the indented area to get rid of as many chill marks as possible.


Finally it is time to take the piece off of the chopstick. Heat the chopstick up until it is red hot, grab the worry stone with a pair of heat proof pliers and pull the glass off of the chopstick. I have not yet quite figured out how to make this end look just right; it will likely need a bit of smoothing.


Make sure to keep the whole piece hot while doing any final shaping, and flash in the flame before popping in the kiln.

Finito!


.


Monday, December 20, 2021

My own spindle sticks

I've been telling myself (and a few other people) that I really need to figure out how to use a lathe and make my own spindle sticks for a while now. I am venturing down that road (with a bit of trepidation). Why bother, you ask? Well I have found precisely one person who can make the sticks I need for a sensible price. Well, for any price, really. And what if Hershey Fibers gets tired of it? Then I will have a pile of stick-less whorls lying about and no one will know what to do with them! So~ away we go!

For starters, using a lathe is a little fun, a little hard on one's body and a little scary. There's a whole lot of shakin' going on! And I am no spring chicken. Secondly, these thin sticks take some finesse. As they thin out, you need a sharp tool to do the work for you, no pushing allowed. I am working at The Hub, and the tools seem a bit over used. So I switch to sand paper near the end. And then I get tired of standing there and just stop and bring it home to finish it. Which is kind of silly as it takes a lot longer to finish by hand!

Anyway, I am fairly pleased with the results. I've paired some whorls up with particular sticks in my etsy shop. How are these sticks different?

  • They are a bit thicker than the ones I can buy, which I like~ they feel firmer in my hand. 
  • The 'flick area' is thicker. I am working on narrowing that.
  • The centers are wider; the shape is not quite what I envisioned, but they're on the way!
  • Some of them are shorter, which is also my preference.
  • They can be notched for drop spinners more easily.
  • They are not all the same. This means that specific whorls work best on specific sticks. I'll be working on getting things a bit standardized in future, though I like that they are not all perzactly the same!
  • A little oil & beeswax finish is rubbed on.
  • Right now I am working with poplar, but Urban Timbers just may be able to provide me with some locally saved wood. I love that idea!

Saturday, April 10, 2021

Viking Inspired Whorl Ideas~ New Glass Whorl Styles

It's time to talk about whorls again! For the last several years I have been making handmade glass whorls that are used for Viking style spinning. Slowly but surely, things keep moving along. First there were single whorls, then pairs of whorls that spun together, and now I seem to be in a phase of making longer single whorls. My busy brain is always ready to pursue a new idea; then it seems I abandon old things and move on! 

There are a few different design ideas affecting my whorl making these days. First and foremost are single conical whorls, which are a bit longer and thinner than past styles. The shape simply appeals to me. It seems like the extra weight near the center is making them spin nicely and possibly longer than the shorter, wider whorls. The conical shape also allows extra weight at the outside edge. Some extra added glass 'bobbles' can add yet more weight at the outside, as well as visual interest. 

The next thing is colors and designs~ oh my! This is where I get excited. I've been making a lot of two-tone beads with a line of something or other swirled between. Sometimes there's a touch of frit (wee bits of broken glass) involved, or goldstone, or a glass that changes colors and reacts in the flame. I may even add a little handmade murrini to jazz up the bobbles between the colors. There's often a bit of a 'happy accident' involved (and sometimes an unhappy accident~ ha,ha). The style can seem rather simple, but again, the look just hits me right.

  Finally, there's encased silver foil with frit or murrini or something trapped within or added on the outside. These are not new techniques for me, but not something I've concentrated on much in the world of whorls. An additional part of this idea is something I am calling an accidental whorl, though it has now become an 'accidentally on purpose' whorl. These babies tend towards a round or bicone shape and were originally made to be worn. One day I made one that seemed just a little bit too large to actually wear and still stand upright. I popped it on a spindle and, well, it spun like a top. Because these were originally meant as wearable beads, the holes are straight. 

One more little flight of thought~ one may wonder, why not just make whorls like the wearable beads? Can it be done? Of course it can, however... I often find that a particular type of bead begs a particular shape or design. I could not tell you why! Have I ever made a bead that is similar in shape and design with a tapered hole? Why yes, but it seems it is not something that my brain directs me to do with ease!

Here's that red accidental whorl spinning its little heart out!


Thursday, November 12, 2020

Medieval and Viking style glass whorls for hand spinning

Just a wee post to show off some of my handmade glass whorls, because I fear I have made a few too many. And of course I want to make more! These are based on historical whorls found in various areas from Medieval and Viking times. 

I cannot say they are historically accurate, because the designs are pretty modern. To read more about how these were developed for my shop, you can refer to this bit on my blog.

https://isinglassdesign.blogspot.com/2014/03/spin-spider-spin-experiments-with.html


Over time, the style has gone from single whorls, to whorl pairs (for extra weight and flexibility), and now to a longer style meant to be used alone. Because change is good, right?

You can find them in my etsy shop~ https://www.etsy.com/shop/glassbead

Wednesday, June 12, 2019

Medieval glass bead spindle special tips


The other day, I had the good fortune to meet someone who had been gifted a glass bead spindle from my etsy shop. She had some questions about things that I had never thought about, so here are a few extra special tips to help modern gals learn about going Medieval with their spindle skills. And do remember to see my other spindle blogs, and the missing spindle blog and youtube channel about these for even more information! Each listing in my etsy shop tells about the weight, size and spin-ability of the whorls shown. That's a good place to start making an informed decision. These are all bottom weighted spindles meant to spin thin yarn. I have not tested them as top whorls.


First the oh-so-helpful o-rings and/or clear hair bands that will help keep your whorls from whirling away. Why do I recommend these and send them along with your order? Well, when I first began making these whorls and they were being tested by Lois, she came back and said something like~ 'these are really sturdy, they were rolling all over my concrete floor,' I looked at her and said- 'we've got to stop that!' A little thinking cap time revealed the o-ring solution. If the whorls go skidding across a hard floor too many times, they should not break, but they will get scuffed up. And it's annoying to have to go skittering after them all the time. You should be able to get more o-rings at your local hardware store in the section with all the little boxes of random hardware. I use the two smallest sizes available. The best place I've found for the clear hair bands (if you prefer those) is Sally Beauty Supply. 
(P.S.~ if your whorl does break, please tell me! They are guaranteed not to do that.)

Why are there two whorls? Well, for the weight! Use them both together when you begin, then as the cop grows you can remove the bottom whorl. As it grows even more, remove the top whorl and put the lower whorl back on. When your cop gets really heavy, you may even be able to take both whorls off and keep on spinning! The double whorl system came into being when my design partner (Lois of missingspindle fame) and I were trying to figure out a way to make the glass a bit more weighty. Since I am only able to make relatively round whorls up to a certain size & weight, we thought of adding a smaller whorl below. Et voila! The two whorl system was born. The smaller whorls can also be paired quite nicely to sit below a heavier pottery whorl~ this is mostly done for looks!

Which end of the stick is which? These sticks are tapered at each end and fatter in the center~ but one end is shorter beyond the wide bit than the other. The short end is for the whorls, while the long end is for spinning up your fiber. Please be sure there is no fiber under you whorl and that your cop is not so low that it is pushing on the whorl. It can push it right off the stick if it is.

What's with the tapered holes? My glass whorls are built on a special steel mandrel that is tapered; so the holes in the beads are not straight. Why? So they will fit on the spindle nicely; it also means there is a right and wrong way to place the whorls on the stick. To double check, put the whorl on and look up the stick to the base of the whorl. If there is a lot of 'wobble room', the whorl is likely on upside down. Flip it and check again. A small gap can often be remedied by pushing the o-ring up snugly under, or even partway into, the gap. A wobbly whorl will make for a wobbly spin. When you are checking whorl listings. be sure and read through the whole description~ if the whorls have a little wobble, I'll let you know. If they spin like the proverbial top, I'll tell you that too!

Do all whorls fit on all sticks the same way? Definitely not! Here's why. I make the whorls in my home studio, Caroline makes the sticks in Ohio, the mandrels for building the whorls were made by a glass tool maker in California. Everything is made by hand by the three of us. All my mandrels are not precisely the same size, with the same taper (I've got a couple of faves I normally use now, which helps). All of the sticks are not precisely the same size. This is one advantage to getting an entire set from me~ I have tested the whorls and paired them with the stick they fit and spin on the best! In some cases you may see that a set is only available all together. This is because the whorls have been particularly difficult to pair with a stick. In some cases I have tweaked the stick and sanded it to make sure everything works well. If you are considering buying a pair of whorls, check the photos to see how close together the two ride on the stick shown. This is a good gauge as to whether they will fit on just any old stick. If they are close together, the chances of them fitting on your stick are often a little smaller. You can also ask me if I feel they are tetchy or easy to pair up!

I hope this might answer some of the questions folks might have about all this. If you have questions, please let me know. You can visit my facebook fan page and send me a message, or message me through my etsy shop.


Sunday, March 8, 2015

Double trouble! Two glass whorls on one stick

Things have been moving along in the glass whorl department. I wonder if folks in medieval times had as much fun as we've been having exploring the spinning possibilities. I may have mentioned that my stick maker is somewhat of an expert on medieval spinning techniques. I wonder if those folks ever put more than one whorl on a stick. I'll just bet they did- why not? It's the next logical step when you're playing with whorls that can be moved from stick to stick, or when you need just a bit more weight~ or a bit less~ to keep things whirling around just right.

We've been pairing glass with more glass and with pottery~ the pottery adds a nice weight and the glass adds that little extra 'wow' factor. Since they are all removable, you can start out with two whorls, remove the glass when your yarn starts building up, and then remove the pottery and put the glass back on as things get even weightier! It's a great way to build up your cop ever larger. If one whorl is just a wee bit wonky, the other one can balance it out and make the spin just right~ it's all good!

It's been an interesting journey so far- matching the colors of glass with the pottery glazes can be a challenge. I just read something recently that said not all colors are available in glass~ no joke! So there's mixing and matching and blurring and all the fun things that can go with playing with colors.

And now let's see one of those double whorls in action!


Thursday, February 5, 2015

Spindles and removable glass whorls

Well, as some of you may have seen, I am now making glass whorls for spinners to fit on some lovely wooden spindles made by my friend Lois at missingspindle. Lois has been studying ancient spindle and whorl use for a very long time and has recently decided to go public with all of her wonderful knowledge. She has been making some quirky movies and writing some amazing blogs about how and why we are making this type of tool. The whorls I make are just one small part of her mission to educate and slowly take over the spinning world with medieval designed spinning tools.

Everyone should read her hilarious blog about testing out fresh and dried fruits and vegetables as whorls. I humbly believe that glass works a bit better. But then again I may be prejudiced! Her etsy shop is here, and you can watch her videos on the missingspindle channel on youtube.

The newest venture we've been working on is spindles with multiple removable whorls. This example has three whorls- getting ahead of myself a bit as we are only at the double whorl stage as yet. But one of my adventurous customers has already asked me to work out a triple scheme for her. Spinners are such a fun bunch!

Tuesday, June 17, 2014

Spindles and Whorls~ Medieval Style!

Lights, camera and action! It's finally time for my new glass whorls to enter my etsy shop. These have been paired with lovely hand turned and hand carved recycled wooden spindles for a wonderfully modern Medieval spinning experience. Say What???!!! Well, let me 'splain a bit.

First of all, let me say that, this being a cooperative effort, things will be moving a wee bit more slowly than my usual frantic glass making mania. Right now, I make the whorls, we meet and measure and Lois makes a matching stick. But soon we will have our standards down to make it all go oh so much more smoothly. Added to that is that these glass whorls are big and they take a lot of time and energy to make. Though that's unlikely to change, I'm hoping to adjust to them over time.

The wooden spindle and whorl are not glued together- they are two separate pieces which fit together snugly. A small o-ring or rubber hairband is included to help keep the whorl from falling off and whirling across the floor.

Watch these sweet little youtube videos to see some of these spindles at work and some instructions for use. 


Now, down to brass tacks- how do these things work? A bulleted list will help, I think.
* These glass whorls are best for light or lace weight spinning. For making heavier weight yarn, add a bit more whorl weight. More glass or one of missingspindle's pottery whorls should do it!
* If adding extra weight, be sure the whorls will nest properly. Questions? Just ask the shop owner!
* Because the whorls are handmade, they may be a little unbalanced. They have all been tested with the specific stick they are sold with, but will need to be adjusted on the spindle until the place of best balance is found.
* Make sure the whorl is perpendicular on the spindle. Push up tightly and test spin. Move around slightly on the stick until you find the place of best balance (the 'sweet spot').
* Push the o-ring or hairband up below the whorl to keep it right where you want it.
* Load leader on spindle by using a lark's head knot just above the glass whorl (at the bottom of the belly).
* Wind up and around the spindle several times, with several small winds near the top.
* Top off with one or two half hitches around the indented neck to hold the leader in place.
* Spin yarn!
* When loading spun yarn on the stick, center it over the widened belly, winding up and down in a spiral.

What fun for a little different hand spinning experience!