Saturday, January 24, 2026

Wabi-Sabi Pottery

 The Relationship Between Wabi-sabi and Pottery

A favorite piece that was soda fired

One never knows what will happen!


What is wabi-sabi? According to wikipedia~ wabi-sabi (侘び寂び) centers on the acceptance of transience and imperfection. It is often described as the appreciation of beauty that is "imperfect, impermanent, and incomplete"

Missed a spot right in the middle

I did know this before it was fired

 
Astrid Auxier has written a wonderful treatise about wabi -sabi in relation to pottery. She mentions ‘…understanding its essence through the concept of tranquility, imperfection, and the appreciation of the temporal nature of all things.
This was originally the side of a vessel

There is a lot to consider in the appreciation of wabi-sabi. After making pottery myself for several years, I have gotten an offbeat idea about wabi-sabi and pottery.
How and why did the idea of embracing imperfection come about? It apparently started in relation to Japanese tea ceremonies and tea cups. And why is this? Well, according to me, it was figured out by a marketing genius! Pottery is inherently risky in so many ways. It can crack, it can become misshapen during firing, glazes can run, colors can be sadly (or happily) surprising. If you make pottery that is not production pottery or formulaic, you must come to accept that things will not turn out as you may have wanted, i.e. you must be willing to release your expectations and accept what happens. If you are soda firing, raku firing or wood firing, control of the finished glaze is not really in your hands.

Flew off the wheel; needed re-shaping

If the pottery is just 'wrong', what must you do with it? I give a lot of pottery away to friends or the neighborhood because I can only accept so much in the way of oddness and what I feel is ugly. But a lot of time, thought and work is put into all of those pieces too.
The marketing mastermind behind wabi-sabi thought ‘How can I make this work for me?’ By pointing out the errors, appreciating them and getting others to enjoy impermanence and imperfection of course. It worked a treat! The monks went along with it, and monks are never wrong. If the monks say it is a good thing then society must agree with them. After all, they have the inside track to enlightenment! And who doesn’t want enlightenment?
Soda fired piece~ well that was unexpected!


Is wabi-sabi simply an invention to make pottery errors acceptable so less of it ends up on the shard pile? Perhaps!


Saturday, October 5, 2024

Plant Based Vegan Cheese, My Way

 Lately I have been leaning more towards a vegan or plant-based lifestyle. I've done a lot of looking around at 'fake' cheese choices. I'm not happy with most of the stuff at the grocer's because it's just flavored oil and potato starch (though some is made using nuts); that is not really recommended for a plant based diet- just more fake food. I've tried out a lot of recipes~ some are OK, some are not so great, but none of them had a texture I was  happy with. So I took a bunch of recipes and rolled them all into this mess~ which will get semi-hard in the fridge. 

Disclaimer- I don't measure a lot of this stuff~ just guesstimate, so tweak as desired. I'll explain the ingredient choices a bit in the end notes.


  • 1/3- 1/2 cup cashews/almonds or a combination of the two, soaked for 1/2-3 hrs; drained  
  • 1/2 T miso
  • 1T tahini
  • 1T cornstarch (optional)
  • 1 1/2 T coconut oil (optional)
  • 2 capfuls of natural vinegar
  • 2 T vegan yogurt (preferred) or plant milk of your choice
  • 1-2 T nutritional yeast
  • 1 t lemon juice
  • 1/2 t tamari or natural soy sauce
  • 2-5 drops smoke flavor

Put nuts and some of the liquid ingredients in blender or food processor first and get the nuts mostly ground up. Add everything else and blend or process until smooth. Add a bit of extra plant milk or water as needed to blend it up.

                                                                                Notes
You can easily remove almond skins once they're soaked if you don't want the brown bits. 

Miso, plant yogurt and vinegar will lend a more tart flavor over time as they contain active cultures.

Cornstarch and coconut oil are there to thicken it up as it site in the fridge. If these are not on your diet, you can omit them; it just won't thicken up as well.

I truly don't measure the yeast, lemon juice or tamari, add and taste to get it to your liking.

Smoke flavoring is obviously optional, but I find it lends a nice gouda-like flavor.

Tahini is there because I believe is helps the flavor along. And I love tahini!


Sunday, September 3, 2023

Bumps and Bobbles and Whorls

It seems everyone has an opinion about raised bumps on beads. Do you like the feel of them, the fact that they add texture to your beads? Or do you prefer the smooth look and feel of the glass all by itself? Long ago, I was a 'no bumps please' bead maker. But now? Oh give me some texture!
For glass whorl making, bobbles have a purpose beyond looks. They add a little weight to the whorl, which often seems like a good thing. And if they are placed all around the outside, they can also affect the speed and length of the spin. Oh, it's physics, and I am not so good with physics. But it does change how things go around.

To quote Wikipedia:  'Whorl shapes vary greatly and can include ball-shaped, disk-shaped and cross shaped whorls. The shape and mass distribution of the whorl affects the momentum it gives to the spindle while it is spinning. For example a center weighted whorl will spin very fast and short, while a rim-weighted disk-shaped whorl will spin longer and slower.[9]'

So, first I make a nice smooth whorl. Then maybe I add some swirls here and there, either evenly all around the bead, or maybe just randomly. Then I wonder if it might need just a little more weight, or if accent bumps would look nice. And then, well, does it need raised bumps around the center to make it spin a bit longer? And, if it happens to be a sea urchin whorl, then bumps and bobbles are a definite part of the design!

Oh, looking through that article, I see spindles are associated with a number of goddesses. Hmmm... going to have to let the brain wheels spin around that for a bit!

Monday, October 3, 2022

Torch Time Again!

 Good golly, I have not been blogging much! Just popping in now to say my torch is back up and running after being on hiatus for a couple of months. I've started out with some fancy silver-cored fish pendants and glass whorls for spinning yarn.
New curved beads are on the to-do right now list! We'll see how that goes~ they are always a bit of a challenge.


Thursday, July 21, 2022

Isinglass Design Makes Pottery


Support Spindle Bowls


   Sometimes it's just time to blog about something new. 

   But  what to talk about? The blazing heat? Where I 

   should live? Getting old? Nah~ let's talk pottery! Wonky 

   or not, it's the latest craze around here. This is news to 

   me too!
  

 Yes, another crafty thing has caught my attention. I have been going to the Arkansas Innovation Hub for a few months now to work on their lathe. Then I saw that there was a hand built pottery workshop coming up. Little did I know how enchanting making pottery could be, and there is so much to learn and try! I feel like I'm under a spell~ My main goal here was to make some support spindle bowls, but I guess that was just a wee bit too easy for my busy brain. Now there are more bowls and containers, incense burners and even a yarn bowl for a buddy to use. 


One day I was walking about and saw a few poppy pods. They have turned out to be a lovely little tool for impressing designs on pieces. And not all pods look the same; the designs on the two pictured are quite different. I've got a whole Pinterest page about hand building pottery, with tons of photos and ideas and I've been watching a bunch of videos from Sarah Pike Pottery on instagram. She's got a lot of cool ideas, and her pottery is lovely!

Tuesday, January 25, 2022

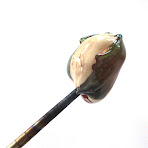
Making Glass Worry Stones

I have been asked off and on if I could make a little flat bit of glass with an indentation in it for- sort of like a worry stone. The short answer? I had tried and not been happy with the results. But now I've figured out a whole different way to do this. There are a few tricks that have been working well for me, so I thought I'd try a mini tut for the glass workers out there.
This piece is not actually just a 'worry stone', but a very small glass bowl that can be used for support spindle spinning.

First, ditch the mandrel! A large glob of glass will be built off the end of a metal chopstick to be removed later. Add 1 ~ 1 ½ rods of clear glass to the stick as quickly as possible; shaping & smoothing can happen after it is on the stick. Build the glass off of the end of the stick; don't let the stick get too far up into the glass. Clear is a nice stiff base; colors will be added over it later.   


Next add colors and shape as desired. Ivory and aqua have been added here. Keep the chopstick hot as you do this. After color has been added, the glass has been heated, shaped into a cone shape, stretched and twirled back on itself. 


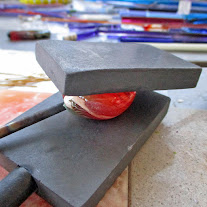
 Get the glass really hot and smooth, and then flatten. Here two graphite marvers are used to press the glass. It may take a few tries to get the glass flattened to about 5/16 - 3/8 inches. Check to be sure it is even and not thicker on one end~ usually this seems to happen at the chopstick end. Just reheat and mash again. Shape the piece as you'd like it to look when finished.


Here's one of those special tricks~  make the hanging or wearing hole now, rather than at the end. Making the hole now will keep the glass from getting distorted later; do keep this area hot as you work on the rest of the piece. 
Thin the top end slightly with the corner of some mashing pliers to make a triangular flat spot; then use a pair of biter tweezers and a pick (or something better like Peter's tweezers) to make the hole. Rotate the pick or stretch with the tweezers so the hole will be large enough for a cord to pass through. Be sure to keep this area warm while you're working through the rest of this piece.
 

It's time to move on to the indentation. After a bit of trial and error, I've settled on a couple of tools from the 'alternate craft store' (my local hardware store)~ a large smooth bolt and ball peen hammer.

Heat the flattened glass well on both sides to be sure the tool will be able to sink into it. Quickly put the hot glass on a marver and push hard with a large smooth bolt. You may need to do this a couple of times to get a good bowl. If you'd like a deeper indentation, a ball peen hammer works quite well. I use both and go back and forth between them to get the bowl as deep and wide as I want it. Remember to keep both ends of the piece warm! Heat the indented area to get rid of as many chill marks as possible.


Finally it is time to take the piece off of the chopstick. Heat the chopstick up until it is red hot, grab the worry stone with a pair of heat proof pliers and pull the glass off of the chopstick. I have not yet quite figured out how to make this end look just right; it will likely need a bit of smoothing.


Make sure to keep the whole piece hot while doing any final shaping, and flash in the flame before popping in the kiln.

Finito!


.


Monday, December 20, 2021

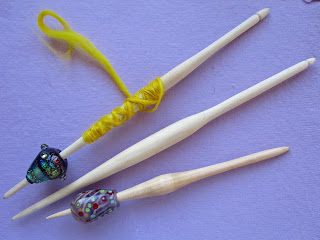
My own spindle sticks

I've been telling myself (and a few other people) that I really need to figure out how to use a lathe and make my own spindle sticks for a while now. I am venturing down that road (with a bit of trepidation). Why bother, you ask? Well I have found precisely one person who can make the sticks I need for a sensible price. Well, for any price, really. And what if Hershey Fibers gets tired of it? Then I will have a pile of stick-less whorls lying about and no one will know what to do with them! So~ away we go!

For starters, using a lathe is a little fun, a little hard on one's body and a little scary. There's a whole lot of shakin' going on! And I am no spring chicken. Secondly, these thin sticks take some finesse. As they thin out, you need a sharp tool to do the work for you, no pushing allowed. I am working at The Hub, and the tools seem a bit over used. So I switch to sand paper near the end. And then I get tired of standing there and just stop and bring it home to finish it. Which is kind of silly as it takes a lot longer to finish by hand!

Anyway, I am fairly pleased with the results. I've paired some whorls up with particular sticks in my etsy shop. How are these sticks different?

  • They are a bit thicker than the ones I can buy, which I like~ they feel firmer in my hand. 
  • The 'flick area' is thicker. I am working on narrowing that.
  • The centers are wider; the shape is not quite what I envisioned, but they're on the way!
  • Some of them are shorter, which is also my preference.
  • They can be notched for drop spinners more easily.
  • They are not all the same. This means that specific whorls work best on specific sticks. I'll be working on getting things a bit standardized in future, though I like that they are not all perzactly the same!
  • A little oil & beeswax finish is rubbed on.
  • Right now I am working with poplar, but Urban Timbers just may be able to provide me with some locally saved wood. I love that idea!

Sunday, May 16, 2021

A Special Whorl Video Showing the 'Wagon Wheel' Effect


 I really expected that this would have a more interesting name than the 'wagon wheel' effect. Anyway~ see how it looks like the whorl is reversing directions while it's spinning around? Not true! It's an optical illusion created by quickly flashing lights and your brain's trying to make sense of what it's seeing! So cool.
This was a special request whorl, which I did not think I would be making. But one day I thought, oh why not give it a try? And hey presto, a whorl with a face on it. And it spins pretty nicely too!

Wednesday, April 21, 2021

Lampwork Glass Beads~ 'Frit Stacking' Ideas

 So... I'm sure many, if not all of y'all bead makers, have some frit mixes lying around. Back when I first started to make beads, I didn't use frit. And it was in the old 'dinosaur' days before Val Cox and her 'Frit Secrets' book came out, so frit mixes were not yet a big part of the glass bead world. Nowadays, a  nice mix of frit can decide the colors of a bead, making that part of the process easy. They are a useful crutch, especially for days when one is feeling a wee bit less than inspired. Just grab a mix and enjoy making the bead! Val's book has a lot of different ideas for how to use frit in a bead; it is a great resource. 

I often feel like I am kind of cheating when I use a prepared frit mix in a bead and it takes a little bit of the creativity away, so I try not to lean on them too heavily. That said, I seem to be in a bit of a frit loving stage. I mean Gaffer's or Reichenbach's royal purple or purple rose frit is simply irresistible! 

While thinking about some of the things that happen when a couple of different frits are mixed, or just a touch more of something is added to a mix, I realized that maybe the frit colors could basically be stacked instead of using them all at once in a mix. Say, for instance, you are inspired by the colors in a violet. Instead of using green and purple together, why not put on some green and then add some purples randomly on top of it. Would this not give more of a violet feet to the whole bead? (Without all the trouble of having to actually put wee violets all over it). How about rolling the bead in a larger size purple frit and then a smaller one~you can see in this example that little bits of purple are on larger dots of purple. Those larger bits of purple must have been sticking out when the smaller purple frit was added, making it look like glass dots were placed on the larger purple bits. Another fun idea!

Today was a 'frit stacking' experiment day. I was pretty happy with the results. As a bonus, interesting reactions sometimes occur between the frits. Here are a couple of the beads and how they happened.

This pink bead started with a base of clear, then CIM rose quartz with triton frit at one end and then another layer of clear all around. The triton was reduced to bring out some shine and then encased for a little extra background play, though that was rather lost in the shuffle after everything else was added. Some Reichenbach iris amber green, opal raspberry and copper ruby were added over the clear layer. These three frits were all about the same size. You can see that some rather interesting things ended up happening on this bead.


Another bead was a play of organic colors and purples. I didn't write down the colors on this bead, but I believe I started with a background of amber green iris (which changes colors a bit as you go), then some large Reichenbach purple rose frit, and then small Gaffer purple rose, which I put all the way across the bead. I don't believe I added any actual green frit to this bead; the iris amber green can make its own green in some instances.


Here are closeups of both of these beads to show some of the yummy reactions that happened!