Well, as things often go, about the time I decided to stop making butterflies to sell, I needed to show a few folks how I make them for the Beads of Courage program. Here’s some more info about the program: http://www.beadsofcourage.net/
Arkansas Children’s Hospital is one of the many hospitals that use this program for children who are undergoing hospitalization and treatment. It’s a little bit of fun for the kids to look forward to at the end of some pretty intense treatments. The (as yet unnamed) bead group that I meet with once a month or so decided to make some beads to donate.

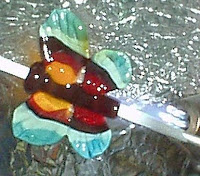
Grace's Butterfly........Debby's Butterfly
Our little three hour session wasn’t really long enough, so we’ve all gone home with a bit of homework: Make some beads to be donated, and we’ll ship them off next time.
After writing this whole crazy mess down, I have to say, for simple and elegant directions, you can go look at the ones Sharon Peters wrote here: http://www.beadsofcourage.net/art/ButterflyTutorial.pdf And then tweak it your own way!
Here's a tutorial for making butterflies the way I do it to go along with the youtube video that actually shows me doing it- see link above (thanks to Vicki of parrotise beads).
NOTE: You are responsible for your safety. Please follow all recommended guidelines for studio ventilation, face mask use, safe use of enamels, and other safety precautions. This tutorial presumes a basic understanding of lampwork bead making techniques.

......Finished!
Here’s a tutorial for making butterflies my way, as can be seen in the video:
First, let me say I had a few problems making the body- my glass had a lot of bubbles in it, and I had to pop them and work them out. So the video actually starts about 5 minutes into the session. I had some problems at the end too, so the video ends before I really finished the butterfly- I got a bit obsessive about the shape. In the end, I just had to let the wings be a little different from each other.
1) Make a tube for the body- about 1 1/8 inches long and ¼ inch in circumference is good. It will need to be a little fatter if you are using a larger mandrel. I often just make a clear body, as I want the wings to be the main focus.
2) Marver into a nice even tube and taper the lower end a just little bit.
3) At one end of the tube, add a bit more glass for the head. A couple of wraps around should do it. Melt down to a nice even shape. Make both ends of the body nice and even and a bit dimpled at this point, as you won’t have much of a chance to do it later.
4) Now it’s time to build the wings. I build them fairly flat, and add quite a few colors. My preference is to make them mostly transparent. To me that’s part of the butterfly look- ephemeral. So, start with the transparent color of your choice and stripe it along the upper 2/3 or so of the body. Make sure the body is fairly hot when you add that first swipe, so that you have a nice attachment between the wings and the body.


The body.......................the head............begin the wings
5) Pick up your next rod and make a swipe or two all the way around the first one.
6) Choose the color you’d like to use first on your lower wings and swipe that on the bottom third of the body. You can use the second color from the top as the first color on the lower wings if you like. Again, be sure you have a nice attachment on this first swipe. Try and push that first swipe up so that it actually touches the upper wings.
7) Add another color to the lower wings. By this time you will (hopefully) have ¼-1/2 inch of glass sticking out from the body on both sides. It already looks a bit like wings. Flatten with your mashers. If it’s all kind of blobbed together, don’t worry too much, we can take care of that in a minute.


another color.........begin lower wings.....ready to flatten
8) If your top and bottom wings aren’t touching each other, now’s the time to fix that. This part’s a bit hard to explain. Heat one of the bottom wings, grab it between the mashers of your choice, and push the top of it towards the top wing while rotating it down. Do the same thing on the other side. If you have watched the video, you can see my hands waving around kind of wildly after I’ve moved the wings around- it’s not part of the bead-making process, or some kind of strange tic- I’m showing the gals an exaggerated example of the motion I just used to move the glass around. It’s more or less drawing a backwards “J” while I have the glass between the mashers.
9) With any luck, you’ll now have the wings pushed together in the middle. If not, you may have to do a little bit of the grab and push with the top wings. All you’re trying to accomplish is to get a little bit of the wings melted together in the center. Why? To make it less fragile in that area. If you have melted them together too much, superheat that area and snip it apart a bit with your scissors, then melt to round off the edges.


Flattening..................flattened.................more colors
10) Add more colors top and bottom, dipping in a little raku frit or enamel along the way if you like. Try and make each set of wings about the same size and shape, with the top wings about twice the size of the bottom ones.
11) Decorate as you like, adding layered dots, bits of color here or there, or what have you.


Adding frit.....enamel............clear and dots
12) Now it’s time for the final shape. For this part I use scissors. Superheat one of the wings. Take it out of the flame and grab with your scissors. Pull a little bit to indent and shape, move and do it again- about four times for the bottom wings and six or so at the top. It may help to have a picture or two of butterflies that you can look at to help you see what shape you are aiming for. Normally I will heat one of the top wings, grab it close to the center on the bottom and indent and shape it, move and do it two or three more times, then reheat and tackle the top half of the same wing. You’ve got to remember what motion you did and do it about the same on the other side. Try not to cut all the way through with the scissors, although that can make a nice effect on the edges as long as you melt and round it out a bit afterwards.


More dots...............first wing shaping...second wing shaping
13) If the wings are not quite to your liking, you can shape them further by heating the wings and a glass rod or stringer, attaching the stringer to the tips of the wings, and pulling gently. The wings should be fairly hot, and the stringer or rod just hot enough so it will stick temporarily to the wing tip. Melt off and reheat a little to make sure you haven’t made a sharp place on the wing.
14) And now for the feelers- if you want to add them, though this may be the deal breaker after all the work you’ve put into this baby! If you are brave enough, dot some antenna onto the top of the head. You can build up a series of small-ish dots, or try dotting and pulling the glass a bit to make them. Don’t make them too long and fragile, and be sure to bend them a little bit away from them mandrel so you can still get in there with your tools to bail it.
Whew! That’s a lot of instructions! I was lucky with the butterfly I made for this tutorial- the photos just about took themselves.


.jpg) The bead at the left is the one I donated a tut for- encased silver with a special technique for some cool organic designs that can be used in a lot of different ways. The bead at the right uses the same technique over an enameled background.
The bead at the left is the one I donated a tut for- encased silver with a special technique for some cool organic designs that can be used in a lot of different ways. The bead at the right uses the same technique over an enameled background. Get your copy right here, right now! There are 20, count 'em 20
wonderful new things for you to try out and make for Beads of Courage,
your friends, family or yourself! Here's a photo of the cover showing all of the tutorial beads- pretty cool!
Get your copy right here, right now! There are 20, count 'em 20
wonderful new things for you to try out and make for Beads of Courage,
your friends, family or yourself! Here's a photo of the cover showing all of the tutorial beads- pretty cool!
 I'll just tell my side of the story. I don't know how Beads of Courage and NASA got together for this event, but I was sure glad, and lucky, to hear about it. One of my friends on facebook mentioned that she was making beads for a juried competition for glass beads to go up in the shuttle. You know how random it can be seeing what any one person is up to on facebook. I saw that and had to look into it right away. I was very disappointed when I heard about it too late the first time, so I was happy to be able to give it a try this time.


