Showing posts with label lampwork instruction. Show all posts

Wednesday, March 1, 2017

Reflections: the Diary of Glass Beadmaker


For the last few months, I have been hard at work writing and putting together a book. It's called 'Reflections: the Diary of a Glass Beadmaker' and is available on etsy here. 
I've added a subtitle: 'tutorials, tips and information for beginning and intermediate lampwork glass beadmakers' because it is really full of short (but complete) tutorials and loads of other stuff. There are nine tutorials included, from making a basic disk or hollow bead to encased silver fish and raked and twirled beads. There are also tips on making matched pairs, basic sculptural bead instruction and how to repair damaged beads among many other things. Kind of a view inside the beadmaking portion of my brain!

      What a surprise, and what a surprisingly large amount of work was involved! My original idea was to take a bunch of blog posts about making beads that I'd written over the years and put them all in one place. I think of it as kind of a 7 year diary of ideas about glass beadmaking. But that's not exactly what happened....

     First, I saw that I would need to re-make a lot of beads so that there would be much better photos. And then I realized that there was a lot of other information floating around in my head, notebooks and computer that folks might find useful. So the book kept growing. It ended up clocking in at about 78 pages. And I learned plenty about using 'Word' while I was at it.

Next, I sent it out to a few friends to look through and see what they thought. And to see if I made any terrible errors! Here a couple of quick assessments from them:

" I enjoyed reading it, thought it had quite a few good tips, with your personality and wit apparent."

"Got your book downloaded and speed-read through it. The following is my impression: 1) It is a very nice compilation of useful details and information; 2) You covered a lot of basics, like cleaning the rods, frit making, shards blowing, etc., etc. It would be a great text book for persons "starting" on the hobby."

" For anyone just starting out it is a wealth of information. A good resource for where to find answers to questions they might have. While at the same time it is a wonderful reference for anyone who has been torching for a while and needs a refresher for something they haven't done in a long time. I also like that you put in info for folks who have been just hobbyists and want to get a little deeper into the craft for teaching and doing shows."

"The last part of the book (almost 15 pages) is about managing schedules, set up for bead shows as well as some of your thoughts on designing of a bead, which is more than any beginner would be able to appreciate or be interested in."
 
" Your book certainly covers a wide range of the topics that all bead instructors should address."
  
"This book is AMAZING - you make me want to get back into beadmaking!!"
 
So, here's an outtake from the introduction explaining a little about the book.


      Because much of this information comes from my blog, it is available publicly. Blog publication dates are included here for general interest, but things have been reorganized in a more sensible order. There are many updates, lots of new photos and information; things like how to make masked patterns and twirly bits on the side of a bead. Also included is a short treatise on inspiration called ‘Keep Your Mojo Workin’ as well as notes for giving demonstrations and classes for those ready to move out of their studios and into the public arena.

      This is not a beginner’s instruction book for making beads, but rather a book for advanced beginners and mid-range lampworkers. It includes ‘beyond basics’ ideas and mini tuts to teach technique rather than how to make a specific bead. There is no list of colors used; you will choose those yourself. This is meant as, hopefully, helpful information to help bring your beads to a new level. Have trouble with 
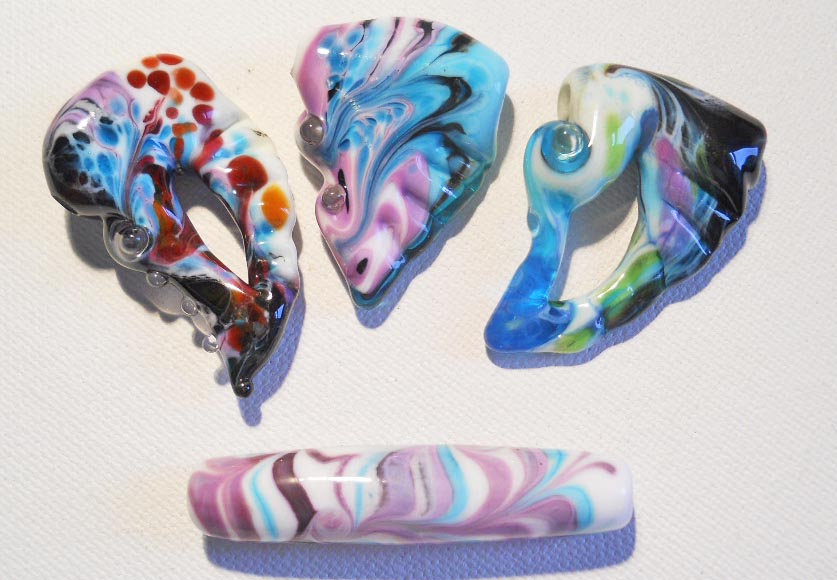
sculptural beads? There are general tips as well as instructions and photo tutorials to make butterflies, fish, leaves and hollow beads.

      It all begins with a few basics, which you may already know- an intro to lampwork, a glossary and primer to help you find the things you need to start your own beadmaking journey. Tips on making a first bead,  good for both students and teachers, cleaning your glass, making shards and frit are included in the ‘basics’. Then there are some more difficult techniques, such as rescuing beads that have broken bits and using rubino oro.

      In the ‘Rambling Thought on Beads, Art and Business’ section near the end, there is general information about things as varied as bead wear-ability, the theory behind deliberate mistakes and button technology. In the standard blog style, there are outside links for further reading on many of these subjects. Most of these missives are simply things I think I’ve learned during the many years of my beadmaking journey. A little window into my thought patterns will be opened to you.


Wednesday, January 15, 2014

Taking tutorial photos

Diane at the Soda Lime Times recently asked if I would like to do a tutorial on making these heart pendants to be published in the February issue of her popular digital magazine. She'd seen the Christmas ornaments I was making and thought they'd make nice pendants. Of course I was honored to be asked and gave an enthusiastic thumbs up.

But making something I felt was worthy of publication, then writing the tut and taking photos took me just a wee bit longer than I'd expected. I take photos for my tuts myself, which means camera in one hand and hot bead in the other. It also means I've gotta be quick. And the chances of bead fail are high because the poor thing is spending a lot of time out of the flame, and the sludge is cooling and being heated way too often.

I was not pleased with the first heart I made- the lobes were not pronounced enough, just not really what I wanted to show off. So I gave it another go and was quite pleased with the resulting bead. I began work on writing the instructions up and sent the photos for the headpin off to Diane so she could take a gander at how things were progressing. Unfortunately, the photos were blurry and couldn't be used. Why didn't I notice that? How annoying, not to mention embarrassing!

So it was back to the drawing board. The Flow has a lot of great tips for writing tutorials and taking photos, so I took another look there. Diane suggested I try laying the bead down on a marver while taking photos. Was I shaking the camera or the bead or both? Who can tell? When I looked at the settings for some of those photos, I saw they were taken at crazy slow shutter speeds, which made me realize that my new studio space is very poorly lit. So I brought in all the light I could find, laid down my white paper for a nice uncluttered background and played with my camera settings until I got a reasonable shutter speed- between 1/60 and 1/125th of a second- much better! Then, when I was actually taking photos of all the steps, I leaned the mandrel against something to stabilize it and took several pics of each step. When the background was darker, I found I had to go down a step or two on the exposure compensation to keep the shutter speed faster.

Results? Good! The photos were no longer blurry and the tut was ready for publication! The February issue of the Soda Lime Times is out today- lots of lovely eye candy and som fun tuts too!

Monday, August 26, 2013

Seahorse Tutorial Results


The sweet seahorse Doris made!
I'm always so excited to see the results when someone uses a tutorial that I wrote. Doris Stumpf makes a lot of wonderful sculptural beads- whimsical little people and such. I was pretty excited when she decided to splurge on my seahorse tutorial a few days ago- she made a wonderful seahorse and even wrote a blog about it! Thanks so much for sharing this, Doris!

And, if anyone should have a yen to try this tut themselves, you can buy it right here- I think it's actually a pretty good bargain. Lots of information, and it even tells you how to make the seahorse with the steps two different ways around. I naturally go in a certain order, even though the other way makes a bit more sense! You can pick your favorite.

Tuesday, July 30, 2013

'Hot Glass for Cool Kids' Tutorial Ebook for Beads of Courage

Have you heard? The Soda Lime Times has just finished publication of a new ebook filled with fun lampwork glass bead tutorials called Hot Glass for Cool Kids. The tutorials were all written with the kids from Beads of Courage in mind, and ALL money from purchases of the book go directly to Beads of Courage. By virtue of my last name, the tutorial I donated is the very first one in the book (thanks Dad!). I also had the honor of being able to name the book- a bunch of possible titles were submitted, and the one I came up with got the most votes- a fluke to be sure, but Diane Woodall generously sent me a bunch of wonderful prizes for being the winner.

The bead at the left is the one I donated a tut for- encased silver with a special technique for some cool organic designs that can be used in a lot of different ways. The bead at the right uses the same technique over an enameled background.
 
Get your copy right here, right now! There are 20, count 'em 20 wonderful new things for you to try out and make for Beads of Courage, your friends, family or yourself! Here's a photo of the cover showing all of the tutorial beads- pretty cool!

Saturday, March 2, 2013

The Taming of EDP- A Lampworker's Secret

How many of you love edp (evil divitrifying purple)? Show of hands... How many of you hate it? Wait! Those are the same people. Well, I used to feel the same way... The color is beautiful, but it tends to just sit on the sidelines and watch me pass it by over and over again- the wall-flower of my studio.

The other day I was feeling adventurous and pulled a rod out  - oh, what the heck- why not. I made a portal bead base, rolled it in a bit of white enamel, and started adding some edp and other colors. And guess what? No devit- a practical miracle. OK, I'm thinking, maybe I just didn't notice it- maybe it will come out of the kiln looking ug-ly. But I'm just gonna try that again and see. So I did. And guess what- no devit again.

OK, I'm thinking, I must just be holding my mouth right today. We'll see what happens when I do this tomorrow.

And my un-scientific assessment of the situation is this. If you roll a bead in white enamel and apply the edp, you get rid of both the 'e' and the 'd' and end up with just the lovely purple you always wanted. There is a bit of edp in all of the beads pictured. I was having some other troubles with the tube, and managed to reduce some of the purple in that bead. The edp ended up a bit washed out looking in that bead as well, so there may be other odd things going on that I haven't quite figured out yet. I hope y'all will give this a try and let me know how it works for you.

Thursday, February 21, 2013

A Lampwork Beadmaking Primer; Getting Started With Hot Glass

From time to time I've had folks ask how they can get started in lampworking, and I've decided it would be smart to just put it all in one place so others can get started on their glass beadmaking obsession. And we're off!

The very most important thing in learning to make glass beads is practice time. A good class at your local Art Center, Glass Shop, or from a beadmaker in your area is a great place to get the ball rolling.
You can join the International Society of Glass Beadmakers to learn about what's happening in your area, get their new magazine Glass Bead Evolution, join in the forum, and meet up with other beadmakers at The Gathering. The instructor listing might just be the perfect place to find that class.
Another excellent place to connect with people on every level in the glass beadmaking community is Lampwork, Etc. It  is chock full of lampworking info-free tutorials, tools for sale, galleries- LE has it all, and so much more! You'll get every opinion possible there.
A nice, inexpensive monthly magazine with some interesting tutorials and information on lots of different levels is The Soda Lime Times. It is now out of print, but back issues are available on her website and in her etsy shop.

You should definitely get a book or two. You can get many of these books through an inter-library loan if you want to take a look before you buy.
Making Glass Beads by Cyndi Jenkins is the book I learned from, and is still a great value for a beadmaking book. If you get a kit, it will likely come with 'you can make glass beads' by the same author- see if you can switch it out, or just take it off as it is just a pamphlet and the book has much more info for about the same price. 
Passing the Flame by Corinna Tettinger is well liked, but a bit pricey. It is nice because it has lots of step-by-step photos. Good thing to look for used.

The Complete Book of Glass Beadmaking by Kimberly Adams is also a good book for learning the basics. 

Beads of Glass by Cindy Jenkins has bead maker bios and step by step instructions to some specific bead styles with some different & interesting techniques.

As far as tools and materials and starter kits- there are a lot of choices. Here are a few I've tried out:
Frantz Art Glass in Washington has a great selection of Moretti glass. They are very helpful and price competitive.
Artistry in Glass in Canada has a wonderful selection of a lot of different brands ( the best overall selection, I think) and decent prices. Check with them for shipping details.
Arrow Springs has a great selection of tools.
Howaco Glass in Michigan is a nice place to get glass because you can order just one rod of something and test it out. Also price competitive.
There are so many suppliers you can use- some of the others that I have not tried are Mountain Glass and  Moretti & More.
Getting proper eye wear is extremely important. All of the vendors I have spoken to over the years have been very helpful, and should be happy to help you make sure you are getting what you need. Most places sell glasses with didydium or Ace lenses, but something else may be recommended if you are using a minor burner or larger torch.

In my opinion, when you are just learning, you don't have to have a kiln immediately. When you have practiced for a while and are thinking about selling, it becomes more important. There are other cooling methods you can use in the beginning like a fiber blanket, vermiculite in a warm crock pot, or annealing bubbles. You need to learn to 'flame anneal' your beads if you are going to go without a kiln, which is just slowly backing them out of the flame until the glow is gone; something you should do anyway (but a kiln makes it less important). The beads can be 'batch annealed' in a kiln later if there is a shop that you can take them to for that.

If the beads are just learning beads and just for you, you can take a bit more of a chance with them. When your beads get larger, or if you want to add things like dichro or silver, you will lose a fairly large percentage of them to breakage without a kiln. The 'inclusions' are the thing that cause the most trouble as they cause the bead to cool differently. My theory is that they insulate the interior while the exterior cools more quickly. I know some people would disagree with me about the whole kiln issue. Now that I have a kiln, I don't know how I lived without it- but I did for quite a while. I dislike batch annealing because I think it can cause problems if done incorrectly, so I pop everything into the kiln as I go now.

Here is a list of the things I think every new lampworker needs to get started on this wonderful journey- kind of a make-your-own kit.
1)  A torch (I'm not gonna tell you what kind- you'll have to research that yourself) and everything that goes with it to get it set up, including a table to attach it to and a way to attach it to your table.
2)  Proper eyewear- see above.
3)  Mandrels- I recommend medium size- 3/32 inch- to start with.
4)  Bead release (sludge)- you can read some of my opinions about that here
5)   A way to cool your beads- kiln, vermiculite or annealing bubbles- see above.
6)  Glass- make sure you have learned about coe and that everything you get is compatible and will work with the torch you've selected.
7)  A good book about glass beadmaking- see above.
8)  Some tools! I recommend a hand held marver, tweezers, scissors (shears), a rake or pick of some kind, a striker to light your torch.
9)  A bead reamer- you can use a manual diamond reamer or an electric reaming tool.
10)  Other good stuff you might just want- a marver that attaches to your torch, a rod rest, a flat or barbeque masher, and any other tools or supplies that just look like too much fun!

So what are you waiting for????