Showing posts with label tutorial. Show all posts

Wednesday, January 1, 2014

Scarf Slides and Cleaning Big Holed Lampwork Beads

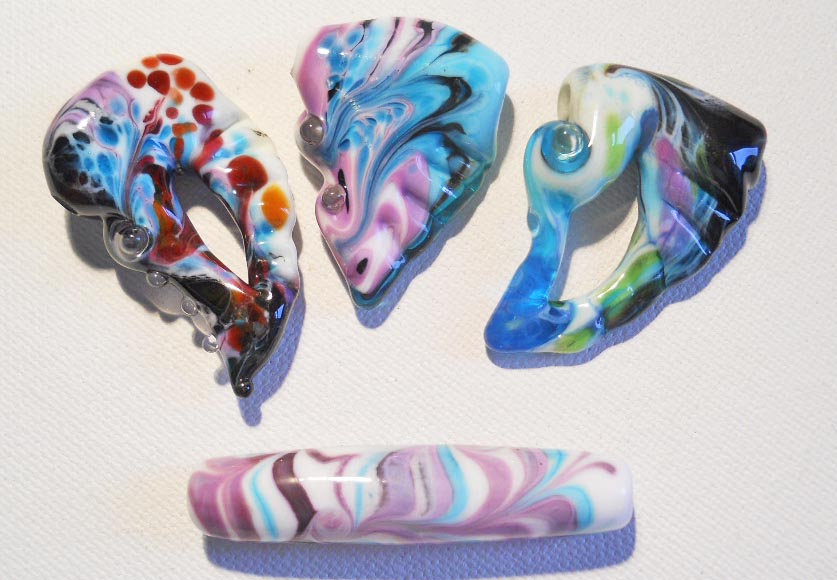
Whoot! My newest lampwork glass bead endeavor is making scarf slides. I finally got myself a really big mandrel- a whopping 1 inch- and started making beads for scarf sliders on them. Though a one inch hole may be a bit larger than needed for some scarves, they seem to be about right for rayon. I gave one to myself, one to my daughter and one to a friend as testers to see how they work out.

The huge mandrel was much easier to use than I thought it would be. It's always best to sludge and dry mandrels overnight when making any high stress beads or beads that take longer to make. The mandrel needs to start out well heated and to stay heated the whole time. These beads started out with a clear core footprint, giving them a good stiff background to work over.

Important: make sure the sludge doesn't have any little gritty bumps. These should be rubbed off of the dry sludge before starting.

Because it's really easy to see inside these beads, they need to be cleaned extremely well. After the bead is finished and removed from the mandrel, clean as usual and then sand with 220 grit and then 400 grit wet/dry sandpaper. This will smooth out the inside nicely. I have to thank Hayley for this piece of advice. It has made a huge difference in the smoothness inside my large holed beads.

A couple of useage tips for these sliders:
For safety, it is probably best to run the scarf horizontally through the slider to be sure it can't just slide off of the bottom. Making sliders with a little bit smaller hole will also solve this issue.

Sliders can be used in a number of different ways- one is to run the scarf through the slider halfway, put the scarf around your neck, and then run both ends of the scarf through the slider. The large hole will allow a silk scarf to easily run through the slider three or even four times. Here are some photos of one around my neck.

Thursday, November 28, 2013

Making Lampwork Glass Headpins Tutorial

Ever wondered how to make those cool lampwork glass headpins you keep seeing around? Here's a tutorial showing how it's done. These are really simple to make, and are pretty versatile too. I've been using them to make Christmas ornaments lately, but I've also used them for necklaces and they're great for earrings too! P.S.- for info from me on making headpins with a wonderful new tool that makes this all so much easier, look here!

As with all of my tutorials, these instructions are meant for those who are familiar with working with hot glass and torches. Your safety is your own concern. This should only be attempted by adults. 

Tools and supplies:
Copper wire-18 gauge
Small pin vise device         Scissors
Locking Hemostat            Graphite paddle 
Amber and clear glass       White enamel           
Goldstone stringer             Raku Frit


 Have frit and enamel ready to use. Mine is laying out on a piece of marble on the workbench.

Cut a piece of copper about 7-9 inches long, or whatever length you prefer; cut it at least an inch longer than you want the finished head pin to be. Flatten end of copper gently with hammer if desired. I'm adding a little caution here- some folks say you must flatten or ball the copper to make sure the copper will not pull out of the glass later, so it is most likely best to do that! Insert bottom end into pin vise. Make sure it is secure and will not pull out accidentally.

Warning- the copper will move and bounce around as you are adding hot glass. This copper is not nearly as stiff as the steel mandrels you are used to.

Heat Clear glass and add a blob to the copper, encasing about 1/3 inch of the copper in glass and being sure to cover end completely. You may find that you need to wrap the glass around the wire rather than rotating the wire and letting the glass flow on. The movement of the copper wire just makes it hard to do things the 'right' way. Since you are working at the end of the wire, it really won't cause you any problems to work this way.


Heat Amber glass and encase clear with amber glass. Yes, it's kind of blobby. I'll shape it nicely in a minute!


Roll the glass in white enamel, melt in and then roll in raku frit. Make sure the glass is pretty hot for this step as you can't really push it down well. Melt in. Rolling in the enamel and frit will help to smooth and round the glass.


 Add 4 or five stripes of goldstone
stringer working from base to tip.
Warm tip of amber rod and attach to the tip of the headpin. Twist a bit and detach rod with flame.


Heat glass to smooth. Hold vertically with tip up while hot to allow glass to droop slightly towards the back end, making sure glass is nice and smooth and there are no tiny stray bits that will crack off later. Repair if needed by adding a little glass to that end  to even up. Roll on marver to smooth further.


 Heat tip of headpin and tip of amber rod.
Attach and pull firmly to point the headpin.

Now comes the fun part- detaching the copper from the pin vise. I have found that it is quickest to lock the hemostats onto the copper about 1 1/2 inches above the top of the pin vise and simply cut through the wire. It can be really difficult to open the pin vise and pull out the wire. That can be done after the headpin has been put in the kiln.


I like to leave as much of the copper as possible sticking out of the kiln. That way it will not become dead soft from the heat. Though the copper on these can be cleaned with pickle, I prefer to soak them in warm water for a few minutes and then sand the fire scale off with 220 grit wet/dry sandpaper. The headpin may need to be hardened a bit by hammering with a rawhide mallet if the copper has become overly soft.

This tut is just a starting place for making headpins- you can decorate them in any way you please, just like beads!These are made from Italian Moretti soft glass. I've also made a few of these out of recycled bottle glass- go here for special tips about that.

Saturday, March 2, 2013

The Taming of EDP- A Lampworker's Secret

How many of you love edp (evil divitrifying purple)? Show of hands... How many of you hate it? Wait! Those are the same people. Well, I used to feel the same way... The color is beautiful, but it tends to just sit on the sidelines and watch me pass it by over and over again- the wall-flower of my studio.

The other day I was feeling adventurous and pulled a rod out  - oh, what the heck- why not. I made a portal bead base, rolled it in a bit of white enamel, and started adding some edp and other colors. And guess what? No devit- a practical miracle. OK, I'm thinking, maybe I just didn't notice it- maybe it will come out of the kiln looking ug-ly. But I'm just gonna try that again and see. So I did. And guess what- no devit again.

OK, I'm thinking, I must just be holding my mouth right today. We'll see what happens when I do this tomorrow.

And my un-scientific assessment of the situation is this. If you roll a bead in white enamel and apply the edp, you get rid of both the 'e' and the 'd' and end up with just the lovely purple you always wanted. There is a bit of edp in all of the beads pictured. I was having some other troubles with the tube, and managed to reduce some of the purple in that bead. The edp ended up a bit washed out looking in that bead as well, so there may be other odd things going on that I haven't quite figured out yet. I hope y'all will give this a try and let me know how it works for you.

Thursday, March 29, 2012

Practice, Practice, Practice! Forty Round Beads

Once in a while I get a line on something really cool in the world of lampwork. Just yesterday I saw a post about Heather Trimlett's 40 Bead Challenge. My first thought? Forty Beads??? Using no tools? Are You Kidding???
But then I passed a restless night thinking about that and a few million other things. And when I woke up this morning I was determined to give it a go!
I am not proud to say that I am a little bit 'round bead challenged'. That's right, I can make fish and cats and even draw a pelican on a bead now and then, but ask me to make a couple of spacers to match a focal bead, and I want to shout "WHY????" So off I went. I picked out a couple of contrasting colors that I don't normally work with, just so I wouldn't feel too badly about using up some of my precious glass.I took a little bit of a break after each ten, and here's where I went with it....

The first ten
The first ten beads were ok- Started off a little bit small, which is always my downfall. And what had I learned when I was done? Well, let's see- remember to look down the mandrel to make sure they are round (ish!). Hide your paddle or you may pick it up by 'accident'! Oh, and remember to have Perry Como's song 'Round and Round' going through your head the whole time! Time for a bit of breakfast and some coffee before I'm on to the next 'round'!
The second set of ten
 And here are the second ten Shoot, I'm starting to like the colors I picked, but they'll be mostly gone when this is over- looks like I'll be using about 3 rods of each by the time it's all over. It's starting to make a bit more sense to me overall. I think my brain is trying to make this a bit easier on its elderly self! And what's new? Well, gravity and heat keep working on your bead whether you're paying attention or not! So pay attention! And it's time to switch songs- Rawhide now, you know 'Rollin', rollin' rollin' keep those beadies rollin'.....
The third ten
Whoot! Halfway there. On to the next 10. When I got to bead #28(!) (third from the right) it was round pretty much all by itself- no adding a dab of glass here or a blob of glass there- it was just round. Well, at least until I added the dots.... And I've been able to add more dots than I normally succeed in adding to a wee round bead. That's called heat control my friends! The theme song here? Oh, the Beach Boys wanted to join in the fun with 'I Get Around'


The final ten
Thirty beads done and the distractions are pouring in- I was using up a little tank of propane that I'd bought for demoing, and it ran out. There is some pressure to decide what I'm doing with my life- now!- but I am determined to finish these last ten little beads! And the final theme song? Well, The song list would not be complete without a few words from Joni Mitchell in 'The Circle Game.'
Although y'all may not see a lot of progress from start to finish, I really feel good about this project. I now know I can make round beads without the use of tools or marvers, and I have a better feel for using gravity to make things nice and round.
So get on over to Heather's 40 Bead Challenge and give it a roll. You'll be glad you did!
Click here to see all of Heather's tutorials. Heather- thanks so much for this! It was best fun!


Sunday, March 18, 2012

Lampwork Glass Seahorse Bead Tutorial is Finally Here!

Whew- it's been a hectic few weeks. Lots of things happening, mostly in my mind, I think!
 I was interviewed for the Soda Lime Times this month. The article just came out a couple of days ago- they did a wonderful job! It's chock full of fun information about lampwork beads, beadmakers and tools with several nice tutorials. The April issue is all about beads and the ocean, and there's a lot of eye candy, including some of my fish, mermaids, a turtle and some seahorses.

So what better time to start work on a Seahorse Tutorial? I admit I had really big plans when I started this- why not seahorses and mermaids? I started out with seahorses and realized that I'd better just take it one step at a time. Good thing too, as I barely got it done in time. OK, so I finished it a couple of days after the article, but it was close!

So what, exactly is in this tut? You are taken- with a ton of pictures- through the making of two different seahorses with two different designs in two different orders. Why? Well, I find myself naturally gravitating towards doing it in a particular order, but I don't necessarily think it's the most logical way to do things. So I do it 'my' way the first time, and the 'right' way the second time. Oh, I almost forgot- I made a wee video that shows me doing all the 'hard' parts. And only folks who get the tut have access to the video. It's not a great movie, but I do think it helps.

What's the big deal? To me, there are three things about this tutorial that make it worthwhile.
One- the tail- the way I make the tails was a revelation to me in a lot of ways- how to make the stock as well as how to curl them up.
Two- shaping the mouth- just a little tricky for such a wee part of the creature, but little details can make a big difference.
Three- basic sculptural information- for those who aren't very familiar with sculptural beads, I really tried to explain how and why I do things the way I do them.

One other thing- I had a wonderful tester for this tutorial. Lynne of Islandgirl's Insights did an excellent job of reading, testing, and making suggestions to make this tutorial better. This is the second time she has done this for me- I can't imagine anyone doing a better job. Lynne Rocks!!!!!

Friday, March 9, 2012

Lilac glass recipe

This is just a quickie! A customer wanted me to make her a couple of masks in a lilac color. All of the purple glass I had was just too dark to work, so I started pulling rods out and holding them up to the light to see what I could do. The winner? Moretti  Light blue #052 over alabastro pink # 372 ( I think- darn- it could have been 376- both will make a nice purple. Try 'em both!). I would not recommend using this for a whole bead as I think there is a slight amount of incompatibility going on there, but the color was a lovely light purple blue.

Friday, April 15, 2011

A published tutorial

Woo hoo! I just received the June copy of Bead Unique magazine with my tutorial for making this bead style! I'm so excited! This is my first time to be published in a magazine that folks can find at their local newsstand (i.e. Barnes & Noble). The tut has info about using silver foil. If you've never tried it, this is a fairly easy place to start.

Here's a link to their website:


Thursday, January 13, 2011

Clean, clear glass for your lampwork glass beads


Sometimes things just seem to come together- like when I was listening to Abbey Road while doing my high school English assignment and realized that the Beatles had used an old English poem in one of their songs (Golden Slumbers). Got my class out of a whole day of work when I brought it along to school! Woo-hoo!

The same thing happened when I saw this information about making your clear glass really clear posted on facebook by Patty Frantz: http://frantznewsletter.com/?p=2914&preview=true

Now normally, this would just go to the back of my brain, because I am not likely to want to have any sodium bisulfate lying around. But then I mentioned it in passing to the man I live with, and he thought I was talking about dill pickles. And THAT reminded me about a library book I had been looking through that mentioned a homemade metal pickling compound made with vinegar.

So I went in search of that info on the internet and ended up here:
http://idreamicanflyaway.blogspot.com/2009/01/to-pickle-or-not-to-pickle.html
Please read through this for much more specific info about the pickling solution.

Now I had all the information I needed. Would it be possible to make my own pickling solution, use it on my glass per Patty's instructions, and end up with a beautiful clear glass? I think the answer is 'yes!' I tried it out and am very happy with the results. Please do read Patty's information- you use this the same way she suggested in her article, but this is a non-toxic solution.

First- about your safety- you are responsible for that. I am not saying any of this is safe or recommended by the AMA or the fire department!
Here's what I did-

1) Used recipe from 'I dream I can fly away'- 1 cup vinegar to 1 Tbl. salt- heated in a non-reactive (ceramic-lined cast iron a la le creuset) pot to the steaming point, stirred until the salt dissolves. I wouldn't boil this stuff.
2) Let solution cool to about 140 degrees. I put the clear and transparent rods into a 15x9 pyrex pan and poured the solution over them. Don't pour it over when it's too hot, or the rods may crack. The clear I am using for this is Moretti #006. All the transparent colors are also Moretti.

3) Put that into an oven that is set to about 150 degrees. I left the door open so it wouldn't get too hot for about 15-20 minutes.
4) Took the rods out and rinsed in tepid water to remove the salt. Handle the rods carefully or use gloves so that the rods don't get oils from your hands on them.
5) Stood the rods upright to dry on a couple of paper towels.

That's it. When the rods were dry, since I didn't have gloves, I picked them up using a plastic grocery bag, bundled them according to color using twist ties, and put them into plastic bags to try and keep all the dust from my house from getting on them. That is the next challenge- how to keep the rods clean!
You can keep this stuff in a non-reactive container and reuse it. Though I haven't tried it, it seems you can also 'refresh' it by adding extra vinegar. And when you do dispose of it, it should be neutralized with baking soda.

Yes, you still need to clean with 91% alcohol to get all those nasty fingerprints off, and you may still need to pull a bit of smutz off the tip from time to time. But this is definitely worth the time it takes- which is not much. Now I can encase without fear- if I could just do it without smear!

Here are couple of the beads made with my newly cleaned clear. I normally don't even bother with this type of bead because of the smutz factor. With that problem out of the way, maybe I'll finally get down to the business of learning to encase properly!
A very special thank you to Patty Frantz and to Jo Hollingsworth- you two rock! And thanks to Larry Scott, who told Patty about this to begin with.