I have been asked off
and on if I could make a little flat bit of glass with an indentation in it
for- sort of like a worry stone. The short answer? I had tried and not been
happy with the results. But now I've figured out a whole different way to do
this. There are a few tricks that have been working well for me, so I thought
I'd try a mini tut for the glass workers out there.
This piece is not actually just a 'worry stone', but a very small glass bowl that can be used for support spindle spinning.
First, ditch the mandrel! A large glob of glass will be built off the end of a metal chopstick to be removed later. Add 1 ~ 1 ½ rods of clear glass to the stick as quickly as possible; shaping & smoothing can happen after it is on the stick. Build the glass off of the end of the stick; don't let the stick get too far up into the glass. Clear is a nice stiff base; colors will be added over it later.


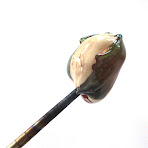
Next add colors and shape as desired. Ivory and aqua have been added here. Keep the chopstick hot as you do this. After color has been added, the glass has been heated, shaped into a cone shape, stretched and twirled back on itself.
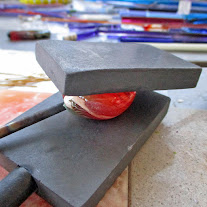
Get the glass really hot and smooth, and then flatten. Here two graphite marvers are used to press the glass. It may take a few tries to get the glass flattened to about 5/16 - 3/8 inches. Check to be sure it is even and not thicker on one end~ usually this seems to happen at the chopstick end. Just reheat and mash again. Shape the piece as you'd like it to look when finished.
It's time to move on to the indentation. After a bit of trial and error, I've settled on a couple of tools from the 'alternate craft store' (my local hardware store)~ a large smooth bolt and ball peen hammer.
Heat the flattened glass well on both sides to be sure the tool will be able to sink into it. Quickly put the hot glass on a marver and push hard with a large smooth bolt. You may need to do this a couple of times to get a good bowl. If you'd like a deeper indentation, a ball peen hammer works quite well. I use both and go back and forth between them to get the bowl as deep and wide as I want it. Remember to keep both ends of the piece warm! Heat the indented area to get rid of as many chill marks as possible.
Finally it is time to take the piece off of the chopstick. Heat the chopstick up until it is red hot, grab the worry stone with a pair of heat proof pliers and pull the glass off of the chopstick. I have not yet quite figured out how to make this end look just right; it will likely need a bit of smoothing.
Make sure to keep the whole piece hot while doing any final shaping, and flash in the flame before popping in the kiln.
Finito!
.


