Thursday, December 23, 2010

Lampwork glass beads for the holidays

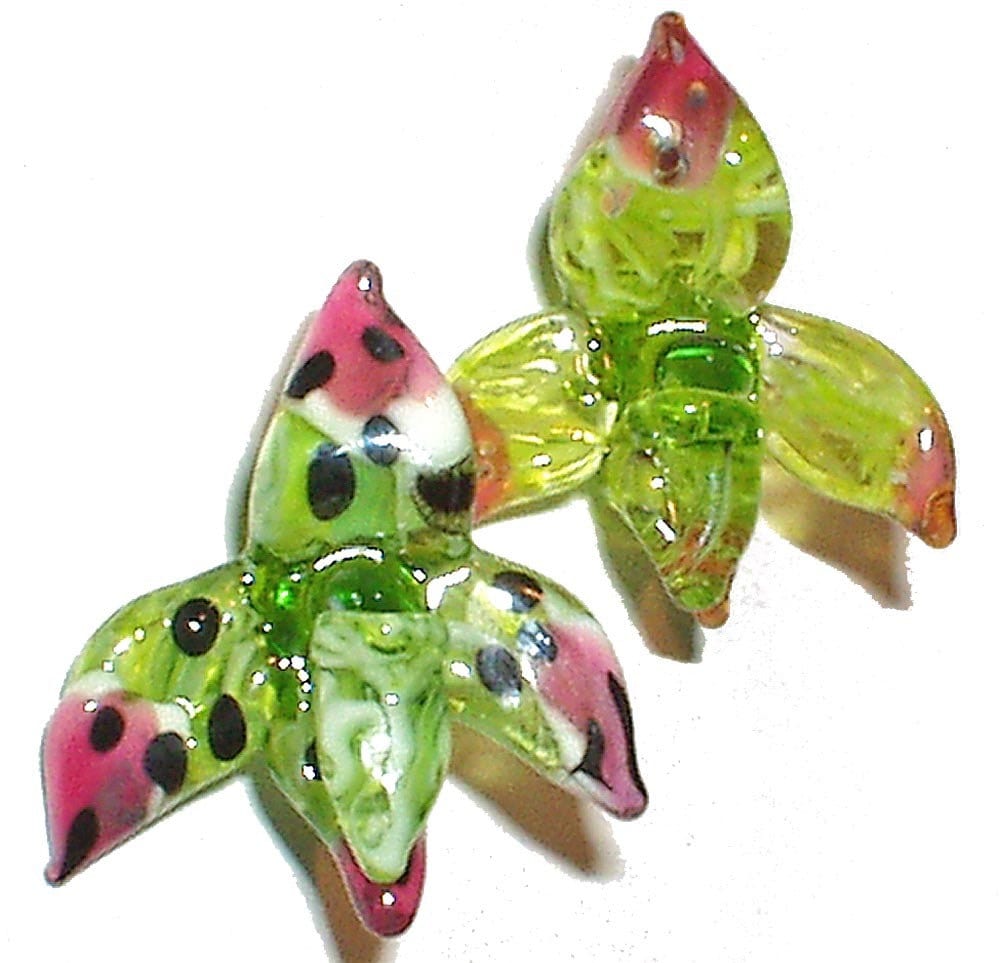
Happy Holidays all of y'all out in the blog-o-sphere (is that right?) I've been working on some big ol' beads this week, and a few glass icicles. I've made a few fish, a couple of birds, and some interesting shaped beads to hang on my tree. In order to keep them from getting lost in the shuffle, I decided to go large and see what happened. So here are the results of that experiment.

I have been asked a number of times over the years whether I can make beads bigger than I generally do, and I always say no. But I suppose I must admit that I was wrong. The answer is- we'll see. If these hold up, maybe next year I'll make some in time for some other folks to enjoy them on their trees!

Sunday, December 19, 2010


I've been working on a special request again this last week. Thought I'd just post a couple of pictures here. I've been remiss in keeping up with my blog- again!


And another kinda scary bead- I got a book on matroyshka out of the library- very intriguing...

Tuesday, November 2, 2010

Pricing bead sets

I have recently decided to try making and selling sets of beads on etsy. Mostly small sets of spacers at this point. I made several sets, timed myself and my bead cleaning buddy, and then tried to figure a price. Who ever thought that would be the hard part.

I figured that, with the time involved, expenses, etc., I would need to charge about $4-5 a bead. Hmm, that meant a set of five small spacers would be about $25. That sounded a little high, so I did some searching on etsy to see what other folks were charging. Surprise! Spacer beads for $1 to $2.

Now I'm not exactly a math whiz, but when a set of beads takes about 25 minutes to make and you charge $12 for it, that doesn't seem like it could be cost effective in any way. Sounds like a lot of money? $24 an hour? Are you considering supplies, gas, paypal and etsy fees, income tax, and the time it takes to photograph and list those beads? If you look at all of that, I'd say you might just as well cut that income in half- $12 an hour is really not that great a wage. And that wage only applies if you can sell every bead you make at the price you set.
So my bead sets are priced in between what I feel they should cost and what others might sell for. They are a bit more complex than those beads that are less, so I'm hoping that will be a good selling point. Guess I'll just have to sit here on my hands and wait to see what happens!

Sunday, October 24, 2010

The birth of the Christmas Bird

I’m not really the kind of bead maker who does anything special for the holidays, but this year there has been a bit of a change. Thanks to a special order pair of earrings, and the confluence of several ideas, I am making Christmas birds. How did this come about? I will try and explain.
First, I have been in quite a swirly mood lately. Twirls on the sides of fish, and swirls on the sides of beads have become the norm. Just a phase I suppose. Then I got an email from someone who wanted a pair of earrings to match a particular dress for his wife. I looked at the photos he sent and- wait, what is that I see- are those paisleys? And did he just ask if I ever make anything with swirls on them? Oh dear, it looked like I was going to be heading into dangerous waters. My oh-so-literal mind couldn’t just try and put paisleys on beads. I had to go the whole way and make 3-D paisleys.
As soon as I’d made the first one, I thought, “Wow, what a cool bird that would make” That idea just sat in my brain for a couple of days while I worked on some more earring choices and some other things I wanted to get done. When I made a nice red and green fish a couple of days later, I had to stop myself from changing directions in the middle and trying my first bird. It was going to be a nice fish, and I didn’t want to mess with it. But the next bead had to be a bird. And it had to be the same colors as that fish.
That little bird is now sitting on my glass table, modeling for the newest item in my repertoire- Christmas bird earrings.
Here’s the quick breakdown of the process: twirls and swirls-customer photos- paisleys- red and green fish- Christmas bird

Saturday, October 2, 2010

The cover of the Autumn Flow!

The cover of The Flow..............My tut bead- in different colors

I was pleasantly surprised when the mail arrived a couple of days ago. There was a package with three of my own personal copies of The Flow magazine, a magazine specifically for people who make lampwork glass. And my tutorial was inside. The first time anything other than a picture of one of my beads has been published. And my name was right there on the cover. There's lots of wonderful information inside- plenty of tuts and pictures! Go here to order your very own copy- I'm keeping all of mine! https://www.theflowmagazine.com/index.htm


I got so excited that I started singing- gonna get me name upon the cover, gonna buy five copies for my brother, gonna get my lampwork tut on the cover of the autumn Flow.....
With thanks to Shel Silverstein!

Tuesday, September 28, 2010

A Bit of Alchemy

Magic? You Betcha!
I love to add a bit of silver to my beads. A nice silver core, some clear, and some color action over it all is a lovely effect, and it adds that 'bling' that so many folks crave.
But a funny thing often happens when I work with silver. I can't help thinking of it as a kind of alchemy. When I put the hot clear glass over the silver foil, it often turns a beautiful gold color. What makes that happen? Well, like the alchemists of old, I really can't say. My feeling is that it has something to do with the heat of the glass that is applied over the silver. But I don't know for sure. Usually, if I apply the silver foil, burnish it on well, and apply some nice hot clear on top of it, it will turn a lovely gold color, but sometimes it is a mixture of gold and silver, and once in a while it stays just plain silver. You can see how different it can look in the photos above.
P.S. Check out the newest issue of The Flow- There's a tutorial by me about scissors- my favorite tool, along with a lot of other great tutorials.

Tuesday, September 14, 2010

Enamels- a quick tip


I'm not saying anyone should use enamels in their beads. And I am saying to use a mask and proper ventilation if you do. I do use enamels, so here's one little thing I've learned about them that has a cool look. Make your core bead. Roll in enamel- white works well. Wrap with a nice lightly colored transparent. That's it! You can see how cool it looks in the pics. No need to fully encase. I think it actually looks more interesting if you don't.

By the way, I don't care how many people say to do it, I DO NOT recommend putting your enamel in a shaker or sifting it onto your beads. Talk about some airborne micro particles that you can breathe! Ugh!

Thursday, September 2, 2010

La Vida Loca!


Hey there. most of y'all probably don't even realize I've been running about the country for the last few weeks. But I'm finally settled for the moment in the middle of nowhere in upstate New York. And I've started making beads again. Believe it or not, it's been almost hot since we've been here. That's scheduled to change this weekend, and I bet I'll be in shock.

Good thing I've got a torch and kiln to keep me warm! I'm gonna be thinking about things to blog about in the near future. Bead-related stuff, not things about the nonsense otherwise referred to as my life! Stay tuned for an exciting announcement....

Feel like I'm Living La Vida Loca!!!!

Wednesday, July 21, 2010

Keeping your cool with special orders


A while ago, an organization requested that I make items they could give as gifts. This was a whole new concept for me- making a large quantity of similar items for one group. I learned a lot (I hope!) from this experience, and thought I might try and pass on some of it.

First of all, stay on top of the project. I was first contacted a full 6 months before the date of the event. I happily made samples, and expected to hear back soon. But I didn’t. I emailed a couple of times, even called once as the date approached, but still was not even sure they wanted anything. Then the event was a month away. I did not want to push, but I know I can only move so quickly when it comes to bead making. And what if I needed more glass, silver or other supplies for the project? That’s another week of waiting. I was getting nervous. They needed a lot of pieces, and I was beginning to feel it would all be un-doable. And I really did want to do this. Not just because the money would be nice, but also to stretch myself, see how I did, and of course the exposure never hurts.

So I made my case- nicely, of course. I called- again. I hate pestering folks, but I also didn’t want to disappoint them by letting the deadline come and go. I needed 3 ½ weeks to get their order ready. That gave me a week to order supplies, and 2 ½ weeks to make, clean and bail the beads. Every day that passed made me more uncertain that I could finish this in a timely manner. While I waited, I tried to beef up my regular inventory and clear the way.

And then things began to happen.

First was the phone call. I realized then that a) they really did want me to make something, and b) they were very busy themselves, and I was being squeezed in. Emails went back and forth, and a meeting was set up. During this time, I became aware that there was a lot of communication needed about what I could and could not do. I was very straightforward about things, and twice had to flat out say no, I can’t do that. I realize now that this was because they were unfamiliar with lampwork glass, and I was not explaining it well- or at all! I thought that, since they had approached me, they understood what was involved, but this is not necessarily so. To my surprise, they did not just drop me at this point, but still wanted to meet and look at the samples, something I had been encouraging from the beginning. I don’t think this project would ever have worked without the face-to-face meeting.

So on to the meeting. This was where the design ideas I originally came up with were pretty much summarily rejected, though a small part of those designs did end up in the final pieces. Fortunately, I had brought along a few beads to show sizes and shapes. And some of them were more along the lines of what they wanted. Hooray! Now we had a design plan. I never realized that they would be able to help with the design. But this is actually quite important. It gives them, hopefully, exactly what they are looking for, and allows them to be a part of the creative process. The buyers become an integral part of the process, and the piece is truly theirs.

Ok, time was really getting short now. Nearly a week had gone by, and only now did I feel like I knew what to do. I set my alarm and got up at 4:30 the next morning to make four more samples and bring them over by 10 am. Fortunately, things went well that morning, and I ended up with four different pieces that were similar. I rushed to get them semi- clean and over to the office by 10. And the person I needed to talk to was in a meeting! Oh man. I hope she didn’t realize that I was nearly frantic by now! I’m afraid that my exhaustion and panic became apparent when she asked how I’d gotten them all ready and nice so quickly. I blurted out before I left that I did it by getting up at four am. Jaws dropped in the meeting (they were all there watching). I left in embarrassment with the promise of a call later in the day. And the time went by…. It was late Friday afternoon when I got a confirmation. And they liked all the samples- I wouldn’t have to make everything exactly the same- yay! And they only needed half of what I had originally been told! Double yay!!! Things were looking up. I don’t know what I would have done if those pieces had not worked for them.

Fortunately, I have some glassy pals in town, and there’s a glass shop too. I started calling and emailing in desperation, looking for the proper pink glass. Just enough to get the project started, so I could make things while I waited for a glass order. Here I was, again, very lucky. My pals came through in spades, and when I went to the glass shop, I found that there was some glass that would work perfectly. So there I was, set for glass, design, and having the time I needed to finish the project. Hooray! All I had to do now was make beads.

I finished the project and delivered it in two weeks- a week and a half before the event, which makes me happy, and allows them some extra time too.

And what have I learned?

1) Always be friendly and professional.
2) Be clear about what you do and what your limitations are.
3) Don’t be afraid to suggest ideas and designs, but don’t be surprised if things go a different way, i.e. be flexible. Help them to be a part of the design, and make the piece truly theirs.
4) Let them know about your deadlines. If you feel they may have dropped the ball, call or email- or both- without being pushy. They most likely don’t realize how much time it might take you to complete the project, and the considerations such ordering the glass and supplies (and finding a company that has everything you need- in stock!). Most folks are unfamiliar with how difficult it can be to simply get the needed supplies in the glass world.
5) Don’t let them see you panic. Try and hold it together, even as you see your personal deadline come and go. Of course, don’t let it get to the point that the project is un-doable. So what is your absolute deadline? This can be difficult to know with a large project.
6) BE NICE! Some of the ‘extras’ included at the end of my latest project:
...Tiny tags that have their event information on the front, and information about the beads and my email address on the back. That’s good for both of us!
...Little favor boxes that I picked up at the dollar store. Ok- I probably should have asked what they wanted and added a box charge to the items. Next time I may do that.
...Three extra pendants. I always make a few extras, and included these free of charge ‘just in case.’ What if they forgot someone? Anyway, this was their design, and what else could I do with them?!
7) And lastly, be thankful when the project is successfully finished- thankful for the opportunity, the learning, and of course the added income!

Sunday, July 4, 2010

Neapolitan Man and the new Vetro colors from Frantz

I'd like you to meet 'Neapolitan Man'.
He's made with the six new Vetrofond colors that I just received as a sample from Frantz Art Glass- pale pesto, biscotti, cream, verde, purple and mauve. The only other things I used were some Moretti clear and intense black. Oh- and I forgot, a little bi ant of raku frit, which reacted nicely with the purple.


Sometimes I see a bunch of rods together and it says-
'look how well we go together- why don't you make something out of just us?
No other colors allowed!'
And thus Neapolitan man was born. Just seeing the words pesto, biscotti and cream made me hungry! So naturally, he had to be named for some kind of Italian food too!

Thursday, June 10, 2010

Bead Wearability

I make beads of glass. What do people do with them? Well, mostly, they wear them. Whether they put them in a piece of their own making, a necklace or bracelet I've made, or a pendant, they want to put 'em around their necks and prance around!

Over the years, I've had a few folks who were baffled by the whole idea of wearing, say, a fish or even a mask. One shop owner asked about the fish- what do people do with these? When I told her they mostly wore them, she simply didn't believe me! Another customer brought a bead back because it was too round and it rolled when she wore it. I exchanged it for earrings, and wondered how the round part had gotten past her to begin with. And I actually let it affect my bead-making style when she said I should only make flat beads- look around my shop, and you'll see very few of the round variety. That's not the ONLY reason for that, but it did have an impact.


Anyway, I'm here to talk about some of the things that I think about when I make my beads to insure that they 'wear' properly.

A big consideration is BALANCE. Your beads need to hang right side up when they are strung- or at least mine do. That means the bead needs to be bottom heavy. I get around that much of the time by making the holes in my beads go from top to bottom rather than from side to side, like in my fish and heart beads. If the hole goes from side to side, it will look more like my large-holed hearts.


Another consideration is FLATNESS. My fish have fins sticking off of the sides, but they don't stick straight out- they are pulled so that they are parallel to the body, but not quite touching it. I don't want bits sticking out all over the place that can break off easily, or that stab my poor customers while they're wearing them.
And then there's BAIL-ABILITY. (Ok, that can't be a real word.) There needs to be an area at each hole end of the bead where silver or a 'seater' bead can get close enough to hold the bead where you want it to stay. This means that there can't be bits of glass sticking up past the end of the hole that make it impossible to put something next to the glass. Hearts are always a challenge when it somes to this, as their lobes do stick up past the bead hole.

And speaking of bailing and stringing, I've found small silver saucer(as in flying saucer) shaped beads to be the perfect seater beads- they sit themselves right down in the bead hole, and take the stress of the bailing so that it can be nice and tight.
That's all I can think of right now! Stay tuned for more nit-picking rantings of an obsessed lampworker.

Tuesday, June 1, 2010

Under the Sea

Well, I'm just bloggin' 'cause I'm sittin' here waitin' for an answer to an online question. Wanted to show a few underwater creatures, and wonder why folks like fish, turtles, frogs, shells, starfish, mermaids and other things so much. And what other underwater creatures can I make? I did make a squid once- well, twice really, because I didn't like the first one. Anyway, here are a few of my current favs.


Wednesday, April 28, 2010

Flower Tut is Finally Finished!

I finally got it done and ready to sell in my etsy shop- a tutorial about making four different kinds of glass flowers- a lily or star flower, an aster, a simple iris and a fancy lady's slipper orchid. So here's the link to that:
http://www.etsy.com/listing/45703612/lampwork-glass-flower-bead-tutorial-lily


Sunday, April 18, 2010

A Surprise Publication

Yesterday I was making my way through the new books at the library, when I saw a book called Earrings, Earrings, Earrings pulished by House of White Birches books. As I was flipping through it to see if I needed to check it out, I flashed by a pair of earrings. And then I went to that page again- there was something about those beads.....
Thanks to a wonderful jewelry maker named Ishita Ghosh, there were a pair of earrings and a matching bracelet using a few of my 'earthy' style beads- a very short- lived phase in my bead making history. Ishita bought some beads form me a couple of years ago, after we connected thanks to an article about her on the Artbeadscene blog. These are the beads she purchased

Here's Ishita's website, so you can see some more wonderful examples of her work:
Here's a link to the actual piece that was in the publication:
Thanks to everyone involved for this!

Tuesday, March 9, 2010

Orchids and other flowers


Well, I've been working on three dimensional flowers lately. It's something I've played with from time to time over the years. Since I haven't really seen anything that looks like the ones I make, I've been taking pictures and started writing a tutorial. I've written lots of mini tuts and published them here, but never tried a big old tut.


The tut I'm currently writing will start with a simple lily, then graduate to a purple aster-like flower that has two rows of petals. But yesterday I finally got to work making something really over the top. This is the flower I want to include instructions for as the final piece in the tut. The two I made yesterday turned out quite nice. I'm hoping to be able to do it again, and refine it just a little for the sake of speed and ease. But I was so happy with these- they are kind of big for me- between 1 and 1 1/2 inches across. I know that doesn't seem like a lot, but it looks HUGE in real life.

The tut and a couple of the flower beads are going to be a part of the ISGB auction next month. I think they'll be up for sale in the last week of the auction. If you haven't heard about that auction, keep your eyes peeled for news. I'll post something here when it begins. There are going to be a lot of amazing pieces for sale, by a lot of wonderful lampworkers- and me! And it's all to benefit the International Society of Glass Beadmakers.

Friday, February 19, 2010

Published in The Glass Bead !

I was so excited today when I got my copy of The Glass Bead in the mail from the ISGB (International Society of Glass Beadmakers). It included a picture of one of my seahorses in the 'eye candy' section. I had submitted some photos a few months ago, and thought one was going to appear this quarter, but I wasn't sure 'til I got the magazine.
But the big surprise was the picture of one of my butterflies in an article by Jim Kervin about butterfly beads and the Beads of Courage program. There was even a link to my butterfly tutorial on this blog, and to the youtube video. I'll include those here just in case you're looking:


Friday, February 5, 2010

New Orleans 'Inside-Out'


You thought maybe I was kidding bout the Who Dat?' chips? The fleur de lis is my latest, New Orleans inspired, bead.

OK, any of you who have been paying attention know that I nearly never talk about my personal life here. But when life and beads cross paths, anything's fair game! I grew up in New Orleans a long time ago. I actually lived there for over 20 years, and in many ways still think of it as home. I have no family there, and have lost touch with friends, so I see N.O. like a regular tourist these days- staying in hotels, eating out, etc. Here are a few of my 'inside-out' tips for any of you who may feel inclined to visit.

The first, and most important issue to discuss is food and water. First is the water issue. I brought my own, and would advise that or buying it there as the best policy. Why? Well, New Orleans gets its drinking water from the muddy Mississippi River. 'Nuf said!
Before I go any further, just let me say- I hate spending money to eat out. Yes, the food in New Orleans is wonderful. But you don't have to spend an arm and a leg to enjoy it. You can hang out in the quarter, go to the big name restaurants, and spend your inheritance there. Or you can eat beignets and cafe au lait at the Cafe du Monde for breakfast, eat lunch in the CBD across Canal Street from the Quarter, and eat dinner at one of the restaurants in the River Bend area- a short streetcar ride away. And the food is great all over!

And yes, they're streetcars, not trolleys. The drivers are like local tour guides, and seem delighted with this. Many of them announce things along the route, and they're happy to answer questions. And to the ridiculous question 'do you have to have exact change?' Have you ever been on public transportation that gives you change??? Actually the streetcar drivers are so used to the tourists that they've got a couple of plans in case you forget your change. You can just go ahead and pay $5 and get a pass that's good for the rest of the day. Or, there's something I call community payment. If you get on with a five, and only want to pay one way, the next three people to enter will give their money to you rather than the driver!

While you're in the Riverbend area, be sure to visit some of the local shops on Dublin Street (like Nuance Glass, which now has a few of my things), and on Maple Street- like the Maple Street Book Store. Do you really want your souvenir of New Orleans to be made in China? There are many shops in the French Quarter, the River Bend, Magazine St. and all over town that sell wonderful local art and crafts. And there are monthly art and craft fairs in different areas of town most weekends. Get the newspaper to see the when and where of these.
If you're driving, be sure to stop at the tourist info place at the border and pick up some hotel coupons. Though many of the hotels will charge you more than the coupons say, they will still get you a bit of a discount. The place where I stayed had a coupon which included free parking- that alone is worth about $30 a day! If you can leave your car at home, do. You won't need it, or even want to drive it around the city. The streets are a mess, the traffic's bad, and you need to watch out for those pesky streetcars if you are foolish enough to try and drive on St. Charles. Driving down Royal or Bourbon streets during the times they are open is just plain foolish. The pedestrians are in the street whether it's closed off or not. Speaking of pedestrians, if you're trying to cross Canal or any of the downtown streets on foot, be careful! I'm not going to tell you how to do it, but there is an art to it, as there is to so much in the Big Easy.

OK, I'm about done, I guess. My bag of Zapp's 'Who Dat?' chips is , sadly, empty. And I can't think of any other advice right now!

Friday, January 22, 2010

Glass Squid

Just a quick blog to show the fun piece I made for my daughter's birthday. She has this thing about squids- don't ask! I've been wanting to make one of these for years, and I finally got brave enough to try. So here it is- Ta-Da!


Wednesday, January 13, 2010

A Quick Pile of Leaves


I have an order for a pile of leaves, and thought I might as well take some pics to show how I do this. A nice, simple shape for the newbies in the bunch! I ended up making a youtube leaf making video- check it out!
Here’s a photo tutorial to make these quick little leaves- they only take about 5 minutes!
1) Make a small base bead- shape ends nicely.
2) Decide which part you want to attach the leaf on, and melt a blob of glass onto that point. Make it kind of globular, not just a flat bit of glass.
3) Add layers of colors around that- I usually do that twice- here I’ve added two lines of clear on each side, then two lines of another green.


4) Dip in one or two colors of frit for some random coloration, or just add some squiggles of this and that.
5) Heat the leaf part of the bead to a nice glow- not completely sloppy, but pretty hot.
6) Get out your leaf press, and press into a rough shape. Try and center the leaf press on the glass before pressing.

7) Use your glass shears to further shape the leaf, and to make some nice deep vein lines.
8) Do the last step again if needed. You can also use your marver or paddle to help shape the leaf into a bit of a cup-like shape instead of having it be flat.
9) Heat the tip of the leaf, touch with a warm (not hot) rod of glass, and pull the tip of the leaf into a point if desired.
10) Pop that baby into the kiln.

The second series of photos shows how to do a leaf without a leaf press. Just follow the above directions, and press with a flat press rather than a leaf-shaped press. I really only use the press for rough shaping- then I like to tweak it a bit, so they all look different.
The leaf press is a wonderful tool for demonstrations- your onlookers get that ‘A-ha’ moment when they see the bead come out of the press. And it’s quite quick, for those with short attention spans!