Monday, December 20, 2021

My own spindle sticks

I've been telling myself (and a few other people) that I really need to figure out how to use a lathe and make my own spindle sticks for a while now. I am venturing down that road (with a bit of trepidation). Why bother, you ask? Well I have found precisely one person who can make the sticks I need for a sensible price. Well, for any price, really. And what if Hershey Fibers gets tired of it? Then I will have a pile of stick-less whorls lying about and no one will know what to do with them! So~ away we go!

For starters, using a lathe is a little fun, a little hard on one's body and a little scary. There's a whole lot of shakin' going on! And I am no spring chicken. Secondly, these thin sticks take some finesse. As they thin out, you need a sharp tool to do the work for you, no pushing allowed. I am working at The Hub, and the tools seem a bit over used. So I switch to sand paper near the end. And then I get tired of standing there and just stop and bring it home to finish it. Which is kind of silly as it takes a lot longer to finish by hand!

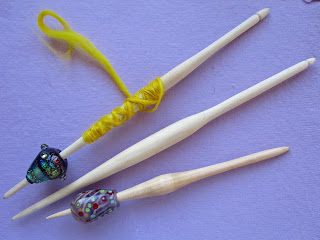
Anyway, I am fairly pleased with the results. I've paired some whorls up with particular sticks in my etsy shop. How are these sticks different?

  • They are a bit thicker than the ones I can buy, which I like~ they feel firmer in my hand. 
  • The 'flick area' is thicker. I am working on narrowing that.
  • The centers are wider; the shape is not quite what I envisioned, but they're on the way!
  • Some of them are shorter, which is also my preference.
  • They can be notched for drop spinners more easily.
  • They are not all the same. This means that specific whorls work best on specific sticks. I'll be working on getting things a bit standardized in future, though I like that they are not all perzactly the same!
  • A little oil & beeswax finish is rubbed on.
  • Right now I am working with poplar, but Urban Timbers just may be able to provide me with some locally saved wood. I love that idea!

Sunday, May 16, 2021

A Special Whorl Video Showing the 'Wagon Wheel' Effect


 I really expected that this would have a more interesting name than the 'wagon wheel' effect. Anyway~ see how it looks like the whorl is reversing directions while it's spinning around? Not true! It's an optical illusion created by quickly flashing lights and your brain's trying to make sense of what it's seeing! So cool.
This was a special request whorl, which I did not think I would be making. But one day I thought, oh why not give it a try? And hey presto, a whorl with a face on it. And it spins pretty nicely too!

Wednesday, April 21, 2021

Lampwork Glass Beads~ 'Frit Stacking' Ideas

 So... I'm sure many, if not all of y'all bead makers, have some frit mixes lying around. Back when I first started to make beads, I didn't use frit. And it was in the old 'dinosaur' days before Val Cox and her 'Frit Secrets' book came out, so frit mixes were not yet a big part of the glass bead world. Nowadays, a  nice mix of frit can decide the colors of a bead, making that part of the process easy. They are a useful crutch, especially for days when one is feeling a wee bit less than inspired. Just grab a mix and enjoy making the bead! Val's book has a lot of different ideas for how to use frit in a bead; it is a great resource. 

I often feel like I am kind of cheating when I use a prepared frit mix in a bead and it takes a little bit of the creativity away, so I try not to lean on them too heavily. That said, I seem to be in a bit of a frit loving stage. I mean Gaffer's or Reichenbach's royal purple or purple rose frit is simply irresistible! 

While thinking about some of the things that happen when a couple of different frits are mixed, or just a touch more of something is added to a mix, I realized that maybe the frit colors could basically be stacked instead of using them all at once in a mix. Say, for instance, you are inspired by the colors in a violet. Instead of using green and purple together, why not put on some green and then add some purples randomly on top of it. Would this not give more of a violet feet to the whole bead? (Without all the trouble of having to actually put wee violets all over it). How about rolling the bead in a larger size purple frit and then a smaller one~you can see in this example that little bits of purple are on larger dots of purple. Those larger bits of purple must have been sticking out when the smaller purple frit was added, making it look like glass dots were placed on the larger purple bits. Another fun idea!

Today was a 'frit stacking' experiment day. I was pretty happy with the results. As a bonus, interesting reactions sometimes occur between the frits. Here are a couple of the beads and how they happened.

This pink bead started with a base of clear, then CIM rose quartz with triton frit at one end and then another layer of clear all around. The triton was reduced to bring out some shine and then encased for a little extra background play, though that was rather lost in the shuffle after everything else was added. Some Reichenbach iris amber green, opal raspberry and copper ruby were added over the clear layer. These three frits were all about the same size. You can see that some rather interesting things ended up happening on this bead.


Another bead was a play of organic colors and purples. I didn't write down the colors on this bead, but I believe I started with a background of amber green iris (which changes colors a bit as you go), then some large Reichenbach purple rose frit, and then small Gaffer purple rose, which I put all the way across the bead. I don't believe I added any actual green frit to this bead; the iris amber green can make its own green in some instances.


Here are closeups of both of these beads to show some of the yummy reactions that happened!


Saturday, April 10, 2021

Viking Inspired Whorl Ideas~ New Glass Whorl Styles

It's time to talk about whorls again! For the last several years I have been making handmade glass whorls that are used for Viking style spinning. Slowly but surely, things keep moving along. First there were single whorls, then pairs of whorls that spun together, and now I seem to be in a phase of making longer single whorls. My busy brain is always ready to pursue a new idea; then it seems I abandon old things and move on! 

There are a few different design ideas affecting my whorl making these days. First and foremost are single conical whorls, which are a bit longer and thinner than past styles. The shape simply appeals to me. It seems like the extra weight near the center is making them spin nicely and possibly longer than the shorter, wider whorls. The conical shape also allows extra weight at the outside edge. Some extra added glass 'bobbles' can add yet more weight at the outside, as well as visual interest. 

The next thing is colors and designs~ oh my! This is where I get excited. I've been making a lot of two-tone beads with a line of something or other swirled between. Sometimes there's a touch of frit (wee bits of broken glass) involved, or goldstone, or a glass that changes colors and reacts in the flame. I may even add a little handmade murrini to jazz up the bobbles between the colors. There's often a bit of a 'happy accident' involved (and sometimes an unhappy accident~ ha,ha). The style can seem rather simple, but again, the look just hits me right.

  Finally, there's encased silver foil with frit or murrini or something trapped within or added on the outside. These are not new techniques for me, but not something I've concentrated on much in the world of whorls. An additional part of this idea is something I am calling an accidental whorl, though it has now become an 'accidentally on purpose' whorl. These babies tend towards a round or bicone shape and were originally made to be worn. One day I made one that seemed just a little bit too large to actually wear and still stand upright. I popped it on a spindle and, well, it spun like a top. Because these were originally meant as wearable beads, the holes are straight. 

One more little flight of thought~ one may wonder, why not just make whorls like the wearable beads? Can it be done? Of course it can, however... I often find that a particular type of bead begs a particular shape or design. I could not tell you why! Have I ever made a bead that is similar in shape and design with a tapered hole? Why yes, but it seems it is not something that my brain directs me to do with ease!

Here's that red accidental whorl spinning its little heart out!


Saturday, February 6, 2021

Wool Felting in a Plastic Bag

So... Roc day (Distaff day, the day after epiphany) has come and gone. This is a special day for spinners, the time for the women to get back to work after the 12 days of Christmas have passed (the men get to wait until the Monday after epiphany. Hmm...). In celebration, I made a short (20 min.) video about how to make a felted woolen coaster inside a plastic zipper bag. An idea for a 'make & take project or a quickie workshop with kids or something like that. The video pretty well tells the whole story, but there may be a few things I can add here. 


~ I neglected to mention that the first layers of wool should be placed at 90 degree angles to each other. They will mesh best that way. For a third layer, I often place the wool at something like a 45 degree angle and it seems to mesh fine.
 
~ Many people say to use warm soapy water to felt. I find the warmth is not all that important. As far as soap, it should not be too frothy or the wool might just start slipping about. 

~ The blue bubble wrap I mention is some kind of industrial strength builders supply stuff, I think. You could also cut up a shipping envelope from something you received in the mail; they can be pretty sturdy.
 
~ I didn't really roll the pre-felt with a pool noodle 100 times. As it turned out, I probably only did it about 50 or so. It came together pretty quickly. And, since you want 'sticky outtie' bits of wool all around, you don't want to overfelt at that point. 

~ I mentioned that I would often use white wool when making the prefelt. The reason for that is because I feel it makes the colors on the outer design show up better and not get muddy looking. And it creates a buffer between the two outside designs too, so they won't interfere with each other.

~ The 'confetti' should really have a touch of wispy wool over it here and there just to be sure it will be well attached.

~ Don't be afraid to get a bit rough with this. It will help it felt better if it is tossed, pounded and pummeled a bit after eveything has been added.

Well, I've really got to watch the video again to see if there are other tips to add~ but in the meantime, I'm going to publish this wee blog post to make the video more 'find-able'.
Cheers~