Showing posts with label glassbead studio. Show all posts

Sunday, September 3, 2023

Bumps and Bobbles and Whorls

It seems everyone has an opinion about raised bumps on beads. Do you like the feel of them, the fact that they add texture to your beads? Or do you prefer the smooth look and feel of the glass all by itself? Long ago, I was a 'no bumps please' bead maker. But now? Oh give me some texture!
For glass whorl making, bobbles have a purpose beyond looks. They add a little weight to the whorl, which often seems like a good thing. And if they are placed all around the outside, they can also affect the speed and length of the spin. Oh, it's physics, and I am not so good with physics. But it does change how things go around.

To quote Wikipedia:  'Whorl shapes vary greatly and can include ball-shaped, disk-shaped and cross shaped whorls. The shape and mass distribution of the whorl affects the momentum it gives to the spindle while it is spinning. For example a center weighted whorl will spin very fast and short, while a rim-weighted disk-shaped whorl will spin longer and slower.[9]'

So, first I make a nice smooth whorl. Then maybe I add some swirls here and there, either evenly all around the bead, or maybe just randomly. Then I wonder if it might need just a little more weight, or if accent bumps would look nice. And then, well, does it need raised bumps around the center to make it spin a bit longer? And, if it happens to be a sea urchin whorl, then bumps and bobbles are a definite part of the design!

Oh, looking through that article, I see spindles are associated with a number of goddesses. Hmmm... going to have to let the brain wheels spin around that for a bit!

Tuesday, January 25, 2022

Making Glass Worry Stones

I have been asked off and on if I could make a little flat bit of glass with an indentation in it for- sort of like a worry stone. The short answer? I had tried and not been happy with the results. But now I've figured out a whole different way to do this. There are a few tricks that have been working well for me, so I thought I'd try a mini tut for the glass workers out there.
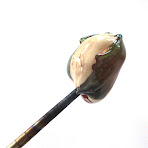
This piece is not actually just a 'worry stone', but a very small glass bowl that can be used for support spindle spinning.

First, ditch the mandrel! A large glob of glass will be built off the end of a metal chopstick to be removed later. Add 1 ~ 1 ½ rods of clear glass to the stick as quickly as possible; shaping & smoothing can happen after it is on the stick. Build the glass off of the end of the stick; don't let the stick get too far up into the glass. Clear is a nice stiff base; colors will be added over it later.   


Next add colors and shape as desired. Ivory and aqua have been added here. Keep the chopstick hot as you do this. After color has been added, the glass has been heated, shaped into a cone shape, stretched and twirled back on itself. 


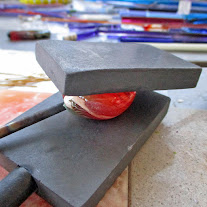
 Get the glass really hot and smooth, and then flatten. Here two graphite marvers are used to press the glass. It may take a few tries to get the glass flattened to about 5/16 - 3/8 inches. Check to be sure it is even and not thicker on one end~ usually this seems to happen at the chopstick end. Just reheat and mash again. Shape the piece as you'd like it to look when finished.


Here's one of those special tricks~  make the hanging or wearing hole now, rather than at the end. Making the hole now will keep the glass from getting distorted later; do keep this area hot as you work on the rest of the piece. 
Thin the top end slightly with the corner of some mashing pliers to make a triangular flat spot; then use a pair of biter tweezers and a pick (or something better like Peter's tweezers) to make the hole. Rotate the pick or stretch with the tweezers so the hole will be large enough for a cord to pass through. Be sure to keep this area warm while you're working through the rest of this piece.
 

It's time to move on to the indentation. After a bit of trial and error, I've settled on a couple of tools from the 'alternate craft store' (my local hardware store)~ a large smooth bolt and ball peen hammer.

Heat the flattened glass well on both sides to be sure the tool will be able to sink into it. Quickly put the hot glass on a marver and push hard with a large smooth bolt. You may need to do this a couple of times to get a good bowl. If you'd like a deeper indentation, a ball peen hammer works quite well. I use both and go back and forth between them to get the bowl as deep and wide as I want it. Remember to keep both ends of the piece warm! Heat the indented area to get rid of as many chill marks as possible.


Finally it is time to take the piece off of the chopstick. Heat the chopstick up until it is red hot, grab the worry stone with a pair of heat proof pliers and pull the glass off of the chopstick. I have not yet quite figured out how to make this end look just right; it will likely need a bit of smoothing.


Make sure to keep the whole piece hot while doing any final shaping, and flash in the flame before popping in the kiln.

Finito!


.


Monday, December 20, 2021

My own spindle sticks

I've been telling myself (and a few other people) that I really need to figure out how to use a lathe and make my own spindle sticks for a while now. I am venturing down that road (with a bit of trepidation). Why bother, you ask? Well I have found precisely one person who can make the sticks I need for a sensible price. Well, for any price, really. And what if Hershey Fibers gets tired of it? Then I will have a pile of stick-less whorls lying about and no one will know what to do with them! So~ away we go!

For starters, using a lathe is a little fun, a little hard on one's body and a little scary. There's a whole lot of shakin' going on! And I am no spring chicken. Secondly, these thin sticks take some finesse. As they thin out, you need a sharp tool to do the work for you, no pushing allowed. I am working at The Hub, and the tools seem a bit over used. So I switch to sand paper near the end. And then I get tired of standing there and just stop and bring it home to finish it. Which is kind of silly as it takes a lot longer to finish by hand!

Anyway, I am fairly pleased with the results. I've paired some whorls up with particular sticks in my etsy shop. How are these sticks different?

  • They are a bit thicker than the ones I can buy, which I like~ they feel firmer in my hand. 
  • The 'flick area' is thicker. I am working on narrowing that.
  • The centers are wider; the shape is not quite what I envisioned, but they're on the way!
  • Some of them are shorter, which is also my preference.
  • They can be notched for drop spinners more easily.
  • They are not all the same. This means that specific whorls work best on specific sticks. I'll be working on getting things a bit standardized in future, though I like that they are not all perzactly the same!
  • A little oil & beeswax finish is rubbed on.
  • Right now I am working with poplar, but Urban Timbers just may be able to provide me with some locally saved wood. I love that idea!

Sunday, May 16, 2021

A Special Whorl Video Showing the 'Wagon Wheel' Effect


 I really expected that this would have a more interesting name than the 'wagon wheel' effect. Anyway~ see how it looks like the whorl is reversing directions while it's spinning around? Not true! It's an optical illusion created by quickly flashing lights and your brain's trying to make sense of what it's seeing! So cool.
This was a special request whorl, which I did not think I would be making. But one day I thought, oh why not give it a try? And hey presto, a whorl with a face on it. And it spins pretty nicely too!