Showing posts with label lampwork. Show all posts

Sunday, September 3, 2023

Bumps and Bobbles and Whorls

It seems everyone has an opinion about raised bumps on beads. Do you like the feel of them, the fact that they add texture to your beads? Or do you prefer the smooth look and feel of the glass all by itself? Long ago, I was a 'no bumps please' bead maker. But now? Oh give me some texture!
For glass whorl making, bobbles have a purpose beyond looks. They add a little weight to the whorl, which often seems like a good thing. And if they are placed all around the outside, they can also affect the speed and length of the spin. Oh, it's physics, and I am not so good with physics. But it does change how things go around.

To quote Wikipedia:  'Whorl shapes vary greatly and can include ball-shaped, disk-shaped and cross shaped whorls. The shape and mass distribution of the whorl affects the momentum it gives to the spindle while it is spinning. For example a center weighted whorl will spin very fast and short, while a rim-weighted disk-shaped whorl will spin longer and slower.[9]'

So, first I make a nice smooth whorl. Then maybe I add some swirls here and there, either evenly all around the bead, or maybe just randomly. Then I wonder if it might need just a little more weight, or if accent bumps would look nice. And then, well, does it need raised bumps around the center to make it spin a bit longer? And, if it happens to be a sea urchin whorl, then bumps and bobbles are a definite part of the design!

Oh, looking through that article, I see spindles are associated with a number of goddesses. Hmmm... going to have to let the brain wheels spin around that for a bit!

Monday, October 3, 2022

Torch Time Again!

 Good golly, I have not been blogging much! Just popping in now to say my torch is back up and running after being on hiatus for a couple of months. I've started out with some fancy silver-cored fish pendants and glass whorls for spinning yarn.
New curved beads are on the to-do right now list! We'll see how that goes~ they are always a bit of a challenge.


Monday, December 20, 2021

My own spindle sticks

I've been telling myself (and a few other people) that I really need to figure out how to use a lathe and make my own spindle sticks for a while now. I am venturing down that road (with a bit of trepidation). Why bother, you ask? Well I have found precisely one person who can make the sticks I need for a sensible price. Well, for any price, really. And what if Hershey Fibers gets tired of it? Then I will have a pile of stick-less whorls lying about and no one will know what to do with them! So~ away we go!

For starters, using a lathe is a little fun, a little hard on one's body and a little scary. There's a whole lot of shakin' going on! And I am no spring chicken. Secondly, these thin sticks take some finesse. As they thin out, you need a sharp tool to do the work for you, no pushing allowed. I am working at The Hub, and the tools seem a bit over used. So I switch to sand paper near the end. And then I get tired of standing there and just stop and bring it home to finish it. Which is kind of silly as it takes a lot longer to finish by hand!

Anyway, I am fairly pleased with the results. I've paired some whorls up with particular sticks in my etsy shop. How are these sticks different?

  • They are a bit thicker than the ones I can buy, which I like~ they feel firmer in my hand. 
  • The 'flick area' is thicker. I am working on narrowing that.
  • The centers are wider; the shape is not quite what I envisioned, but they're on the way!
  • Some of them are shorter, which is also my preference.
  • They can be notched for drop spinners more easily.
  • They are not all the same. This means that specific whorls work best on specific sticks. I'll be working on getting things a bit standardized in future, though I like that they are not all perzactly the same!
  • A little oil & beeswax finish is rubbed on.
  • Right now I am working with poplar, but Urban Timbers just may be able to provide me with some locally saved wood. I love that idea!

Monday, November 16, 2020

A Short Story About the Birth of a Glass, Felt & Suminagashi Studio

Here's a little something I've never thought to do~ write up a wee bio for public consumption. So here's a bit of information I think folks might find interesting about me and my work.

Work, you say? Well, that's what we call it around here! I began making lampwork glass beads in 1999 when I purchased a bead making kit for my daughter (ha,ha). She rushed off to college in short order, where she was not allowed to have a torch in her dorm room ~ who knows why? So I was left with a torch, a book, a bunch of glass and time on my hands. I made beads. And more beads. And I found that there was a lot I didn't know, so I made yet more beads. And bought more books, and more glass. The internet intruded with its wealth of information, and then I found there was yet more to learn. A vicious cycle to be sure! And so Isinglass Design was born.

At this point, I've learned so much that I've shared a lot of it on this blog. Take a look around for tutorials and general gibberish about lampwork bead making.

You can see some of my old work on flickr and more recent stuff on pinterest, or pop over to my facebook page. You are also allowed to follow me on instagram if that's more up your alley. Of course there's stuff for sale in my etsy shop~

But bead making is not all I do in the world of arts and crafts these days. I started working with wool and making felt in about 2015. I've made scarves and bowls and puppets and purses. Right on this blog I show how some of those things were made. Look here to see how I got interested in the world of fiber.

And then, more fool me, just before we were all sequestered, I went to an introduction to suminagashi workshop at the local library. So now I play with ink and paper when I can think of nothing else to do! Want to try it yourself? Read here for a bit more info.

Surely no one needs to know more about me than this? But truly, if you look around this blog and watch me on instagram, you will definitely know more than you bargained for!

P.S. my name is Laurie~ yeah I did forget that bit...


Thursday, January 18, 2018

A Treatise on Artisan Pricing for Your Handmade Work

lampwork glass beads fro Isinglass DesignThis is not to be a blog on how to price your work. If you're looking for that, check out Laura Bracken's jewelry and craft pricing calculator.

What I wanted to talk about here is a bit about the vagaries of pricing artisan handmade work. Yes, you need to take your supply cost and time into account. Also all the training you've done to get to where you are today. But there are other elements that can come into play. I think of it as the 'because I say so' factor. I have jokingly said this to customers from time to time (if I think
they will understand that it IS a joke), but there is a big element of truth involved in that statement. Only I understand exactly how a particular bead was made and what it took to do it. There are pieces I love because I am so happy with the success of the technique involved. But the customer has no clue about that. If you meet me in person at a market or show, I am likely to try and encapsulate the technique used that I am so delighted with. But as a customer, you'd probably have no clue what I was talking about. Most folks smile and nod~ their take away is probably something like 'well the artisan is pretty excited about that piece, so there must be something special about it.' ( I hope they're not thinking- 'well SHE'S certainly proud of herself!).
Colorful handmade wet felted bowls from Isinglass Design
Does size matter? Well, in perceived value, it probably does, but in reality, size is not the main determining factor in my own price structure. If you look at my etsy shop you will see that most pieces of the same type are pretty close to each other in price. Even though there are some pieces that I am really happy with and some that I feel are more average, I determine a basic price for the type of item and then stay within that range. The base price is pretty much a result of the time I normally spend making a piece of that type. Some pieces take a little less time, some considerably more, but time is not the only thing that makes a piece more or less valuable to me. And since I'm the one making the decisions around here, the prices I determine on are the ones I'll use. Why not charge more for the pieces I like better? Well, as my mom used to say 'it all comes out in the wash.' It is true that, just because I like something, that doesn't mean it will be a customer favorite. And just because I am not impressed with something else doesn't mean it is inferior. Again, perceived value comes into play. What the customer likes will seem more valuable to them than the pieces that didn't catch their eye, regardless of what I tell them. I would never say- 'oh I hate that piece, you should get this one instead, it's nicer!'- regardless of what I might be thinking!

Isinglass Design earrings on handmade glass headpins
Prices for each type of item will rise over the years as I feel that the pieces in general are nicer, larger or more complicated and therefore worth a bit more. One other thing that I am aware of is what I perceive as the value of the item. If I were out shopping, how much would I be willing to pay for something like I make? What would I think of as a reasonable price? I want my work to be affordable. Maybe something you wouldn't buy every day, but something you're not kicking yourself about buying later because of the price. In the spirit of keeping the joy of owning a wee bit of an artisan's work alive, I'd like customers to remain happy with their purchase on all levels. It is also a reason that I am not a 'hard seller'. If you like something, can afford it and want to take it home with you, then I am on board and happy to help you out! If you want to just stop and chat and look, that's good too. I have gotten so many ideas and suggestions from window shoppers and customers alike~ I consider getting out of my box a bonus to setting up for in person shows.

I am a 'bail as you go' bead seller. When I am at my table, I have a few pieces bailed and ready to roll and a lot that can be fixed up on demand. It is true that folks tend to buy the bailed pieces first (so I probably should have more of them ready to roll). I can sit at my table and do a few more throughout the day, which often brings folks by to see what I'm up to. I've also had folks who want to watch the bailing process- a mini class if you will. I'm just fine with giving out some pointers. If they're serious about it, they may learn a little something.

Here's a little pricing trick I use at my table when selling in person. I use signs that show a range of prices rather than pricing each item individually. After years of hearing folks say 'oh it figures I would choose the most expensive one' I have made my price signs so the highest possible price is a little more than the most expensive piece on the table. Silly? Yes, but I'm much happier not having to hear folks say that so often.

Wednesday, January 20, 2016

Form Follows Function


Looking around on facebook, I saw a wonderful thread with many lampworking tips and it got me thinking about one little lampworking detail that I think about a lot which is the first step in many bead style decisions, and that is- 'how will this bead hang?' I make a LOT of fish, so that's where I'll start.

If the fish has a vertical hole (as most of mine do), the front and back end need to be fairly well balanced. That means the front end of the basic body will be a little bit longer than the back end. Why? Because the back will have the fins and the tail added which, though thin, will add some weight. The side fins do not extend much past the hole, adding a little more weight to the front. Hopefully in the end it will all work out! One more thing; ever since my wind disaster, I have made my fish with the side fins against the body rather than sticking out to the sides. Much less fragile!

A horizontal hole on a fish is a bit more difficult for me. The bottom of the fish needs to be heavier than the top, so I mash it a bit unevenly and then try to extend the bottom a little more. Sometimes later in the process, when it's time to add the eyes, I can't remember or really see which is the top and which is the bottom. Today, I added a wee dot of clear at the top where I was planning to put the eyes. Problem solved~ now I wouldn't get mixed up later, and the clear does not mess with the design; I can just melt it and cover it up later. (thanks to Elizabeth Dauch for this tip)

Another new design change for those horizontal fish has made them work out so much better in my mind. No more worries about the tail being too fragile- it is now just another part of the bead.

One more thing- you might call this a pet peeve, I suppose. Both sides of any bead I make have a design on them. Why? Because they can flip over or be put on backwards and I feel they should still be nice to look at. Any time I put up a bead for sale anywhere online, I show both sides, and maybe even a side view.

There you have it~ one little step in the design of the bead that can be quite important. Or so I believe...

Friday, March 6, 2015

Handmade Lampwork Glass Bead Suncatchers and Kits

Been making suncatchers and sun catcher kits with a new style of beads lately. A little something to cheer up the winter scene.
Here are a few of the beads on their own- lots of layers of transparent glass, which looks really sweet when the sun shines through. The flowing bead style is so much fun to make- pulling, twisting, trying to get the feel just right!


Here they are in action!      


Sunday, February 15, 2015

Making a Wrap Bracelet with Lampwork Beads

Here you go! I've made a few wrap bracelets lately and wanted to share my easy as pie method. It's adjustable and does not require the wearer to tie it on. One thing I have learned is that the hole size of the beads matter immensely. A 3/32 hole is not really large enough for one of these silk ribbons to fit through. If it goes through it's great because it is a nice snug fit and won't go off in its own direction later. But it will not always fit on the ribbon. You're on your own with that!

A focal bead that fits snugly on the ribbon is a good start. Put it on the ribbon and center. This is the hard part! You might need to use a wire to push the cord through, and it might even help to put one of the end threads through the hole at a time.


Then you'll need a couple of beads with a little larger holes for the end of the cords. These were built on a 4 mm mandrel and fit just right.


Put a bead on each end of the cord.
Put other end of the cord through each of those beads going in the opposite direction form the first cord. You now have an enclosed loop.


Tie end of each thread end and cauterize with lighter.


 Tie a knot in each end of the ribbon.
 To wear- wrap around wrist four times, pull tight (you may need to use your teeth for this!), then pull small beads to the ends of the ribbon. For me the small beads end up at the bottom of my wrist- this will, of course depend on your wrist size and how you like your bracelet to lie. Finito!


Tuesday, June 17, 2014

Spindles and Whorls~ Medieval Style!

Lights, camera and action! It's finally time for my new glass whorls to enter my etsy shop. These have been paired with lovely hand turned and hand carved recycled wooden spindles for a wonderfully modern Medieval spinning experience. Say What???!!! Well, let me 'splain a bit.

First of all, let me say that, this being a cooperative effort, things will be moving a wee bit more slowly than my usual frantic glass making mania. Right now, I make the whorls, we meet and measure and Lois makes a matching stick. But soon we will have our standards down to make it all go oh so much more smoothly. Added to that is that these glass whorls are big and they take a lot of time and energy to make. Though that's unlikely to change, I'm hoping to adjust to them over time.

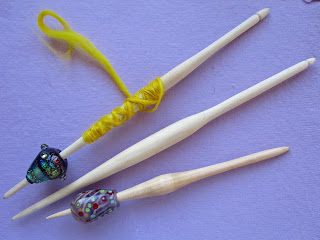
The wooden spindle and whorl are not glued together- they are two separate pieces which fit together snugly. A small o-ring or rubber hairband is included to help keep the whorl from falling off and whirling across the floor.

Watch these sweet little youtube videos to see some of these spindles at work and some instructions for use. 


Now, down to brass tacks- how do these things work? A bulleted list will help, I think.
* These glass whorls are best for light or lace weight spinning. For making heavier weight yarn, add a bit more whorl weight. More glass or one of missingspindle's pottery whorls should do it!
* If adding extra weight, be sure the whorls will nest properly. Questions? Just ask the shop owner!
* Because the whorls are handmade, they may be a little unbalanced. They have all been tested with the specific stick they are sold with, but will need to be adjusted on the spindle until the place of best balance is found.
* Make sure the whorl is perpendicular on the spindle. Push up tightly and test spin. Move around slightly on the stick until you find the place of best balance (the 'sweet spot').
* Push the o-ring or hairband up below the whorl to keep it right where you want it.
* Load leader on spindle by using a lark's head knot just above the glass whorl (at the bottom of the belly).
* Wind up and around the spindle several times, with several small winds near the top.
* Top off with one or two half hitches around the indented neck to hold the leader in place.
* Spin yarn!
* When loading spun yarn on the stick, center it over the widened belly, winding up and down in a spiral.

What fun for a little different hand spinning experience! 


Saturday, May 10, 2014

Bead Soup Blog Party Reveal, Beads and Findings from Kumi Fisher Designs with Isinglass Design

The soup Kumi sent me- Wow!
Time to show off my creation for the Bead Soup Blog Party! If you look at my blog post here you can see the wonderful beads and findings Kumi Fisher sent me all the way from sunny Hawaii- Aloha y'all!

You can see what she made with the beads I sent her here!

Here's how it worked- I sent beads to Kumi, she sent beads to me and we each tried our hardest to make something lovely using each others' stuff. Kumi sent me some really lovely enameled copper pieces to work with as well as a pretty handmade clasp and a wonderful tree focal along with loads of other goodies. We had talked a little bit about the colors we like to work with- both of us like the blue/aqua family a lot. Next we sent each other a surprise package containing fun handmade things to use.

Always easy to start with a pair of earrings...

The whole necklace
Then it was time to put on the thinking cap and get to work. I finally figured out what I wanted to do to the back of this necklace - well- yesterday! Yup, it took me a couple of months to figure that part out!I mixed a few of my own lampwork beads in and added one of my bent beads at the back to make the whole thing adjustable and add some back interest. So- here you go, hope this piece gives you some new ideas. It certainly got me thinking in some new ways, which was wonderful!

One more link to Kumi- here's her facebook page!

And here's the link to all of the participants so you can view all of the lovely pieces made by all (500+!) people.

One more shot!
Closeup of the center


Sunday, March 16, 2014

8th Bead Soup Blog Party- Ready to Roll!

Time for the Bead Soup Blog Party bead exchange to begin. My partner in this endeavor is Kumi Fisher who lives on the island of Kauai in Hawaii. My lucky beads get to go live with her there, while her beads are traveling to the freezing cold climes of upstate New York. I can see the packages waving at each other as they pass by in some post office somewhere in California- Aloha! Mine filled with lampwork and hers filled with some of her wonderful handmade metal beads and adornments.
I can't wait to see what Kumi makes out of her bits and pieces, and to be inspired by the bits I find in the package she has sent.
Kumi does a lot of experimenting with metals- it seems like she's tried a little of everything- enameling, using alcohol inks, hammering, coiling- you name it! What started out as a little something to do in her spare time has turned into a passion that can't be stopped!

Here are a couple of pics of the things Kumi can expect to arrive in her mail box shortly.


Friday, March 7, 2014

Spin, Spider, Spin: Experiments With Whorls, Spindles and Yarn

A spindle experiment with double whorl
Handmade spindles and glass whorls- sometimes it seems things just happen and sometimes you have to make them happen! This little tale is a combination of those two things.
Mmm... pink!
In the beginning of January, I went to the Black Sheep Spinners Guild ROC Day
 celebration. Spinning is such a big deal around here, and it's something I've always wanted to learn more about. While I was there I met a wonderful woman who showed me how to use a drop spindle (OK, it's gonna take a lot of practice to get it right!).

Masked style pattern
One thing led to another and before I left I found out that she was in search of a glass bead maker who could make her some rather large beads in particular shapes to use as whorls with her handmade Viking-style spindles. We had a short chat, I got down some basics, and we agreed to stay in touch.

I really like the design on this one!
I went home thinking- make big beads, make big beads. We met again a couple of weeks later for show and tell- she with spindles, I with some rudimentary whorls. These are smaller than a standard whorl and would be used to make light or lace weight yarns.

Love this shape!
Well, one thing led to another. I made myself a fun little drop spindle with a dowel, a wooden wheel and (of course) a glass bead for a little extra weight and got to practicing. What I do is called 'park and draft', which means I spin the spindle, stop and make the yarn over and over. It's how all the kiddies start out!

We met again, I made more whorls and started looking at all the fun shapes and styles that were traditionally used. And then we went to the monthly spinners guild meeting with our new spindles and whorls. Folks loved them! We're still working on a little bit of standardization and in the meantime, I'm having a lot of fun testing out different designs I might be able to offer.
Drying my first yarn

Stay tuned for- hopefully- some spindles and whorls for sale in my etsy shop soon!

Wednesday, January 1, 2014

Scarf Slides and Cleaning Big Holed Lampwork Beads

Whoot! My newest lampwork glass bead endeavor is making scarf slides. I finally got myself a really big mandrel- a whopping 1 inch- and started making beads for scarf sliders on them. Though a one inch hole may be a bit larger than needed for some scarves, they seem to be about right for rayon. I gave one to myself, one to my daughter and one to a friend as testers to see how they work out.

The huge mandrel was much easier to use than I thought it would be. It's always best to sludge and dry mandrels overnight when making any high stress beads or beads that take longer to make. The mandrel needs to start out well heated and to stay heated the whole time. These beads started out with a clear core footprint, giving them a good stiff background to work over.

Important: make sure the sludge doesn't have any little gritty bumps. These should be rubbed off of the dry sludge before starting.

Because it's really easy to see inside these beads, they need to be cleaned extremely well. After the bead is finished and removed from the mandrel, clean as usual and then sand with 220 grit and then 400 grit wet/dry sandpaper. This will smooth out the inside nicely. I have to thank Hayley for this piece of advice. It has made a huge difference in the smoothness inside my large holed beads.

A couple of useage tips for these sliders:
For safety, it is probably best to run the scarf horizontally through the slider to be sure it can't just slide off of the bottom. Making sliders with a little bit smaller hole will also solve this issue.

Sliders can be used in a number of different ways- one is to run the scarf through the slider halfway, put the scarf around your neck, and then run both ends of the scarf through the slider. The large hole will allow a silk scarf to easily run through the slider three or even four times. Here are some photos of one around my neck.