Thursday, December 27, 2012

Happy Holidays!

It's been a while since I've had anything to write about . And maybe I still don't, let's see...
Well, we had a white day-after Christmas, which has been kind of fun.

There are photos of a these two long beads in the gallery of the December issue of Bead Design Studio- I always love to see something get published! Tube beads are some of my favorite types to make; they can really class up an outfit bailed and hanging vertically.
And I decided to make a few new hearts. For some reason, I am tired of hearts with vertical holes through them, so I've moved to big holed slider hearts with a horizontal hole. It just seems that the shape is more to my liking, as are the designs I can use.
Oh! I made a 6 minute video of me making a leaf and put it on youtube. I need to figure out how to set up the camera so that it zooms in closer to what I'm doing. Something to work on, as I've got more video ideas in the works.
Soon there will be more important updates, but that's it for now!

Monday, November 12, 2012

Some new favorite glass colors from CIM

Leaky Pen Background
I have to admit- I've been resistant to using Chinese CIM glass for many years. When the first few colors came out, I was interested, but had a few apparent compatibility issues and decided it just wasn't worth it. After all these years, I decided it was time to give some new colors a try- a lot of them just looked too interesting to keep ignoring. I found that Howaco Glass in Michigan sells single rods of glass (as well as all the usual), so picked out a few rods to try. And I have some winners!

Very Berry on top
Everyone already knows about leaky pen- a wonderful shade of dark teal like nothing Moretti makes. It seems a bit stiffer than most of the Italian glass, but also seems to melt and apply very smoothly. And the color is truly lovely and very saturated- a clear background will thin it out just enough to see it well.

Very Berry was another nice choice. It's a lovely saturated dark reddish purple. Similar to amethyst, but it seems to keep more of its purple color and it also seems a bit on the stiff side.
Crocus Purple


The big winner? Drum roll please.... Crocus. What a beautiful color of light purple. It reminds me of the old yellow vaseline glass- beautifully translucent. It is a little bit shocky, but not overly so as long as the rod is not too big around. It doesn't seem to scorch like the alabastro and opalino glasses, so is very easy to use. I worked it pretty long to make this little dragon and had no problems at all.

Monday, October 29, 2012

Making Shards and Confetti!

CAUTION! This should not be attempted by a novice, minor, or someone without experience with a torch and lampworking. Please use care if you choose to attempt to blow shards. Your safety is your own concern. Do not blow too hard or too quickly as the glass may become thin and dangerous pieces will become airborne. Do not breathe these pieces. If the glass seems to be getting too thin, stop and put it in the metal can. Protect your eyes from breaking glass at all times. Follow all safety rules generally used in lampworking studios.

A fusing pal of mine likes using collage-style glass in some of his designs. You know- the kind with streamers and confetti all over it. The problem is that stuff can be a bit pricey. Since I had tried making glass shards once or twice with decent results, we decided to have a shard-making workshop. We ordered some blow tubes, had a nice stainless steel can at the ready, filled a little jar with some water, put on our safety glasses and went to town. I had looked up some shard-making instructions to refresh my memory.

If you've ever made a hollow bead, you pretty well know the drill. Heat the tube to a nice glow and add a wrap of glass near the end of the tube. Then start wrapping glass on top of that first wrap, making a nice disk and then slowly bending the disk into a globe shape and closing it off. Watch for any holes, close them up, heat the whole thing and then carefully blow out to a thin, but not too thin, thickness. Drop that bubble in the steel can and let it break apart, then clean any remaining glass off the tube by plunging in water if necessary. (One more caution- make sure any tube you are using for this is dry- steam is very hot).

Building a good disk can be a bit of a challenge if you've never done it before, and my friend hadn't. I had some problems with my second disk too. And it was a bit slow- so I started thinking outside the box. Why were we being told to build a hollow globe? What was the need for that when we were going to be blowing a bubble into it anyway. Glassblowers start out with a big molten blob at the end of their blowpipes- why couldn't I do the same thing? And besides, we're blowing shards- it doesn't really matter if they are the same thickness or not.

This morning, I went to the torch and tried out my revised version of shard blowing. I've got a few photos that I hope will help you through this. This was much easier and quicker for me.

1) Heat the end of a 1/4 inch diameter hollow tube to glowing and add a wrap of glass (I used black) about 1/8 inch from the end. Wrap around a couple of times to make a small disk- 1/4 inch high is enough.

step 2


2) Start building a tube onto the front of that disk- parallel to the blow tube. Build it fairly straight out until it is about 3/4 inches long.
step 2-3

3) Close off the end of the glass tube and round up in the flame. You may use a tool to help round up if desired. If there are any holes, close them with a blob of glass.


step 3
   4) You can give a tiny puff of air  into the tube at this point if you like. I don't actually know if this is necessary or not.
step 5

5) Wrap the entire globe with more glass- all the way from top to bottom two or three more times. You can begin adding some more colors if you would like at this point. You should not have any holes as you are adding several layers of glass.


6)  Heat globe and dip into frit if desired. I used raku frit. Give another small puff of air while the blob is hot. After adding air, hold your thumb over the hole for a minute, tilting the tube up slightly while turning.

step 6


7)  Heat, melting everything smooth. Use a tool to shape if needed. 


step 7

Step 8
8) Shape into even globe, making sure it is centered on the blow pipe. Turn the globe around and keep centered, making sure it is evenly heated- the best indicator of this is the color of the glass- it should be the same color all over; a nice glowing orange.


step 9


9)  Heat to a nice, even glow, remove from flame, and blow out carefully. If it collapses, let it melt together, heat and blow again. Rather than holding the tube straight, point it down slightly while blowing (remember, do this out of the flame). For me, one steady blow seemed to work best. Pay attention and don't let one portion blow out too thin and burst. The thin airborne shards this creates are dangerous to breathe. This one did blow out a bit as I was taking the photo.


10)  Carefully put the blown out globe into the steel container. You can tap it carefully inside the container (protecting your eyes), or just put it in the container and it will break on its own.


That's it! You can put the blow tube into water to try and pop off the little bit that may stick, or just heat slowly and build your next shard bubble right onto it.


Tuesday, October 16, 2012

Inspiration, Big Hole Beads

Isn't it nice when something inspiring just pops into your inbox! The November issue of the Soda Lime Times just came out yesterday and it was all about big hole beads. How to make 'em, how to core 'em and all the eye candy a girl could wish for! The big hole bead category covers anything from a bead with 5 or 6mm hole that will fit on a European style charm bracelet to sliders and dread beads with 1/4 or 1/2 inch holes- or more! I've been making mandala or kaleidoscope beads for years- but never very many at a time, because they take me so darn long and I end up feeling just a wee bit incompetent. But with a few words of encouragement from the folks at Soda Lime (and did I mention a lot of eye candy???), I thought it was time to give it all a bit of a go. Fun stuff, even though these babies took me about 40 minutes each- and these are actually a bit on the small side.

One of the interesting thing about BHBs is that they are often used so that the flatter side faces out. When I make these, I am constantly looking down the mandrel to see if they are fairly round, and how the design is coming together. But round is not the only shape a BHB can be- far from it! One of my own Icarus Wing Beads was featured in the gallery. This is a fairly new style for me with a bit of a wing shape on one side and lots of twirls and curls on the other.

Big Hole Beads do present the small problem of getting that large hole to look good on the inside. Sludging the mandrel the night before and letting it air dry will help ensure a good bond between glass and mandrel. Use the sludged mandrel within a day or two to prevent rust from forming on the mandrel- rust stains are quite hard to remove from inside the bead. At The Gathering, I was instructed to sand the inside of these beads with wet/dry sandpaper in ever increasing grits to make them nice and smooth. For more tips and a fun tut, I'd advise you to get your own copy of the November 2012 Soda Lime Times-it's great fun, and a tremendous value too!

Monday, October 8, 2012

I'm always so excited when one of my beads is featured anywhere. One of my masks was chosen for the 'Show Me Sunday' Art Bead Scene.

You can sign up to receive their daily blog posts- lots of fun ideas, mini tuts and a monthly challenge. So go check it out to keep abreast of things in the world of art beads!

Wednesday, October 3, 2012

Keep the Customer Satisfied, Satisfied...

I had a rather bizarre conversation the other day with the owner of a fairly new online business. He was interested in having a few of my items available through his site. Seemed like a nice guy, we had a good talk, and then I went home, looked at the site and started thinking... Hmmmm...

One thing he mentioned was a current customer who was giving him a bit of trouble about some slow shipping. He apparently had his hands full, and had to hold off on sending out their order. I mentioned that I always send shipping notification out when I ship something. Etsy has made that so simple now- a pre-written note I can just punch a button and send, and I can even add a clickable tracking number. He said he just didn't have time to send out shipping notification. Really?  Well...

A couple of days later I placed an order with a company I'd never done business with before. And guess what- no shipping notification. So what happened? Well, I waited 6 days and emailed to ask the status. No reply. The next day I waited for the mail to arrive- still nothing, so I called. Of course it was on the way. But I don't think this was much of a time-saver for them since they had to go back and look it up and talk to me on the phone.

In the meantime I was getting a bit peeved. I find I am not very patient when I order online. I send the $$ in good faith, and then I really want to know when it's on the way. After all, I have no idea who you are or what your policies are. An automatic message only goes so far- I still want to know when MY package is on the way- and how it's being shipped so I know who to look out for.

So back to the new online company. Another thing he mentioned was that his customer could not possibly be in a rush to get his product as they couldn't use it for months. Second guessing the customer never seems like the best business plan to me. What if they are doing this as a test- they want to find out how quickly you ship and what kind of customer service you give- well, you've just failed miserably.

I work hard on customer service, always trying to give a bit more than expected- a little note on one of my own special cards, an extra 'lucky' bead, careful packaging. I find communication is key, especially if there is any problem with an order. Yes, we all make mistakes from time to time. I always apologize, offer to cancel the order, and offer a bit of something extra- whether it's free shipping, a discount or a freebie if there is any type of problem whatsoever. Why? Because repeat customers are my favorite kind!

Alright- this has been a bit of a rant! In conclusion, I think the best policy is to treat the customer as you would like to be treated!

Tuesday, September 18, 2012

Making Shipping Boxes

I am hoping these photos are rather self-explanatory. In an effort to reuse and recycle, and to keep shipping costs at a minimum, I have resorted to making boxes for shipping out of clean cardboard such as cereal and cracker boxes. I'm posting this here now because my daughter just made her first etsy sale in her shop, and I thought she might could use the instructions. No words, just follow the folding (and cutting) hands! Tape it up and away you go!
By the way, this box goes inside a bubble mailer- I don't feel it is sturdy enough to ship on its own. After all, I'm shipping glass (whether my postal person seems to believe me or not...). As someone pointed out, now you can make the boxes whatever size you need. Whoops- an important piece of information I forgot- if you are using delivery confirmation and mailing by first class mail, your package must be at least 3/4 inch tall, so make sure your box and the bubble mailer add up to that. Otherwise you will have to pay for priority mail. I don't make the rules.......

Wednesday, September 12, 2012

Let's Twistie Again!

Well another blind idea came to me the other day. What if I made twisties and offered them for sale? I fired up the torch and made a small pile, put a picture on facebook and waited to see who said what. Lots of 'likes', which I always like, and one lovely pal who asked if they were for sale. And I'm off! Twisties for sale- a few at a time in random color assortments for the moment. A lot of the combinations contain colors that may react with each other depending on the background used and the amount of heat applied- edp, copper green, intense black- things like that. I used some scraps in this turtle and let them cook a bit for a cool organic reaction.
I love making beads, have been doing it for about 12 years, and am fairly confident that I'm doing some things right in that category. But making supplies to sell? All those scary monsters I thought were locked away in some closet started sitting over my shoulder and saying- no, no, no, you shouldn't be doing this! They're still talking to me, but I'm giving it a bit of a try anyway.

Everything I sell is always guaranteed, but these are doubly so. They have to arrive intact, and the buyer has to like them! If not, keep 'em and I eat the cost. Oh and I want feedback too- real feedback, not the kind you get on etsy. Any and all ideas will be happily considered.

Tuesday, August 21, 2012

Ignition: My First Beads

Well, I've not participated in a blog hop before, but this sounded like too much fun to pass up! So here, I am participating in the Art Jewelry Elements Blog Hop - follow the link at the bottom of this post to see all the other great blogs!

Everyone, no matter what they make, had to start somewhere. And often it seems we don't get much beyond the start- frustration, lack of time, no matter the reason, I can't even remember all of the things I have started to learn and just never gotten anywhere with.

But lampwork beads- that's another story. Like so many others who have tried out this wonderful craft, it seemed from the start that I couldn't get enough. First I think it was the pure determination of trying to make a bead that was- well, sort of round. And then there were so many other shapes to try. I actually gave the kit to my daughter for Christmas when she was 16- about 13 years ago- but when she went off to college a little over a year later, it was mine, all mine! For some strange reason, they didn't allow torches in dorm rooms- who knew! I had a book, a torch, some tools, some glass and some time; add an empty nest to all those supplies and what else was I to do?!

Anyway, these are some of my early beads- I don't remember how long I had been making beads, but I know these were from my first year. The only reason I still have them is because I gave them to my mother when she was first falling into dementia. She used to worry them and restring them all the time. Now they have sentimental value. These beads have been well loved- covered with food, licked, worn- I like to think my mother understood that they were made by her wacky daughter even after she could no longer speak.

The mask is from a year or two later. They have progressed a lot since then, but this one has a little something that still makes it dear to me.


And today's beads? Well, I would be mortified if I made beads that were so wonky with jagged ends these days. Those babies generally get tossed into the nearest body of water for some later archaeological midden fun!
Here's a 'modern' mask and a pendant.

Wednesday, August 8, 2012

Wing-y Earrings

 After the winglet I posted in my etsy shop the other day got such nice comments, I decided to try making a pair of mini winglets for earrings. But my mind is spinning with questions.
First- Should the hole be this size or should it be a lot bigger? In other words, should the hole be more a part of the design of the bead? The holes on these are much larger than on a regular bead, but I get the feeling that they could be even larger.
Second- How should these be bailed? Just a jump ring through the hole, or more like these leaf earrings? Doing them like the leaves leads me to the next question.
Third- Which way are earrings like this supposed to face? I've always bailed them so that they face the front- parallel to the front of the face. But I have seen earrings that face the side- perpendicular to the face. Which is correct?
Fourth- these are a little bit different in size. One is a bit wider. I'm passing them, but wonder what others think.

I'm open to ideas and suggestions about how to make these babies work!

Tuesday, August 7, 2012

Confessions of a Lampwork Bead Maker


This one has a wonky hole, but I couldn't bear to trash it!
At the torch today, while I had a mandrel with a hot bead on one end in my mouth, I got to wondering- what kind of bad things do we lampworkers do in the privacy of our studios? I know I do things that I would never want anyone to see me do (so I'm gonna tell you about them, right?). And just fyi- NONE of these things are recommended- I am NOT telling you to try any of this at home- or anywhere else for that matter.

Here's the first- and possibly the most dangerous- thing I do: As mentioned in the first paragraph, I will put a mandrel between my lips with a hot bead on the the other end when needed. And when is that? Well, when I forgot to cut a piece of silver in advance, or cut it to the wrong size. I make sure the bead is good and hot, though not drippy, so it will be okay out of the flame while I find and cut a piece of silver. That's usually the reason for that faux pas. And I try to remember to suck in a little bit so that I won't just drop it on the floor by mistake.

This Bead had a bit of 'Mouth Time' While I cut the silver
What else, you ask? If a bead is 3/4 of the way done and it detaches from the mandrel, moving about freely, do I trash it? Nope, not if I can help it (unless it is just plain ugly..). Making sure the mandrel is not pointing in such a way that the bead can fall down it and burn my hand, I continue to finish it off if possible. This may mean that something I intended to do has to be forgotten about, it may make for a weird bead hole that my poor reaming buddy has to fix for me, but sometimes it is so worth it!

Some of my other poor ideas? Straightening and finding the end of the silver wire I am adding to the bead with my lips ( I use my mouth like a third hand, it seems!). I always have to remind myself not to do this while the wire is still hot. After I twirl designs together- as in the bead at the right- I often blow on the point where the twirler attaches to the bead to cool it. My lips are about an inch from the bead at that point- one false move and --- Ouch!

Then there is the balancing act, where I have picked up a rod to add a new color and decide that the bead needs a little more help before that happens. Back goes the mandrel into my right hand while I continue to hold the new color in the same hand. I'm not even really sure how I manage to do this- it just kind of happens. Still not a particularly good idea!

Wearing flip-flops is another one of my poor ideas. Invariably a piece of glass flies off the end of a rod and gets trapped between my foot and the flop, which is rather alarming. At this point I shake my foot around, trying to dislodge the shoe so that the glass will fall away. Bad news, yet I keep doing it. Pavlov would be alarmed!

And while I'm on the subject of clothing, I laugh at the idea of  wearing long sleeves to protect my arms. Those little scars running up the insides of both my arms are a point of pride! But yes, I do wear protective glasses, though they seem to slide down my nose when I 'glisten' (hence a piece of hot glass managed to find its way into the corner of my eye).

For more bad ideas, check this out!
http://isinglassdesign.blogspot.com/2008/04/ten-or-so-things-you-shouldnt-do-with.html


Monday, July 30, 2012

Deliberate Mistakes, imperfections and artistry


Today I've been out searching for some hard, fast information about mistakes made purposely. I have heard, for many years, and from many sources (who shall remain nameless as I can't remember who they are!) about the tradition of making a deliberate mistake, especially in the weaving of Kilim rugs. When I went on my search, I found that the tradition carries over into other cultures and is used by folks in other mediums as well. Quiltmakers, Navajo Indians, even carpenters are aware of and use this idea. It's pretty hard to pin down how this all works, but here's some interesting info.

My search began with this blog. I love the Navajo idea that evil spirits can only escape through an error in art. Not to mention the Amish belief that adding an error is the ultimate in arrogance as it implies that you could make something that was perfect to begin with!

According to this website it's all about humility. Lots of interesting stuff here about deliberate mistakes, devotion, 'atomism' and symbolism in Kilim rugs.In a Kilim rug, the errors can range from nearly invisible to easily spotted. One source even says that the errors included are the same for a particular weaver- sort of like a maker's mark.

If you want to read about 'hoo doo blocks' or 'humility blocks' in American quilts check out this blog. The purposeful errors that are included in these wonderful works are pretty hard to spot unless you are really looking for them.

Much of this seems to be traced back to the character of Arachne in Greek mythology, who made a perfect weaving on a topic which didn't please Athena, eventually leading to her being turned into a spider (and who really wants to be turned into a spider?)

So that is your lesson on imperfection from me. I suppose I'd have to say I am most like the Amish, believing that it would be an arrogance to think I could ever make anything that is perfect. So here's my guarantee- no bead that I make will ever be perfect. I couldn't make it perfect if I had to. It might contain a little bubble, a color that didn't really work out right, or some other bit of oddness that I couldn't fix. And that is the real beauty of handmade....

Monday, July 2, 2012

A Match Made- Well, at the Torch!

This is the finished pair.

Last week I put some pictures up on facebook of pairs of fish I was working on for earrings. I get a little particular when I'm looking for earring pairs. I can take a bit of variance in design, but the size and shape have to be fairly close. So I thought I'd fill y'all in on what I do to attempt to achieve that.

The first part is easy- make a wee fish! First- I count the number of wraps of glass I start the bead with, then take a good look at my starter bead and try to remember the size. I do give it a little bit of a measure against my graphite paddle (for all the good that does me...)
While I'm doing that I attempt to put all the rods down on the table in the order that I used them- so when I go to make the match it should be much easier (except that in the flurry of making the fish, I often make a few mistakes- so I still have to think!).

Here's a picture of some lined up rods. But they were kind of wrong. At least all the colors were there. The next thing is to find a way to measure so I know what I'm aiming for. Need to know both length and height, so I lay it across the graphite paddle again and mark it in my mind.
The first fish goes into the kiln and then I have to put on my thinking cap and cross my fingers.

Hmmm... I made three fish, but I have a bad feeling there is no match there. On to the next trick. Instead of blindly making more, I take the precaution of writing down everything I did just in case I need to try again the next day- which I did. Good luck trying to understand my goofy notes. But it did help. Gave it a read through, brought both of the beads to the torch for comparison, and got to work.

Whew! I think I got it- well close enough for lamp-work!

Monday, June 11, 2012

My Daughter's New Etsy Shop!

A quick note to tell y'all about my daughter's new etsy shop. Yep, she's joined the ranks of the etsy-ites.

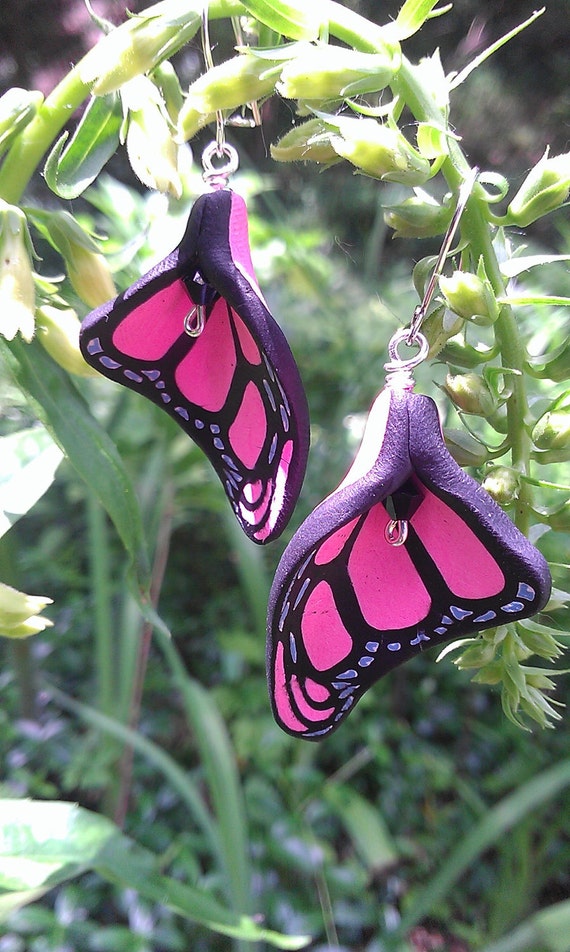
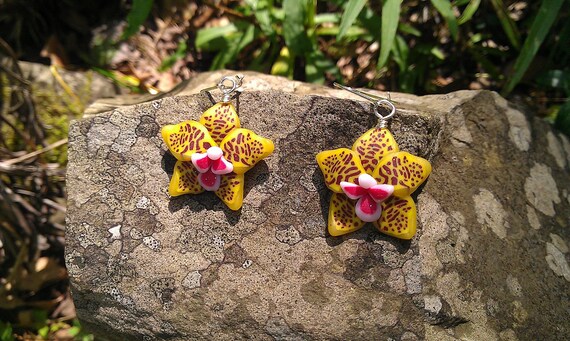
She's started making her own polymer clay cane, and is currently making earrings using them- butterfly wings , flowers, fish and sugar skulls. More to come soon, I'm sure! Go take a look at her etsy shop, TheRedQueensGarden. And you can 'like' her business page on facebook as well!

Wednesday, June 6, 2012

Kumihimo and Lampwork Fish- A Perfect Pair!

As just about anyone knows who watches me online, I make A LOT of lampwork glass fish beads. Why? Well, I love playing with the colors and designs. Every time I learn some kind of new lampwork trick or technique, I find myself thinking- 'I wonder how this would look as a fish?' And so off I go....
 
A few months ago a lovely jewelry designer named Libby found my etsy shop. She lives on the Atlantic coast, so was drawn to trying out my lampwork fish with some of her jewelry making techniques. I have to say, I am impressed. Her lovely Kumihimo necklaces are perfectly matched to the colors in the fish, and set them off wonderfully.
But kumihimo isn't all she does- the accent beads she used on the first necklace pictured here are just yummy!
Libby has two different shops on etsy- LadyBGems, which features her handmade jewelry and KittyKatGlassDesigns, which features her handmade fused glass (don't miss the June sale in this shop!).
I rarely get to see what someone has made out of some of the beads I created, and I'm just delighted with what Libby has done with these fish. Thanks for letting me share!

Wednesday, May 30, 2012

People Who Live in Glass Houses.....

 Amazing! The internet can certainly lead one on a wild goose chase sometimes. The other day I went around my new neighborhood and took photos of a couple of bottle trees. These are a fun tradition in the southern U.S. though anyone anywhere could build one. It's pretty easy to do (I think)- just make sure that it is firmly in the ground- you wouldn't want a big wind to come along and knock it over!

So, I posted a few bottle tree pics on facebook, and one of my friends (yes, I really do know her- we've even shared a hotel room!) came back with a picture of a wall made of bottles.

She didn't know where it was, so I had to go on an online fishing expedition to see if I could find it. Well, I did not, but boy what I did find! A wonderful blog that has marvelous photos of glass houses from all over the world- 'Glass Bottle Walls'. I also found instructions on how to put one of these babies together. Wow! It's just astounding all of the ways folks have used bottles in construction, and they've been doing it for along time too.
As for me- I'm gonna get to work on drinking a lot of something- anything- as long as it's in a glass bottle!

Monday, May 21, 2012

Where Y'at? (a treatise on giving directions)

Today is the day that I give my unbiased and totally correct opinions about giving (and receiving) directions. Since I'm a world class expert on this subject (!), and pretty directionally challenged, I thought- why not?

What, you need proof that I've got direction problems? Well, when I was 7 years old I loved to ride my bicycle around our very large block. One day I decided to go around in reverse- didn't cross a single street- in tears, I asked a stranger where my street was (I was on it) and how to get home. Put me inside a building any day of the week, make me turn a corner and then see if I can tell you where anything is outside the building- nope!

Several years ago, a BIG part of my job was giving directions to anyone who called from anywhere to where I was. And here's what I learned- there are pretty well three reasons folks call for directions-
1) They've never been where you are.
2) They don't know how to get where you are.
3) They are hopelessly lost.

So my advice? Remember- They have no clue (None!) how to get from wherever they are to where you are. They've never been there. They don't know the landmarks. They probably don't have a pencil and paper in hand. They barely know where they are right now. Here's what you, as direction giver, must do:
1) Ask where they are- yeah, they probably didn't bother to tell you that.
2) Know the street names, exit numbers, landmarks and approximate distances to get to you from elsewhere.
 This was drummed into my head one day when the man in charge tossed a piece of paper on my desk (because one of my minions was being flaky) telling me that if the customer missed the exit they would have to drive another 7 miles or so before they could turn around and make it right. (Time to change the office workers manual to include that!)
3) If the directions are complicated (and when are they not?), make sure the person is capable of writing them down.
4) Be clear, don't use the back route if the regular route is easier to explain. Concentrate on simplicity!

My best direction story? The day someone called me from the parking lot where I was working and asked how to get back home- true story! And yes, I did give them directions!

As a direction receiver, what should you do?
1) Have paper and pencil at the ready.
2) Listen. Do not cut the direction giver off unless you aren't keeping up with the writing part.
3) Read back the directions.
4) If you're calling from a cell phone- pull over if you're the driver- know where you are!

OK- that's all I've got for now!

Friday, May 18, 2012

Lucky Elephants

When I first started making elephant beads, I was told by a number of folks that the trunks needed to be upraised to make them lucky. As a matter of fact, many people did not want them unless their trunks were in this position. Now I have never tried to attach meaning to any of my beads. Though I know some folks use them as amulets or talismans, I feel that attributing value to them is a personal thing. But- my elephants do all have their wee trunks pointing up into the air now- just in case!
But where did all of this begin? Why upturned trunks? What's the big dealie bobber (as we used to say)? Well, as it turns out, it looks like it's another American-ism. Though the lucky elephant charm idea most likely originated in India, it was a combination of the Indian elephant charm and interest in the white elephants of Thailand that somehow led to the US decree that only elephants with upraised trunks were lucky. It's all a part of popular culture folk-magic. And who knew there was such a thing?
Want to read a bit more about all of this? Here's an interesting little article with links to more info about elephants and other lucky charms.

Monday, April 23, 2012

Trial ( & Error) !

When a customer asks for something special- like a pendant to match a pair of earrings- I always try to give‘em what they want. But sometimes it ends up being a LOT harder than I thought it would.
Recently I had a customer who wanted just that- pendant and earring set. I looked at the earrings and thought ‘can do!’ I knew exactly which colors I would need, and even had the earrings in my hand to refer to. But none of that seemed to make a lot of difference.
The first two were nice enough, but the rubino oro just took over. I didn’t even want to show those to the customer, so I tried again. Still a nice bead, but where did all the periwinkle I added go? And the pink was nearly non-existent. 
One more chance was all I had- the gas was running out, and I was getting ready to move (yes, again….). Finally I got a couple of choices made that actually matched the earrings nicely- my customer made her choice, the gas ran out, and I hit the road! Now what to do with all those other pendants…..?