Showing posts with label bead. Show all posts

Saturday, June 22, 2013

You Are... Focus on Life week 25

Well, in my mind I changed this from 'you are' to 'I am' So that's what I'm going with!
One thing I am this week is late! I've been forgetful about blogging lately.
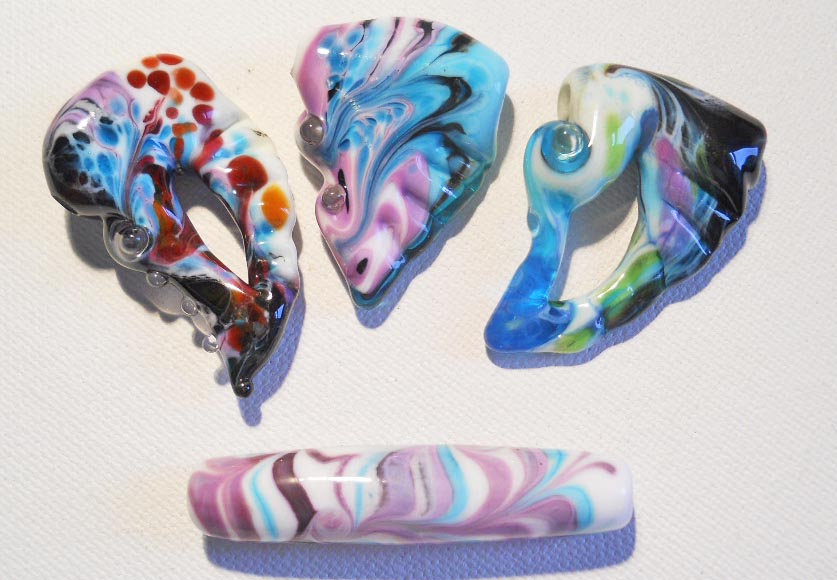
This week, I am a bead researcher. I have a lot of ideas about making focal beads- what looks good and what doesn't. But the question is- am I right or wrong? So- I'm asking y'all, among others, for a bead assessment. Here are four beads- all very similar in color, but different in shape and other design details. So the question is- do you have a favorite? One (or more) you don't like? can you explain why??
When I make beads there are always a lot of different thoughts and ideas knocking around my brain- about what I want to do with that bead, what I want to do next, and what others might find interesting about how this all works. One burning question I keep coming back to is what makes a good focal bead!!??!!
Let me know what you think! To see more of what we are, check out Sally's Blog!


Friday, April 26, 2013

Color / Colour- Les Couleurs Focus on Life Week 17

Today, we will quote from the immortal words of Kermit the Frog-


"Why are there so many songs about rainbows
and what's on the other side?
Rainbows are visions, but only illusions,
and rainbows have nothing to hide.
So we've been told and some choose to believe it.
I know they're wrong, wait and see.
Someday we'll find it, the rainbow connection.
The lovers, the dreamers and me.

Who said that every wish would be heard
and answered when wished on the morning star?
Somebody thought of that and someone believed it.
Look what it's done so far.
What's so amazing that keeps us star gazing
and what do we think we might see?
Someday we'll find it, the rainbow connection.
The lovers, the dreamers and me.

All of us under its spell. We know that it's probably magic. "

OK- kind of a goofy song, and who knows what it really means, but color is such an important part of what we do every day- it can make us feel happy or sad, the difference in light can make a day dreary or lively, it influences us whether we are paying attention or not! I was getting ready to make a kind of blue/ aqua deep sea creature pendant, and then I looked at the colors that were already on the table and saw how lovely they looked together, thought of the prompt for this week and went off on a bit of a tangent. So here you go! 


And end with the words of Henri Matisse:

Seek the strongest color effect possible.. the content is of no importance.


Want to hear more colorful thoughts? Start at Sally's Blog!

Thursday, April 25, 2013

Handmade Lampwork Glass Bead Headpins and Sets


I've been working on beads sets a little at a time lately. Trying to make more supplies available in my etsy shop. I've kind of decided on the name 'stone soup' for the types of sets I'm making right now. They look like they've got bits and pieces of stone all through them- very organic.


I've also made some headpin sets. These are great fun to play around with! When I made the pins, I left the copper wire about 5 or 6 inches long, so there's plenty to work with. Before I used them, I decided to hammer them flat just because I like the way that looks; then I went to town! I've made a few necklaces out of them-added a few flattened copper baubles as well- making these little paddle dangles is a wonderful way to use up copper scraps. Being new to metal working, I always seem to have a lot of those lying about!


Sunday, April 21, 2013

Hearts!

I've just been ignoring my blog-no fun lampwork posts for a while. So I'm just going to show off a few hearts. I love arranging beads into fun shapes. The heart that sits at about 2 minutes to twelve is my fave of this bunch- lots of odd color reactions!

Thursday, March 14, 2013

Green or Not? Recycled Bottle Glass Headpins

I've been playing with a bit of bottle glass that I found lying about on the streets here lately. I just couldn't resist those lovely blue bottles any longer. In the beginning I thought- what a cool thing- free glass, nice color, and I can do a bit of small time recycling. But, after fooling with it a little, I've pretty well decided that it might actually be anti- green to work with this stuff. They are now in my etsy shop.

It is definitely more time consuming. First you have to clean and cut up the bottles- watch those precious hands, you don't want to cut them to shreds! Maybe gloves would be good idea? I asked my fusible friend to give me a quick bottle cutting lesson. Turns out his are just as jagged and nasty as mine. Oh well...

Then I had to melt the stuff. As you may (or may not) know, Italian Moretti glass (Effetre) is fairly soft. That means it melts relatively quickly. This bottle glass is not. I'll bet it took me nearly twice as long to melt it as it does to melt my regular glass. Of course, bottle glass doesn't have to be specially transported to my house from Italy, so maybe that makes up for some of that extra energy; it's already here!

I also figured out  that you can add just a wee bit of extra color to this glass by rolling it in Thompson enamels, which makes it a little more fun. Oh, and if you decide you'd like to try this remember that the fire will creep up a flat side, so be sure and put it into the flame on its edge, not on the wider flat section or it will creep right up to your wee fingers!

Saturday, March 2, 2013

The Taming of EDP- A Lampworker's Secret

How many of you love edp (evil divitrifying purple)? Show of hands... How many of you hate it? Wait! Those are the same people. Well, I used to feel the same way... The color is beautiful, but it tends to just sit on the sidelines and watch me pass it by over and over again- the wall-flower of my studio.

The other day I was feeling adventurous and pulled a rod out  - oh, what the heck- why not. I made a portal bead base, rolled it in a bit of white enamel, and started adding some edp and other colors. And guess what? No devit- a practical miracle. OK, I'm thinking, maybe I just didn't notice it- maybe it will come out of the kiln looking ug-ly. But I'm just gonna try that again and see. So I did. And guess what- no devit again.

OK, I'm thinking, I must just be holding my mouth right today. We'll see what happens when I do this tomorrow.

And my un-scientific assessment of the situation is this. If you roll a bead in white enamel and apply the edp, you get rid of both the 'e' and the 'd' and end up with just the lovely purple you always wanted. There is a bit of edp in all of the beads pictured. I was having some other troubles with the tube, and managed to reduce some of the purple in that bead. The edp ended up a bit washed out looking in that bead as well, so there may be other odd things going on that I haven't quite figured out yet. I hope y'all will give this a try and let me know how it works for you.

Friday, January 11, 2013

ISGB Glass Bead Evolution Advertising

Just a very quick little post. I have just recently gotten a new work-from-home job as the advertising sales representative for the ISGB's (International Society of Glassbeadmakers) new publication. Woo-hoo! I really needed another source of income, hence the happy face.

We're publishing a brand new magazine called Glass Bead Evolution- you can see from the official blurb that follows that this magazine is going to be expanding to include other mediums and to be available to non-members in digital format. It's an exciting idea, and I'm happy to be a part of it. Ads go from a premium classified size all the way up to full page. If you want more info, or to see the media kit, email me at sales@isgb.org

   "2013 is an exciting year for the International Society of Glass Beadmakers (ISGB), the leading organization for the promotion, education, and appreciation of the art of glass beadmaking for wearable, sculptural, and functional art. With its new mission, direction, and marketing and communications programs, ISGB is introducing its new publication, Glass Bead Evolution, with content that will complement its new mission statement, programs that move the organization forward, and directions that will make the magazine more than a membership publication. The organization plans on continually expanding its readership and target audience, and will strive to provide artists, designers, educators, studios, galleries, suppliers, and museums opportunities to reach new markets.

  Glass Bead Evolution is a magazine created by beadmakers for beadmakers and yet is inclusive of other artisan mediums. Every issue will feature a complementary medium while maintaining a strong emphasis on glass. Moreover, it will be in both print and digital formats and available to both members and non-members reaching artisans worldwide.

  Glass Bead Evolution provides its readership robust content that includes insight into artists’ private worlds, tours of fascinating venues, tips and techniques for both glass and complementary mediums, a showcase of exquisite work, and reviews of tools, materials, tutorials, and books.

 ISGB is currently celebrating its 20th anniversary. We hope you will join us in our journey into the next 20 years. "

Thursday, December 27, 2012

Happy Holidays!

It's been a while since I've had anything to write about . And maybe I still don't, let's see...
Well, we had a white day-after Christmas, which has been kind of fun.

There are photos of a these two long beads in the gallery of the December issue of Bead Design Studio- I always love to see something get published! Tube beads are some of my favorite types to make; they can really class up an outfit bailed and hanging vertically.
And I decided to make a few new hearts. For some reason, I am tired of hearts with vertical holes through them, so I've moved to big holed slider hearts with a horizontal hole. It just seems that the shape is more to my liking, as are the designs I can use.
Oh! I made a 6 minute video of me making a leaf and put it on youtube. I need to figure out how to set up the camera so that it zooms in closer to what I'm doing. Something to work on, as I've got more video ideas in the works.
Soon there will be more important updates, but that's it for now!

Wednesday, October 3, 2012

Keep the Customer Satisfied, Satisfied...

I had a rather bizarre conversation the other day with the owner of a fairly new online business. He was interested in having a few of my items available through his site. Seemed like a nice guy, we had a good talk, and then I went home, looked at the site and started thinking... Hmmmm...

One thing he mentioned was a current customer who was giving him a bit of trouble about some slow shipping. He apparently had his hands full, and had to hold off on sending out their order. I mentioned that I always send shipping notification out when I ship something. Etsy has made that so simple now- a pre-written note I can just punch a button and send, and I can even add a clickable tracking number. He said he just didn't have time to send out shipping notification. Really?  Well...

A couple of days later I placed an order with a company I'd never done business with before. And guess what- no shipping notification. So what happened? Well, I waited 6 days and emailed to ask the status. No reply. The next day I waited for the mail to arrive- still nothing, so I called. Of course it was on the way. But I don't think this was much of a time-saver for them since they had to go back and look it up and talk to me on the phone.

In the meantime I was getting a bit peeved. I find I am not very patient when I order online. I send the $$ in good faith, and then I really want to know when it's on the way. After all, I have no idea who you are or what your policies are. An automatic message only goes so far- I still want to know when MY package is on the way- and how it's being shipped so I know who to look out for.

So back to the new online company. Another thing he mentioned was that his customer could not possibly be in a rush to get his product as they couldn't use it for months. Second guessing the customer never seems like the best business plan to me. What if they are doing this as a test- they want to find out how quickly you ship and what kind of customer service you give- well, you've just failed miserably.

I work hard on customer service, always trying to give a bit more than expected- a little note on one of my own special cards, an extra 'lucky' bead, careful packaging. I find communication is key, especially if there is any problem with an order. Yes, we all make mistakes from time to time. I always apologize, offer to cancel the order, and offer a bit of something extra- whether it's free shipping, a discount or a freebie if there is any type of problem whatsoever. Why? Because repeat customers are my favorite kind!

Alright- this has been a bit of a rant! In conclusion, I think the best policy is to treat the customer as you would like to be treated!

Tuesday, August 21, 2012

Ignition: My First Beads

Well, I've not participated in a blog hop before, but this sounded like too much fun to pass up! So here, I am participating in the Art Jewelry Elements Blog Hop - follow the link at the bottom of this post to see all the other great blogs!

Everyone, no matter what they make, had to start somewhere. And often it seems we don't get much beyond the start- frustration, lack of time, no matter the reason, I can't even remember all of the things I have started to learn and just never gotten anywhere with.

But lampwork beads- that's another story. Like so many others who have tried out this wonderful craft, it seemed from the start that I couldn't get enough. First I think it was the pure determination of trying to make a bead that was- well, sort of round. And then there were so many other shapes to try. I actually gave the kit to my daughter for Christmas when she was 16- about 13 years ago- but when she went off to college a little over a year later, it was mine, all mine! For some strange reason, they didn't allow torches in dorm rooms- who knew! I had a book, a torch, some tools, some glass and some time; add an empty nest to all those supplies and what else was I to do?!

Anyway, these are some of my early beads- I don't remember how long I had been making beads, but I know these were from my first year. The only reason I still have them is because I gave them to my mother when she was first falling into dementia. She used to worry them and restring them all the time. Now they have sentimental value. These beads have been well loved- covered with food, licked, worn- I like to think my mother understood that they were made by her wacky daughter even after she could no longer speak.

The mask is from a year or two later. They have progressed a lot since then, but this one has a little something that still makes it dear to me.


And today's beads? Well, I would be mortified if I made beads that were so wonky with jagged ends these days. Those babies generally get tossed into the nearest body of water for some later archaeological midden fun!
Here's a 'modern' mask and a pendant.

Wednesday, June 6, 2012

Kumihimo and Lampwork Fish- A Perfect Pair!

As just about anyone knows who watches me online, I make A LOT of lampwork glass fish beads. Why? Well, I love playing with the colors and designs. Every time I learn some kind of new lampwork trick or technique, I find myself thinking- 'I wonder how this would look as a fish?' And so off I go....
 
A few months ago a lovely jewelry designer named Libby found my etsy shop. She lives on the Atlantic coast, so was drawn to trying out my lampwork fish with some of her jewelry making techniques. I have to say, I am impressed. Her lovely Kumihimo necklaces are perfectly matched to the colors in the fish, and set them off wonderfully.
But kumihimo isn't all she does- the accent beads she used on the first necklace pictured here are just yummy!
Libby has two different shops on etsy- LadyBGems, which features her handmade jewelry and KittyKatGlassDesigns, which features her handmade fused glass (don't miss the June sale in this shop!).
I rarely get to see what someone has made out of some of the beads I created, and I'm just delighted with what Libby has done with these fish. Thanks for letting me share!

Thursday, March 29, 2012

Practice, Practice, Practice! Forty Round Beads

Once in a while I get a line on something really cool in the world of lampwork. Just yesterday I saw a post about Heather Trimlett's 40 Bead Challenge. My first thought? Forty Beads??? Using no tools? Are You Kidding???
But then I passed a restless night thinking about that and a few million other things. And when I woke up this morning I was determined to give it a go!
I am not proud to say that I am a little bit 'round bead challenged'. That's right, I can make fish and cats and even draw a pelican on a bead now and then, but ask me to make a couple of spacers to match a focal bead, and I want to shout "WHY????" So off I went. I picked out a couple of contrasting colors that I don't normally work with, just so I wouldn't feel too badly about using up some of my precious glass.I took a little bit of a break after each ten, and here's where I went with it....

The first ten
The first ten beads were ok- Started off a little bit small, which is always my downfall. And what had I learned when I was done? Well, let's see- remember to look down the mandrel to make sure they are round (ish!). Hide your paddle or you may pick it up by 'accident'! Oh, and remember to have Perry Como's song 'Round and Round' going through your head the whole time! Time for a bit of breakfast and some coffee before I'm on to the next 'round'!
The second set of ten
 And here are the second ten Shoot, I'm starting to like the colors I picked, but they'll be mostly gone when this is over- looks like I'll be using about 3 rods of each by the time it's all over. It's starting to make a bit more sense to me overall. I think my brain is trying to make this a bit easier on its elderly self! And what's new? Well, gravity and heat keep working on your bead whether you're paying attention or not! So pay attention! And it's time to switch songs- Rawhide now, you know 'Rollin', rollin' rollin' keep those beadies rollin'.....
The third ten
Whoot! Halfway there. On to the next 10. When I got to bead #28(!) (third from the right) it was round pretty much all by itself- no adding a dab of glass here or a blob of glass there- it was just round. Well, at least until I added the dots.... And I've been able to add more dots than I normally succeed in adding to a wee round bead. That's called heat control my friends! The theme song here? Oh, the Beach Boys wanted to join in the fun with 'I Get Around'


The final ten
Thirty beads done and the distractions are pouring in- I was using up a little tank of propane that I'd bought for demoing, and it ran out. There is some pressure to decide what I'm doing with my life- now!- but I am determined to finish these last ten little beads! And the final theme song? Well, The song list would not be complete without a few words from Joni Mitchell in 'The Circle Game.'
Although y'all may not see a lot of progress from start to finish, I really feel good about this project. I now know I can make round beads without the use of tools or marvers, and I have a better feel for using gravity to make things nice and round.
So get on over to Heather's 40 Bead Challenge and give it a roll. You'll be glad you did!
Click here to see all of Heather's tutorials. Heather- thanks so much for this! It was best fun!


Friday, March 9, 2012

Lilac glass recipe

This is just a quickie! A customer wanted me to make her a couple of masks in a lilac color. All of the purple glass I had was just too dark to work, so I started pulling rods out and holding them up to the light to see what I could do. The winner? Moretti  Light blue #052 over alabastro pink # 372 ( I think- darn- it could have been 376- both will make a nice purple. Try 'em both!). I would not recommend using this for a whole bead as I think there is a slight amount of incompatibility going on there, but the color was a lovely light purple blue.

Sunday, January 29, 2012

Making Glass Frit

In an effort to clean up an an ever-growing pile of glass rod ends accruing on my table, I thought it might be time to show off my frit-making skills. I used to use my empty altoid container collection to save little bits of rods- all sorted into piles of like color- for instance, I put all of the aquas together- transparent and pastel alike. No, I did not put each aqua hue into a separate container, I'm not that organized. (And I don't use quite that many altoids). Granted, if you keep all of your 'shorts' separated by color, you can make a nice precise frit mix that is repeatable using the same methods I will outline here.
I'm not a real big user of frit- I'm more of a 'mix as you go' person. Most of the bits I had lying about were in tones of purple, green, and aqua. I piled them all together and they looked pretty good, so that was the frit mix I was going to make.
Again, I will say- your safety is your responsibility. This is what I do, it has not gone through any rigorous testing by any certified safety organization:

1) Put on safety glasses

2) Fill a clean glass jar with at least 4 inches of water (friends have suggested this be cold water- that should make it break even better!) and put it nearby on my torching table.

3) Light the torch.

4) Grab one of the shorts with a pair of tweezers and put it in the torch until it glows a nice red just about all over. Try not to put the tweezers directly into the flame.

5) Drop the hot glass into the jar of water. If it is attached to the tweezers, plunge the whole thing into the water and tap lightly. Usually the glass will detach from the tweezers. If there is a little bit still attached to them, reheat and plunge into a different jar of water to remove it- the 'junk' jar.
6) Do this with all of the pieces of glass. They will shatter as they are placed in the water, but not really into small enough pieces to be used as frit as they are.
*** After I wrote this, a friend told me that she mashes the glass into a thin lollipop shape and the glass naturally breaks into small frit, so it is not necessary to use a hammer. What a great tip! Thanks so much, Lara***

7) Pour the glass through a small strainer that is reserved for this purpose.

8) Let dry on a piece of newspaper.

9) Put glass into an old broken down cereal box or other thin cardboard, or wrap in fabric. Wrap around the glass so that it can't escape easily.

10) Wrap with newspaper and tap with a hammer on a solid surface. Open and see if the pieces are to your liking. If not repeat wrapping and tapping.

11) If desired, the frit can be put through different sizes of mesh to sort it by size.

 That's it! All done and I'm ready to use it.  Frit made of glass with special qualities, like rubino oro or silver reaction colors, should be made separately rather than used in a mix so that the reactions and flame atmosphere can be controlled properly.

There are times when I want to make frit using specific color combinations. To do this, I simply heat the end of a rod and plunge it into my jar of clean water. This is where Lara's 'lollipop' trick could really come in handy!
It is a good idea to reheat the end of this rod right away as it may be a bit cracked at the end. This will save your being surprised by a 'shocky' end later.

Sunday, October 30, 2011

Taking Photos- New Backgrounds, New Ideas

Ever since my scanner broke a couple of years ago and I had to start learning to take  my online photos using a camera, I have struggled with what looks good. Generally I take a photo on a white background, and then photoshop it until it looks better. That takes a lot of finagling- I have to sharpen it (my photos always look a little blurry to me), cut it to the right size and shape for my online shop- I use 300 dpi, and cut it to 3x3 inches, though that doesn't work with everything, and then I have to lighten, brighten and adjust the color to make it look right- especially the stupid white background. It's really more energy than I want to put into each picture I take. The white background is a real bear, and black just doesn't seem to work at all for me. Maybe because I don't have any kind of official setup to use, like a light tent or proper lighting.

Oh, that's another thing- taking the photo itself- I use a rather high powered halogen lamp, lighten the exposure by a couple of clicks and shoot a closeup without a flash. My old garage-sale camera actually worked better as the flash wasn't so harsh, so I could actually use it. The flash on my present camera is covered with a little piece of paper as it washes everything out, no matter how far away it is. The scanner was really easier, and I might even go back to that if I could!

So get to the point already!!! Well, I have, by necessity, taken to using different backrounds with my photos, and I am kind of liking them. The autumn leaf background is cool- no messing with trying to get it just right- I can just concentrate on the item I am trying to feature- I like that a lot! And the newest map background, though I still often correct the 'level' to make it whiter, is kind of fun, and it is not very noticeable if it's not all bright white. And it has the advantage that I might just see a word I like and use it to name the piece. Woohoo- a twofer!
I'll be keeping my eyes peeled for more fun backgrounds in the future.

Tuesday, October 25, 2011

Portal bead goes to Austria

One of my portal beads is the focal for this lovely piece, made by Marianne Cornelius (see link below)
It is made of woven silver wire with garnets.
Marianne paints some wonderful watercolors, as well as making some very nice jewelry pieces. I have no idea how she found my beads on etsy, but I'm glad she did!
The neckpiece is currently on display at this gallery in Vienna, Austria- http://www.spiegelgasse8.com/ 
I am always so excited to have something of mine travel to another country, and having Marianne use one of my beads as a focal to be displayed in a gallery in Vienna of all places was doubly exciting!

Please go here to see more of Marianne's wonderful work:
http://www.mariannecornelius.com/


Monday, July 11, 2011

Lampwork Glass Bead Rescue and Repair

Here's my newest observation- wind is the enemy at outdoor shows. Well, not really a new observation, but still important. I was reminded of this recently when the wind grabbed my table and flipped it completely over onto my beads, which were now on concrete. The result? Too many broken beads. After a couple of days moping around, and the comment ' fire polish them' niggling in my brain, I realized that I had a kiln and I am not afraid to experiment with it. So I grabbed a couple of my minorly 'scuffed' beads, jammed them onto some sludged mandrels, and got to work. I'm here to tell you what I learned, just in case you need the info some day. I'm not going to go through the whole grueling process, but will just get right to my recommendations.

There's one person I need to thank for suggestions and ideas in all of this- that's Lynne of Fireball Beeds. She had some great ideas and suggestions to help me along the way. Here's her blog: http://islandgirlsinsights.blogspot.com/

The repairs I have done are fairly minor- fish fins, eyes, scuff marks and small dings. These types of repairs go pretty quickly. This is by no means a foolproof method. Sometime beads crack or break dramatically during the process. But I had a lot of lemons on my hands, and I just needed to try and make some lemonade!

********NOTE: Your safety is your own concern. I am not recommending that you try any of these procedures, just telling you what I have done. **********
Here's what I do:

1) Put the beads on sludged mandrels. I have tried this with both wet and dry mandrels. Either can work, though it is nearly impossible to push a bead down onto a dry mandrel. If using wet sludge, it helps to make it a bit thin. I put the bead on the mandrel, pull it off and wipe off the wet sludge, then put it on again. This helps me keep from getting a lot of junk at the end of the bead.

Either way, I like to put a 'stop' at the handle end of the sludge to keep the bead from falling onto my hand- a bit of thick sludge that the bead cannot slide over. Since the bead can get loose when heated, I am extra careful not to point the mandrel down so that the bead can fall onto my hand, the floor or the table. The stop needs to be made with thicker sludge.

2) Put the beads into a room temperature kiln with the ends sticking out 4-6 inches. I only put in about four at a time since I don't want to take a chance that they will touch each other and stick together. If that happens they will certainly be ruined. I turn the kiln to a low temperature and slowly ramp up to about 800 degrees. My kiln does not have a digital controller, so I turn it to low until it reaches about 300 degrees, then turn it to 3 until it reaches about 600 degrees, then 5 up to 850 or so. After that it can be allowed to ramp up quickly. The target temperature is 1200 degrees. I keep an eye on it so that it doesn't get any hotter than that.

3) Let the beads 'soak' for 5-10 minutes at between 1100 and 1200 degrees. This allows the heat to get to the core of the beads. Lynne likes to hold at 1200. I let the beads get to 1200, and then allow them to cool to 1100 and let them soak there. This is because I want to be sure the beads don't start distorting before I torch them.

4) Make sure the mandrels aren't too hot to handle. If they are, I take a damp paper towel and cool down the handle end. I also pull them a bit farther out of the kiln if necessary.

5) When I am ready, I turn on the torch, and make sure I am wearing protective eyewear. I want to grab the beads and get them into the flame as quickly as possible. I am mindful of the danger at this point- moving quickly but carefully around the lit torch.

6) Put the bead into the flame and heat slowly. DANGER- the bead can shock, crack, break, or explode at this point. It is very important that the bead is hot, and that I move quickly. This is rather similar to the initial heating of a rod while making a bead- in and out, up and down, slowly into the sweet spot in the flame.

7) Once the bead is glowing, I am ready to work on it again. I have now done quite a few repairs in this manner, and am fairly happy with the results. It is not a perfect solution, but oh so much better than tossing alot of what used to be lovely beads.

8) Turn the kiln down to proper annealing temperature. I generally do this as soon as I am done working on the first bead.

You can see the photos of the fish with a broken fin at the top, and the repaired bead below.


Tuesday, May 24, 2011

Beads for Japan

With the ease of gathering worldwide news these days, it sometimes seems as if one tragedy after another is occuring, each quickly overshadowed by the next. The earthquake, tsunami and nuclear disaster in Japan is just a couple of months behind us, and already it seems we have nearly forgotten this awful trio of events that devastated Japan.

I'm so glad the ISGB (International Society of Glass Beadmakers) has put together a fundraiser to help out the people of Japan in a small way.

I can't imagine what it must be like living in a country with such a large population and such a small bit of land that has suffered so many things all at once. The ISGB will be selling beads made by its member at the annual Bead & Button show in Milwaukee, WI in June and donating the funds to the Japan Disaster Relief Fund of the American Red Cross. I've sent off 10 of my hollow Japanese lantern beads to be sold there. The price is pretty nominal- I'm kind of hoping that folks will donate a little extra when they choose a bead.

Thanks to the ISGB for putting this together. And if you are a member, I hope you will consider making a donation as well.

Friday, April 22, 2011

Yes, published again- Bead and Button

I'm sure everyone is tired of hearing about all the exciting bead things that are going on around here. No need to be jealous- my life is quite complicated right now in many ways.

I just received my advance copy of the June issue of Bead & Button magazine with a guide to lampwork terms for folks who love lampwork, but don't know what all of those wacky terms mean. It's on pages 20 and 21- one of their 'Expert Advice' columns (no, I do not call myself an expert- that's their thing).

Anyway, it's pretty exciting for me. If you look at the little words along the bottom of the cover, it says 'Shopping extra: A guide to lampworking terms p. 20'

Friday, April 15, 2011

A published tutorial

Woo hoo! I just received the June copy of Bead Unique magazine with my tutorial for making this bead style! I'm so excited! This is my first time to be published in a magazine that folks can find at their local newsstand (i.e. Barnes & Noble). The tut has info about using silver foil. If you've never tried it, this is a fairly easy place to start.

Here's a link to their website: