Tuesday, February 19, 2019

Lampwork Glass Curved Bead Tutorial- Making Curved Glass Beads


Well, I finally did it! After many requests and loads of questions from folks, I have written down everything I know about curving glass tube beads my way, which is in the kiln! If you look at the etsy listing for the booklet, you will see that there are a lot of disclaimers. Why? Because it will take some work for each person to get it right. This is not a tut in the traditional sense, but rather instructions, suggestions, a lot of information on what might go wrong and why and happy photos of some of the beads I have made using this method. It's written in more of a workshop style, with loads of information. I've really tried to include everything I've learned as I've explored this method over the years. Tester questions are answered and details I've explored are explained. I am happy to answer questions and lend support where needed.


Is it easy? Well, yes and no. Making the bead is fairly simple, and I have provided two short photo tuts to help with that bit. Curving them after they're made is a bit of a nail biter because issues can arise. This method of curving in a kiln came about through the help of a glass fusing friend of mine. It took a lot of fooling around and changes before I got a method I was really satisfied with.


Here's a little bit of feedback I've gotten on it~
'I just glanced through your tutorial and it’s really exciting. I made some assumptions about how you make your beads and not one of them were correct.'
' It's designed to encourage experimentation, and shows you a way to create these distinctive, curved beads without any special equipment. The entire process is very clearly expressed and even includes a nice introduction to making long tube beads in addition to the info on curving them. It's really like being in the workshop with Laurie and watching her process and learning from her years of experience. No, it's not a plug-and-play, effortless, "copy this and you'll get that" kind of tutorial. To me, it's much better, because it shows you a whole way of looking at your work methods.'
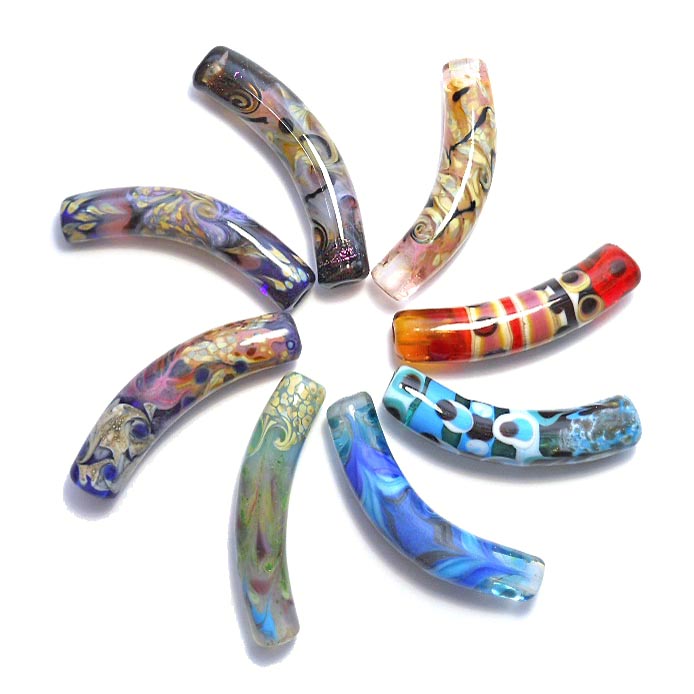
I have tried some other methods and read up on others. I've had more success with this method than with the 'Tom & Sage' method (which is pretty cool) or using a curved mandrel. The curved mandrel has a few problems in my book- first it is not really all that curved, secondly it is darn hard to get the beads off, and thirdly it is simply difficult to build a bead on a mandrel that is not straight! There is also a method where the bead is built on something flexible and curved while it's hot. Sounds interesting though I have not tried it ~ it sounds a bit scary and I don't like the texture left inside by the flexible rope!

Here's the etsy listing link:
Glass Bead Workshop~ an exploration of curving tube beads in your kiln


Friday, December 14, 2018

Paypal 'shipnow' link

Here's the paypal 'shipnow' link (though it looks like they've renamed it). I'm putting it up here because I'm tired of having to look around the web and find it each and every time I need it!

 If you've got a paypal account and want to ship something to someone through paypal that wasn't a purchase, this is what you use! Just click on the link below, sign in to your paypal account and you'll be ready to ship stuff using your paypal funds.


https://www.paypal.com/us/cgi-bin/webscr?cmd=_ship-now

I found it here, so you can thank Goosie Girl!

Sunday, November 18, 2018

Using Enamels in Lampwork Beads


Here’s a rundown of the enamels I use for making lampwork glass beads, such as it is. I don’t actually use all that many colors. I have tried a few others, but these are the ones I’ve settled on. 
I like enamels because they give nice, clean colors with none of the problems you can run into with glass rods. No devit, no mud, no worries! I also find them essential when I’m trying to duplicate most types of designs from nature~ I always use them as part of my seahorse patterning. I wrote a blog about an experimental bead of that sort a while ago, trying to imitate a natural pattern. My camera ran out of gas in the middle of the experiment, so there are no pics of the best part, but you can get an idea of what was done, anyway.  
By the way, I don't care how many people say to do it, I DO NOT recommend putting your enamel in a shaker or sifting it onto your beads. Talk about some airborne micro particles that you can breathe! Ugh! 

Here are links to a few articles on this blog that talk about enamel use.


I’m still not really sure about the edp trick, but it’s worth further exploration. 

Here are the colors I use, and why!

*  White(9010)- essential~it’s great for a background and can make the colors pop. And there are other things you can do with it too, like overmelt goldstone frit into it for an interesting stone like look (there’s a little more to it than that, but not much. I need to find my old notes as I haven’t done this in years.)
*  Bright red (9840)~ great for a nice, stable red red. If folks ask me for something red and I am thinking clearly, I virtually always use red enamel.
*  ‘New’ purple #9740~ a nice, clean purple. Dark purple is OK, but this reads more true to me.
*  Light or dark orchid(9760 or 9780)~ wonderful pink either way~ also essential. I don’t know if I can tell one from the other. Reacts nicely with raku and iris gold frit.Also lovely with a line of rubino running through it.
*  Oxford blue (9650). There are several blues that are all very similar. Medium blue or blue green are OK, but I prefer oxford. There is also something called just 'aqua' I think which is quite nice.
*  Transparent aqua( might be #9452)~the only transparent I really want to have around. It’s a nice light aqua blue, not dark like all of the ones mentioned above. Probably best backed with white enamel.
*  Melon yellow (9830)~ kind of halfway between orange and yellow. I’m not a big yellow fan, but I do like this color.
*  Green~ I’m pretty sure it’s apple green (9330) that I like. Moss is a bit too grey and dark for my taste.

I have not tried orange red (9835) but it looks intriguing.
NOT black. I’ve gotten it and it just seems to turns kind of dark grey and takes over. Then again, maybe some folks know what to do with it!

Monday, October 29, 2018

Free Shipping~ Or Not


What’s so free about free shipping?! Recently, etsy has been having a sweepstakes with a big prize and all you have to do to be registered in the drawing is to have free shipping in your shop over the holidays. Huh! Apparently this is something that customers actually prefer to, say, a 10% off sale. It is also something that I can’t get my head around. My shop motto should be something like ‘fair and sensible pricing on everything all the time.’ Because that’s what I try to do. 

So how about this free shipping thing? Why not do it? Well, frankly, I can’t see how it would not cost my customers more, in some cases much more, than just charging a fair shipping price. Why? Because I do have to pay for shipping. In order to offer ‘free’ shipping to my customers, I’d simply have to add it to the cost of each item up front. To be truly fair about it, I’d have to go through all of my etsy sales and see the average number of items in a single order and then, being some kind of a math genius, figure out from there exactly how much I would need to add to the cost of each item. What a pain! But let’s pretend I feel like doing that. Let’s see if I can lay it all out.

Right now, I charge shipping for the first item and the rest are gratis. The reason is that it doesn’t really cost me much to add another item to a box. And if someone buys a bunch of things, well, I’m happy to eat the additional cost and sometimes even upgrade to priority mail. 

So today, if you buy 10 beads in my shop, you pay $3.50 in shipping within the US.

Let’s say I offer ‘free’ shipping and have done the calculations and found that the average person buys 2 items at a time. Generously, I will add only $1.75 to the price of each item to cover shipping costs. Now let’s say you are a wonderful customer and buy 10 items at once. Well, because I’ve added $1.75 to each item, you’ve just paid a whopping $17.50 in shipping, instead of $3.50. That’s $14 extra dollars, in case you weren’t paying attention.

The other side of this is that if I did offer free shipping, folks might simply purchase one thing at a time, costing me both extra time and money. I feel that what I am doing now is fairest for everyone.

Now, here’s what my current shipping charge covers, just in case you’re wondering. Postage of $2.66 (if I can ship from home~ if not the postage is the entire $3.50), an envelope, which usually costs .50, a touch of tissue, bubble wrap and tape so we’ll add .10 there, and another .05 for a business card and a note for a whopping total of $3.31. So I get paid about .19 for making the box, packing and walking to the mail box~ just like in olden times… Oh wait! Now that etsy is taking 6% (or something) of shipping charges, I actually get nothing for packing it up and sending it off. Ah well.